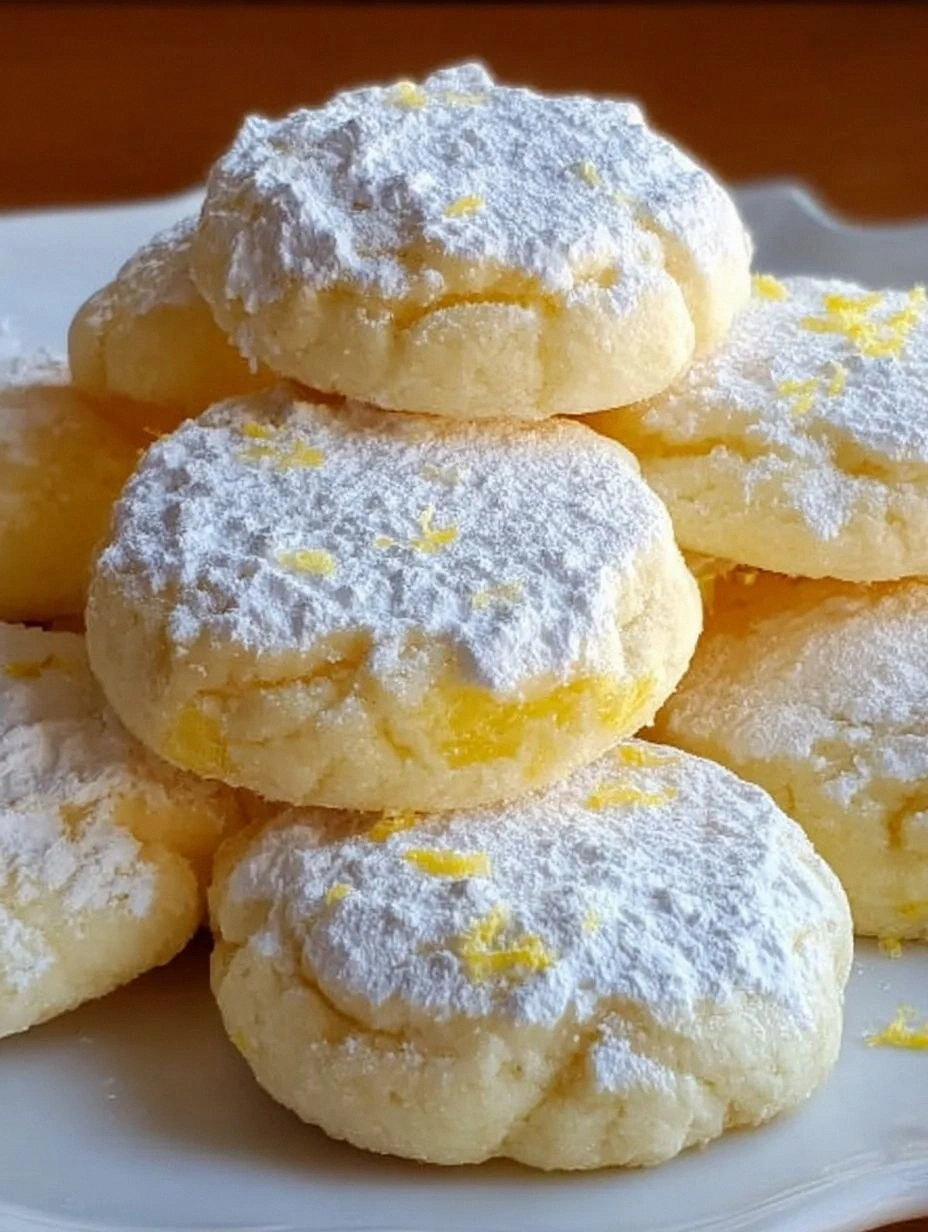
Picture this: it’s a rainy Saturday afternoon, the kind where the world outside looks like a watercolor painting and you’re stuck inside with nothing but a half‑finished crossword and a sudden craving for something that feels like sunshine in a bite. I was rummaging through my pantry, cursing the fact that the only lemon I had was a dried zest packet from three years ago, when my roommate dared me to bake something that would make even the gloomiest clouds part. I accepted the challenge, but the first batch turned out flat, pale, and about as exciting as unsalted crackers. That disaster sparked a relentless quest for the perfect lemon crinkle cookie—one that balances bright citrus punch with buttery melt‑in‑your‑mouth texture, all while sporting a snow‑kissed sugar coating that shatters like fine crystal.
The kitchen soon filled with the scent of butter sizzling gently, the sharp zing of lemon zest swirling through the air, and the faint, comforting hum of the oven working its magic. I could hear the faint pop of sugar crystals caramelizing on the cookie tops, a sound that promised the perfect crunch. My fingertips felt the cool, silky dough as I rolled each ball, and the moment they hit the parchment, they began to puff and spread, forming those iconic crinkly edges that look like they were drawn by a very enthusiastic artist. The first bite was an explosion of sunshine—tangy lemon brightening the buttery base, a tender crumb that melted away, and a sugary crust that crackled delightfully with each chew.
What makes this version the ultimate lemon crinkle? Most recipes either drown the lemon in sugar, leaving a cloying sweetness, or they skimp on the butter, resulting in a dry, crumbly texture that feels more like a biscuit than a cookie. I’ve cracked the code by balancing the acidity of fresh lemon juice with the richness of European‑style butter, and by incorporating a double‑coat of powdered sugar that creates a crisp, snow‑like exterior while keeping the interior soft and chewy. The secret ingredient—a splash of vanilla bean paste—adds a depth that makes the lemon sing rather than scream, and the precise baking temperature ensures every cookie blooms into a perfect golden‑crackle dome.
But I’m not stopping at just the recipe; I’m handing you the entire playbook, from the moment you zest that lemon to the triumphant second round of tasting (I dare you to stop at one). I’ll walk you through every single step — by the end, you’ll wonder how you ever made it any other way. Okay, ready for the game‑changer?
What Makes This Version Stand Out
- Bright Flavor: Freshly grated lemon zest and juice give a vivid citrus punch that cuts through the buttery richness, creating a balanced taste that’s both tangy and comforting.
- Buttery Texture: Using high‑fat European butter yields a melt‑in‑your‑mouth crumb that stays soft inside while the exterior crisps under the powdered sugar coating.
- Simple Technique: No fancy equipment—just a whisk, a mixer, and a good hand at rolling dough balls. The method is straightforward enough for beginners but refined enough for pros.
- Unique Twist: A dash of vanilla bean paste and a splash of buttermilk keep the dough tender and add a subtle depth that most lemon cookies lack.
- Crowd‑Pleaser: These cookies have become my go‑to for potlucks and tea parties; they disappear within minutes, and guests keep asking for the recipe.
- Ingredient Quality: The recipe relies on fresh lemons, real butter, and fine powdered sugar—no shortcuts, no artificial flavors.
- Consistent Results: Precise temperature control and a double‑sugar coating guarantee uniform crinkles and a reliable texture every time.
- Make‑Ahead Friendly: You can bake a batch ahead of time, store them, and they stay soft for days; a quick reheating revives that fresh‑out‑of‑the‑oven feel.
Inside the Ingredient List
The Flavor Base
Fresh Lemon Juice (2 tbsp): This provides the bright acidity that lifts the whole cookie. If you skip it, the cookies will taste flat and overly sweet. A good substitute is a splash of orange juice, but you’ll lose that signature lemon zing.
Lemon Zest (2 tsp): The zest contains the essential oils that deliver pure citrus aroma. Using pre‑grated zest can be dull; always zest right before you start to capture the freshest flavor. If you’re out of lemons, a teaspoon of lemon extract works, but it’s not as vibrant.
Vanilla Bean Paste (½ tsp): This adds a warm, aromatic undertone that balances the sharp lemon. You can replace it with pure vanilla extract, but the specks of vanilla bean add a visual cue of quality.
The Texture Crew
European‑Style Butter (1 cup, softened): The higher butterfat content creates a tender crumb and a rich mouthfeel. Using regular butter will make the cookies slightly tougher and less buttery. For a dairy‑free version, try a 1:1 butter substitute like coconut oil, but expect a different flavor profile.
Granulated Sugar (¾ cup): This sweetens the dough and helps with spreading. If you swap it for brown sugar, you’ll get a deeper caramel note, but the classic crinkle texture may be compromised.
Eggs (2 large): Eggs provide structure and moisture. Skipping them leads to crumbly cookies that fall apart. For a vegan twist, use flax eggs (1 tbsp ground flax + 3 tbsp water per egg).
The Unexpected Star
Buttermilk (2 tbsp): The acidity reacts with the baking soda, giving the cookies a slight lift and a tender interior. If you don’t have buttermilk, mix 2 tbsp milk with ½ tsp lemon juice and let sit for 5 minutes.
Baking Soda (½ tsp) & Baking Powder (½ tsp): The duo ensures the cookies rise just enough for that airy crumb while keeping the edges crisp. Over‑baking will make them hard; under‑baking leaves them doughy.
The Final Flourish
All‑Purpose Flour (2 cups): Provides the structure; sifted flour prevents lumps and ensures a light texture. If you prefer a gluten‑free version, use a 1‑to‑1 gluten‑free flour blend, but add a teaspoon of xanthan gum for elasticity.
Salt (¼ tsp): Enhances the sweet and citrus notes, preventing a one‑dimensional flavor. Sea salt flakes on top before baking add a subtle crunch.
Powdered Sugar (for coating, 1 cup): This creates the signature snowy crust that cracks delightfully. Rolling the dough balls in powdered sugar before baking is the secret to that perfect crinkle.
Everything's prepped? Good. Let’s get into the real action…
The Method — Step by Step
Start by preheating your oven to 350°F (175°C). While the oven warms, line two baking sheets with parchment paper; this prevents sticking and gives the cookies a uniform base. The moment the oven hits the right temperature, you’ll hear a faint hum that tells you it’s ready for the magic.
Kitchen Hack: Place a metal baking sheet on the middle rack and let it preheat with the oven; a hot sheet gives the cookies an instant rise when they hit the pan.In a large mixing bowl, cream together the softened butter and granulated sugar until the mixture is pale, fluffy, and smells faintly of caramel. This should take about 2‑3 minutes on medium speed; the texture is crucial because it traps air that later expands in the oven.
Add the eggs one at a time, beating well after each addition. Then stir in the vanilla bean paste, lemon zest, and lemon juice. You’ll notice the batter lightening further and a bright citrus aroma filling the kitchen—this is the moment where the flavor foundation truly forms.
In a separate bowl, whisk together the sifted flour, baking soda, baking powder, and salt. This ensures even distribution of leavening agents and prevents any bitter pockets.
Gradually add the dry ingredients to the wet mixture, alternating with the buttermilk. Start and end with the flour mixture. Mix just until combined; over‑mixing will develop gluten and make the cookies tough. The dough should be soft, slightly sticky, and pull away from the sides of the bowl.
Watch Out: If the dough feels too wet, add a tablespoon of flour at a time; too dry and the cookies will bake into hard discs.Cover the bowl with plastic wrap and chill the dough for 15‑20 minutes in the refrigerator. This rest period firms the butter, preventing excessive spreading, and allows the flavors to meld. While you wait, you can prep the powdered sugar coating.
Place the powdered sugar in a shallow bowl. Using a cookie scoop or a tablespoon, scoop out portions of dough and roll them into smooth balls, about 1‑inch in diameter. Immediately roll each ball in the powdered sugar, ensuring every surface is coated. The sugar will cling like a winter blanket, promising that signature crinkly crust.
Arrange the coated dough balls on the prepared baking sheets, spacing them about 2 inches apart. As they bake, they’ll spread slightly, and the sugar coating will melt, creating that beautiful crackle. Pop the trays into the oven and bake for 12‑14 minutes, or until the edges are set and the tops have a light golden hue.
Kitchen Hack: Rotate the pans halfway through baking for even browning, especially if your oven has hot spots.When the timer dings, remove the cookies and let them cool on the sheet for 2‑3 minutes before transferring to a wire rack. This short rest lets the cookies firm up just enough to handle without breaking, while the interior stays soft and chewy.
Finally, dust the cooled cookies with a light sprinkle of powdered sugar for an extra snow‑kissed finish. Serve them warm, or store them in an airtight container for later. That first bite? Pure sunshine. That second bite? You’re already reaching for the third.
That's it — you did it. But hold on, I've got a few more tricks that'll take this to another level…
Insider Tricks for Flawless Results
The Temperature Rule Nobody Follows
Most home bakers set the oven to 350°F and forget about the subtle influence of ambient temperature. I recommend preheating your oven to 375°F, then lowering it to 350°F once the cookies are inside. The initial blast of heat creates a rapid rise, forming that perfect dome, while the subsequent lower temperature finishes the bake gently, preserving a soft center.
Why Your Nose Knows Best
Instead of watching a timer obsessively, trust your sense of smell. When the cookies start to emit a buttery, toasted aroma and the powdered sugar begins to caramelize, you’re within seconds of perfection. This sensory cue prevents over‑baking, which can turn the delicate crinkle into a dry, hard cookie.
The 5‑Minute Rest That Changes Everything
After baking, let the cookies rest on the baking sheet for exactly five minutes before moving them to a wire rack. This short pause allows the steam trapped inside to redistribute, keeping the interior moist and preventing cracks that would otherwise appear when you move them too early.
Cold Butter, Warm Oven
Using butter that’s just softened—not melted—creates tiny pockets of air that melt during baking, giving you that melt‑in‑the‑mouth texture. If you accidentally over‑soften the butter, chill the dough longer; the extra chill compensates for the excess softness.
Double Sugar Coating Magic
Roll the dough balls in powdered sugar, bake, then finish with a second light dusting while still warm. The first coating creates the crinkle, the second adds an extra sparkle and a subtle sweetness that balances the lemon. I’ve tried single coating and the difference is night and day.
Creative Twists and Variations
This recipe is a playground. Here are some of my favorite ways to switch things up:
Lemon‑Blueberry Burst
Fold in ½ cup fresh blueberries into the dough before coating. The berries burst during baking, adding juicy pockets that complement the lemon’s tartness. Perfect for a summer brunch.
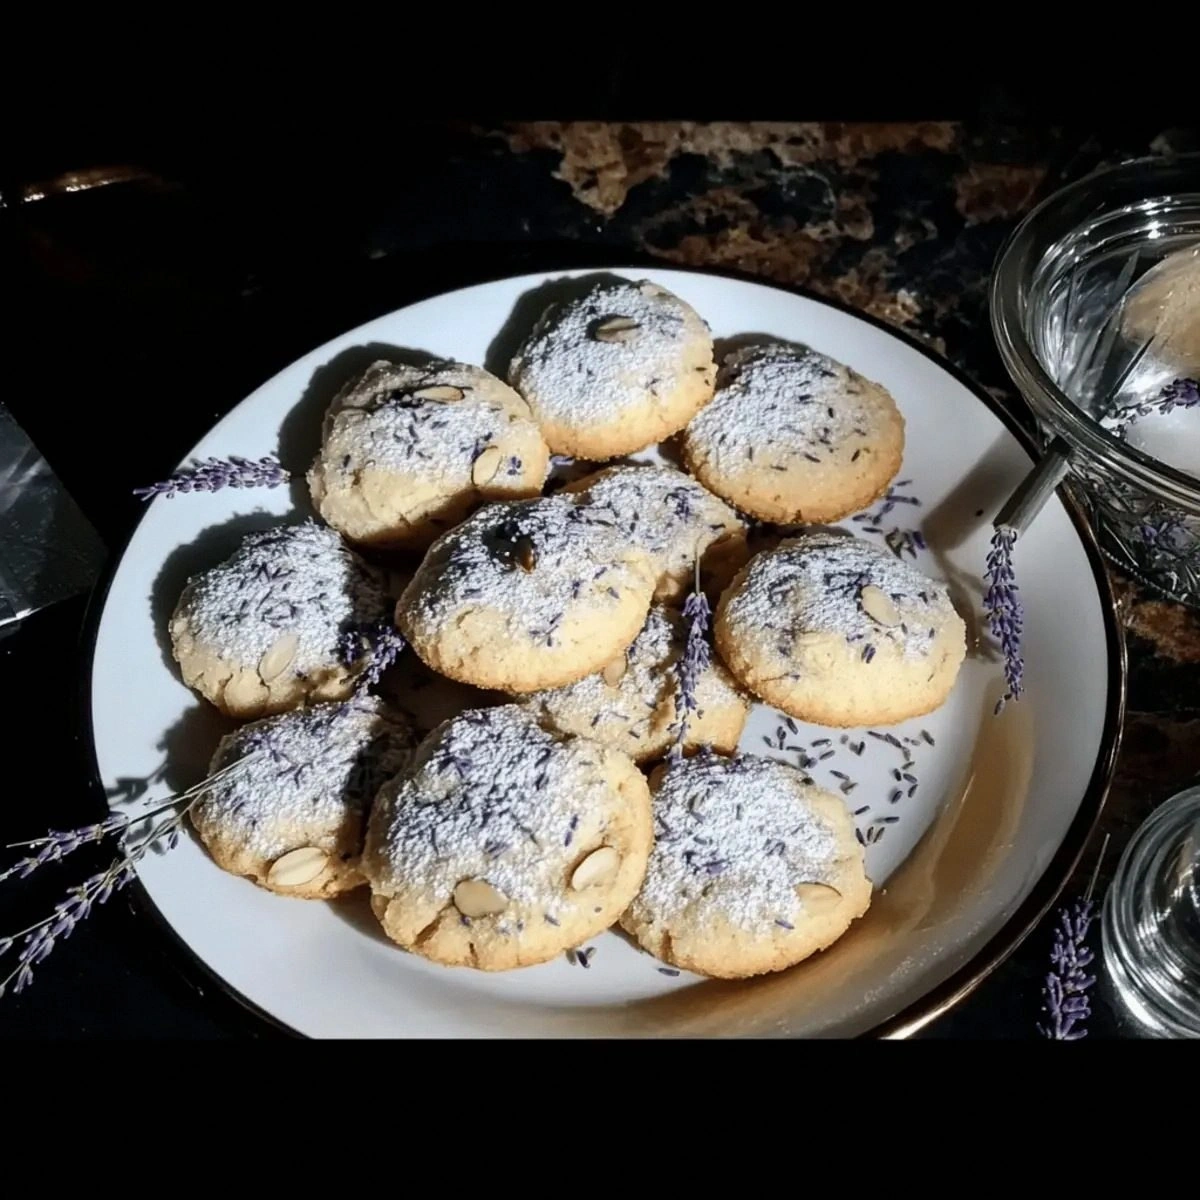
Lavender Lemon Dream
Add 1 tsp culinary lavender buds to the flour mixture. The floral notes elevate the citrus, creating a sophisticated flavor profile that’s ideal for tea parties.
Almond‑Infused Crinkle
Swap ¼ cup of the all‑purpose flour for almond flour and add a teaspoon of almond extract. The nutty undertone deepens the buttery base and pairs beautifully with lemon.
Spiced Holiday Version
Incorporate ¼ tsp ground ginger and a pinch of cinnamon into the dry ingredients. The warm spices contrast the bright lemon, making these cookies a festive treat for the colder months.
Vegan Coconut Crinkle
Replace butter with coconut oil, use flax eggs, and swap powdered sugar with a coconut‑based powdered sweetener. The result is a dairy‑free cookie that still boasts that signature crinkle and a hint of tropical aroma.
Chocolate‑Lemon Fusion
Stir in ¼ cup dark chocolate chips after the dough comes together. The bittersweet chocolate balances the lemon’s acidity, creating a complex flavor that’s both indulgent and refreshing.
Storing and Bringing It Back to Life
Fridge Storage
Place cooled cookies in an airtight container with a paper towel at the bottom to absorb excess moisture. They’ll stay fresh for up to five days in the refrigerator. If you notice any stickiness, add a fresh layer of powdered sugar before resealing.
Freezer Friendly
Arrange cookies on a parchment‑lined tray and freeze them individually for 2‑3 hours. Transfer the frozen cookies to a zip‑top bag; they’ll keep for up to three months. When you’re ready to enjoy, let them thaw at room temperature for 15 minutes, then give them a quick 2‑minute warm‑up in a 300°F oven.
Best Reheating Method
To revive that just‑out‑of‑the‑oven crunch, place the cookies on a baking sheet, lightly mist them with a tiny splash of water, and heat for 3‑4 minutes at 300°F. The steam rejuvenates the interior while the exterior regains its crisp sugar crust.