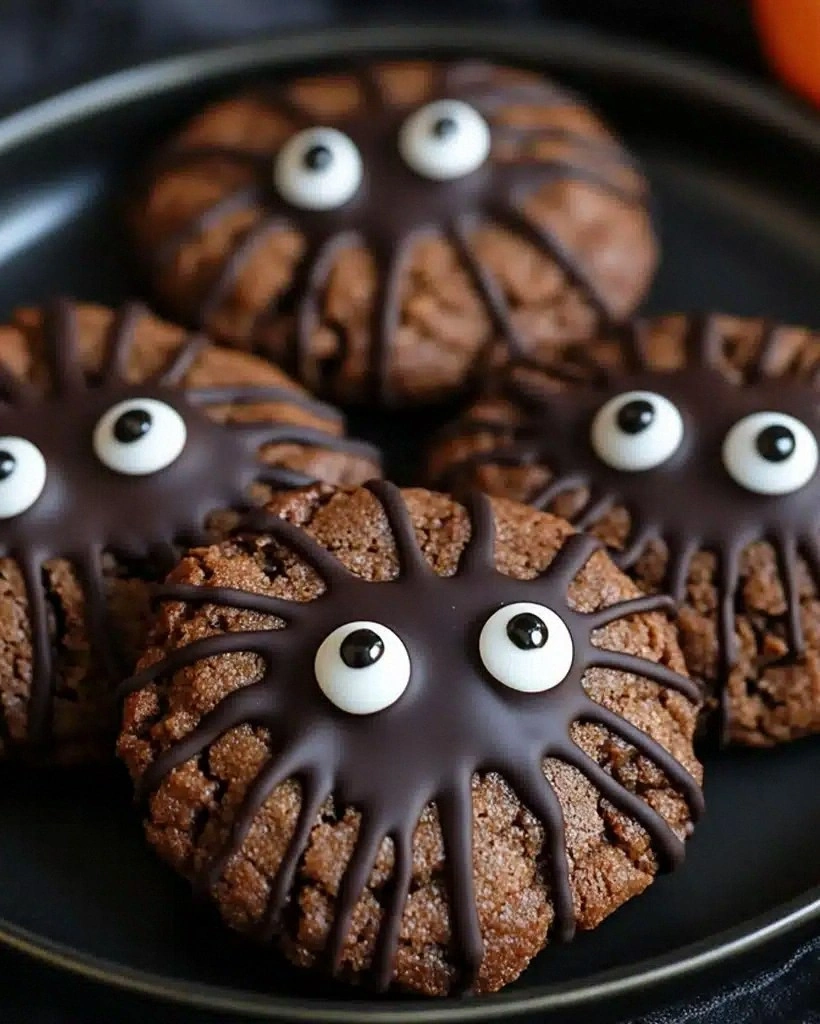
Last October I set out to make "regular" chocolate pumpkin cookies for my nephew's Halloween party. Two hours later I was elbows-deep in orange-tinted dough, my kitchen looked like a cocoa powder crime scene, and I'd managed to burn half the batch while the other half emerged as pale, cakey puddles. In the middle of this chaos, my seven-year-old niece waltzed in, gasped with delight, and declared the misshapen blobs "perfect spider bodies!" That happy accident became the blueprint for these Chocolate Pumpkin Spider Cookies — the spooky, fudgy, crackle-topped treats that now headline every Halloween spread I bake for.
Picture this: a cookie that tastes like someone melted a brownie, pumpkin pie, and your favorite spiced latte into one glorious bite. The edges shatter like thin ice, giving way to a chewy center that's almost truffle-rich thanks to pumpkin keeping everything moist. Cocoa delivers deep chocolate swagger while cinnamon, nutmeg, and cloves whisper ghost stories of autumn. Then come the candy eyes, staring up at you like tiny edible googly surprises, and the quick zig-zag of melted-chocolate "legs" that make everyone reach for the platter before dinner.
Most pumpkin-chocolate hybrids end up tasting like dessert identity crises — too much spice, not enough chocolate, or worse, wet sponge masquerading as cookie. This version is hands down the best you'll ever make at home because it balances fat, flour, and moisture like a tightrope walker. The pumpkin isn't just gimmick; it's the secret to that fudgy middle that stays fudgy for days. I dare you to taste one and not go back for seconds, thirds, and "just one more before bed."
Okay, ready for the game-changer? We're going to brown half the butter for nutty depth, under-bake by exactly two minutes so the centers stay lava-soft, then flash-chill the dough for ten minutes so the spiders hold their shape. Stay with me here — this is worth it. Let me walk you through every single step — by the end, you'll wonder how you ever made it any other way.
What Makes This Version Stand Out
Fudgy Forever: Thanks to pumpkin puree and a higher fat-to-flour ratio, these cookies stay moist and chewy for four days on the counter — if they last that long. Most cookies turn into hockey pucks overnight; these stay borderline gooey.
One-Bowl Brilliance: No stand mixer required. A whisk, a spatula, and ten minutes of arm day give you bakery-level results without the mountain of dishes.
Spice Without Overkill: We use just enough cinnamon, nutmeg, and cloves to nod at pumpkin pie without turning the cookie into potpourri. Chocolate leads, spice supports.
Spooky but Sophisticated: Kids go bananas for the candy eyes; adults rave about the bittersweet cocoa and browned butter. Bring these to an office party and watch them vanish before the veggie tray.
Make-Ahead Superstar: The dough keeps three days in the fridge and freezes like a dream for up to two months. Bake half now, half on Halloween morning and your house will smell like Willy Wonka's autumn vacation.
Instagram Gold: Those chocolate legs set into dramatic midnight zig-zags against the orange-tinged cookie, creating a visual that basically racks up likes on autopilot.
Alright, let's break down exactly what goes into this masterpiece...
Inside the Ingredient List
The Flavor Base
Unsalted butter is our canvas. Browning half of it coaxes out toffee notes that make the chocolate taste deeper and the pumpkin taste roasted rather than canned. If you only have salted butter, skip the ½ teaspoon of added salt later; otherwise you'll edge into pretzel territory. Coconut oil is an okay swap in a pinch, but you'll lose that nutty complexity that makes people ask, "Wait, what's in these?"
Pumpkin puree does the heavy lifting for moisture and that trademark autumn hue. Be sure to grab puree, not pie filling — the spiced goop already has sugar and spices that will hijack our carefully calibrated flavor. If you're feeling ambitious, roast a sugar pumpkin and blitz it yourself; the color is brighter and the flavor fresher, but honestly, the canned stuff works like a charm.
The Texture Crew
Brown sugar brings molasses undertones and chew, while granulated sugar provides crisp edges. Skimp on either and you'll throw off the entire textural balance. I like dark brown sugar for its deeper flavor, but light brown works if that's what you've got. No brown sugar at all? Mix 1 cup granulated with 2 tablespoons of maple syrup for a quick hack.
Two large eggs bind everything and add structure, but here's the trick: use one whole egg and one yolk. The extra yolk pumps up richness and keeps the centers fudgy even after cooling. Save the white for an omelet or meringue and feel smug about your zero-waste kitchen.
The Unexpected Star
Cocoa powder is where most recipes get it wrong. They reach for natural cocoa and end up with a flat, almost reddish taste. We're using Dutch-processed cocoa for its smoother, more intense chocolate punch. If the container doesn't specify "Dutch" or "alkalized," look for the near-black color — that's your clue. In a pinch, natural cocoa works, but bump up the baking soda by ⅛ teaspoon to balance acidity.
The Final Flourish
Dark chocolate chips melt into molten pockets that contrast with the tender cookie. Go for 60–70% cacao; anything darker can taste bitter against the sweet dough, anything lighter feels like kid stuff. Mini chips distribute more evenly, but I like the drama of standard chips that create gooey lava flows. If you're dairy-free, grab the coconut-milk-based chips — they melt beautifully and add a subtle tropical note.
Everything's prepped? Good. Let's get into the real action...
The Method — Step by Step
- Start by browning ½ cup (1 stick) of the butter. Slice it so it melts evenly, drop into a stainless skillet over medium heat, and swirl constantly. First it will foam like a bubble bath, then the milk solids will sink and turn chestnut brown. The moment you smell nutty toffee and see amber flecks, pull it off the heat and pour into a heat-proof bowl to stop cooking. Cool 10 minutes while you prep everything else.
- In a large bowl whisk the remaining ½ cup softened butter with the cooled brown butter, brown sugar, and granulated sugar until it looks like wet sand at the beach. Don't panic if it feels gritty; the sugar dissolves as the dough rests and creates that glossy crackle top.
- Crack in the whole egg, egg yolk, and vanilla. Whisk until the mixture is silky and the color of light caramel. This is the moment of truth — if your arm isn't slightly sore, you haven't whisked enough. The batter should ribbon off the whisk and sit on top for a second before sinking.
- Now the fun part. Whisk in the pumpkin puree until the batter looks like autumn in a bowl — orange, glossy, and smelling like Thanksgiving. It may look slightly broken; that's the water in the pumpkin fighting the fat. Keep whisking and it will come together like velvet.
- In a separate bowl whisk together flour, cocoa, baking soda, cinnamon, nutmeg, cloves, and salt. Use a fork to break up cocoa lumps; nobody wants bitter pockets of powder in their cookie. If you've ever struggled with dry cocoa chunks, you're not alone — and I've got the fix: sift once if you're feeling fancy, or just smash the clumps with the back of a spoon.
- Fold the dry ingredients into the wet with a spatula. Stop the second you see no more streaks of flour. Over-mixing develops gluten and you'll end up with bread-y spiders. The dough will be soft and tacky, closer to brownie batter than cookie dough. That's exactly what you want.
- Stir in the chocolate chips. They'll sink a bit; that's okay. Cover the bowl with plastic wrap pressed directly onto the surface to prevent a skin, then refrigerate 10 minutes. This flash-chill firms the butter so the cookies hold their shape and don't pancake across the pan.
- Preheat oven to 350°F (175°C). Line two baking sheets with parchment. Using a medium cookie scoop or two spoons, drop rounded mounds 2 inches apart. I weigh mine at 45 g each for bakery uniformity, but eyeballing works. The dough feels like soft clay — roll it gently so the tops stay smooth and the eyes have a flat surface later.
- Bake 10–12 minutes, rotating pans halfway. The edges should look set, the centers still puffed and slightly underdone. They'll finish cooking on the hot sheet out of the oven — this is the 5-minute rest that changes everything. Pull them when the chocolate chips look like glossy puddles and the kitchen smells like Willy Wonka's pumpkin patch.
- Cool 5 minutes on the sheet, then transfer to a rack. While they cool, melt the ½ cup dark chocolate in short bursts in the microwave or over a double boiler. Spoon into a small zip bag, snip the tiniest corner, and pipe eight legs per cookie. Press two candy eyes into the warm surface so they adhere. Let the chocolate legs set 15 minutes, then devour.
That's it — you did it. But hold on, I've got a few more tricks that'll take this to another level...
Insider Tricks for Flawless Results
The Temperature Rule Nobody Follows
Room-temperature butter isn't suggestion — it's science. Cold butter won't trap air, so your cookies bake up dense. Too-warm butter melts before structure sets, yielding greasy puddles. Aim for 65–68°F: the butter should dent when pressed but not smear. If you forgot to pull it ahead, cube and let sit 15 minutes, or microwave at 30% power in 5-second bursts, rotating the stick each time. Your nose knows best: properly tempered dough smells like sweet cream and cocoa, not oily or flat.
Why Your Nose Knows Best
When the cocoa hits the hot butter, it blooms — releasing volatile aromatics that smell like brownie edges. If you don't get that chocolate fog, your cocoa is stale. Taste a pinch: it should be bitter but fragrant, not dusty or cardboard-y. Store cocoa in a dark jar with a tight lid; light and oxygen murder flavor fast. I date mine with painter's tape so I never roll the dice on dead spice.
The 5-Minute Rest That Changes Everything
Those cookies look under-baked when you pull them — and that's perfect. Carry-over heat finishes cooking the centers without drying the edges. If you bake until they look done in the oven, they'll cool into hockey pucks. A friend tried skipping this step once; let's just say her "spiders" could have doubled as pet toys. Trust the wiggle.
Eye Placement Psychology
Cluster the eyes toward the front third of the cookie and slightly cross them for maximum cute factor. Place them while the cookie is warm but not hot; too hot and they melt, too cool and they won't stick. Press gently — you want them halfway embedded so little goblins can't flick them off in transport.
Creative Twists and Variations
This recipe is a playground. Here are some of my favorite ways to switch things up:
White Chocolate Mummy Cookies
Swap dark chips for white chocolate, pipe the legs in thin horizontal stripes across the top, then add eyes peeking through the "bandages." The sweetness of white chocolate plays like candy corn against the spiced dough.
Spicy Mexican Hot Chocolate Spiders
Add ¼ teaspoon cayenne and ½ teaspoon espresso powder to the dry mix. Use Abuelita-style Mexican chocolate chunks instead of chips. The heat sneaks up after the chocolate fades, making guests reach for milk and then another cookie.
Peanut Butter Arachnids
Sub ½ cup of the butter with creamy peanut butter. The cookies bake up slightly thinner with crisp edges and a nostalgic PB-cup vibe. Kids love the familiar flavor, adults love the grown-up spice balance.
Gluten-Free Graveyard
Use a 1:1 gluten-free baking blend with xanthan gum. Chill the dough 20 minutes longer so the starches hydrate and the cookies don't spread into spooky puddles. Nobody will know the difference unless you tell them.
Vegan Web-Slingers
Replace butter with vegan butter sticks, use flax eggs (2 tablespoons ground flax + 5 tablespoons water per egg), and opt for dairy-free chips. The flavor is shockingly close to the original — I fed them to unsuspecting carnivores who asked for the "brown butter" recipe.
Salted Caramel Tarantulas
Press a tiny cube of soft caramel into the center of each dough ball before baking. Dust with flaky sea salt right when they come out. The caramel melts into a lava core that stretches into Instagram-worthy pulls when you break a cookie in half.
Storing and Bringing It Back to Life
Fridge Storage
Once the chocolate legs are fully set, layer cookies in an airtight container with parchment between stacks. They'll keep 4 days at room temp or 7 days refrigerated. Bring to room temp for 20 minutes before serving — cold mutes chocolate flavor and makes the pumpkin taste flat.
Freezer Friendly
Freeze baked cookies in a single layer until solid, then transfer to zip bags with as much air removed as possible. They thaw in 30 minutes on the counter or 5 minutes in a low microwave. For dough, scoop mounds onto a sheet, freeze, then bag. Bake straight from frozen, adding 2 extra minutes.
Best Reheating Method
Revive day-old cookies by wrapping one in a barely damp paper towel and microwaving 8 seconds. The steam softens the center and re-melts the chips. If you're re-crisping edges, pop into a 300°F oven for 4 minutes. Add a tiny splash of water to the container before reheating — it steams back to perfection without drying.