I still remember the exact moment these cookies changed my life — and no, that's not hyperbole. It was a drizzly October afternoon, the kind where the sky can't decide between rain and mist, and I was staring at a half-empty bottle of apple cider I'd bought for some mulled wine that never materialized. My kitchen smelled like disappointment and stale cinnamon from a failed attempt at apple hand pies the day before. You know those days when everything you touch in the kitchen turns to culinary tragedy? That was me, standing there in my worn-out apron, determined to make something — anything — that didn't end up in the compost bin.
But here's where the magic happened: instead of reaching for the usual suspects (chocolate chips, peanut butter, the reliable old standbys), I grabbed that neglected cider and thought, "What if?" What if I could capture everything I love about fall — the crisp air, the farmers market apples, the way caramel sticks to your fingers at apple orchards — and pack it all into one ridiculously soft, chewy cookie? I started dumping ingredients into my stand mixer like a woman possessed, no recipe in sight, just pure instinct and a desperate need for something that tasted like happiness. The dough came together in this gorgeous autumn-colored swirl, and when I pulled the first batch from the oven, the entire house smelled like I'd bottled up October and released it into the air.
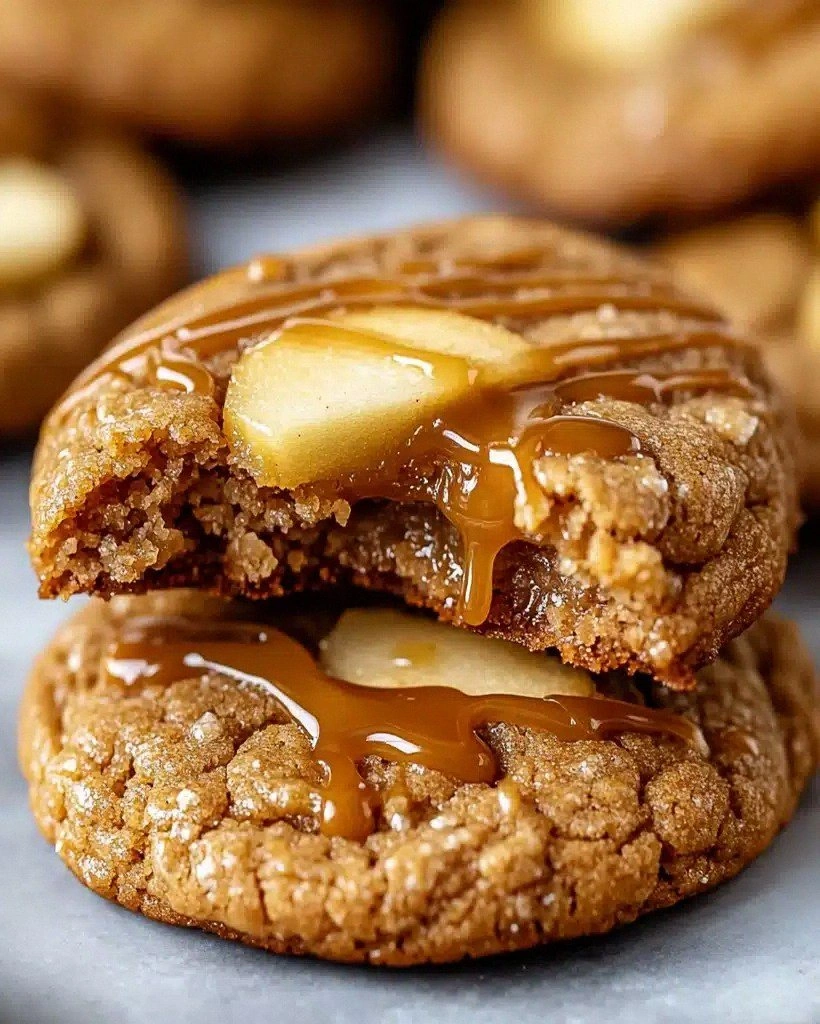
I'll be honest — I ate half the batch before anyone else got to try it. Not out of greed (okay, maybe a little), but because I couldn't believe what had just happened in my kitchen. These weren't just good cookies; they were the Platonic ideal of fall baking. The edges had that perfect slight crisp that gives way to a center so soft and chewy it practically melts on your tongue. The apple cider reduces down to this concentrated autumn essence that makes your taste buds sit up and pay attention, while tiny pockets of diced apple provide these delightful bursts of fresh fruit flavor. And the caramel drizzle? Pure genius. It seeps into the cookie's crevices, creating these sticky rivers of sweetness that make eating them feel slightly illicit.
Picture yourself pulling this out of the oven, the whole kitchen smelling incredible, and watch as everyone gravitates toward you like you're the Pied Piper of fall treats. This next part? Pure magic. Let me walk you through every single step — by the end, you'll wonder how you ever made it any other way.
What Makes This Version Stand Out
Flavors That Actually Taste Like Fall: Most apple cookies taste like someone waved a bottle of artificial apple flavoring over the dough and called it a day. These bad boys get their punch from reduced apple cider that concentrates down to a syrup so potent, you'll swear you're biting into a fresh-picked Honeycrisp. The combination of cinnamon and nutmeg isn't just thrown in willy-nilly — it's balanced like a tightrope walker, giving you that cozy spice without overwhelming the apple's delicate flavor.
Texture That Defies Physics: Here's what most recipes get completely wrong: they either go cakey and dry or spread into sad, crispy puddles. These cookies achieve the impossible — crisp edges that shatter like thin ice while maintaining centers so soft and chewy, they bend rather than break. The secret? A higher ratio of brown sugar to white sugar creates that perfect chew, while the apple cider adds moisture that keeps them soft for days (if they last that long).
They're Foolproof Even for Baking Disasters: If you've ever struggled with cookies that spread too much, brown too fast, or taste like you're eating spiced cardboard, you're not alone — and I've got the fix. This dough is forgiving like your favorite aunt. Overmix it slightly? Still great. Apples a little too wet? Just pat them dry. I've made these at high altitude, on humid days, in ancient ovens with questionable temperature control, and they still turn out better than anything from a bakery.
The Caramel Situation: Most recipes just throw some store-bought caramel on top and hope for the best. But here's the game-changer: you drizzle the caramel while the cookies are still warm, so it partially absorbs into the cookie while maintaining that gorgeous sticky top. Add a whisper of sea salt flakes and suddenly you've got this sophisticated sweet-salty thing happening that makes grown adults close their eyes when they take the first bite.
They Age Like Fine Wine: Unlike most cookies that turn into hockey pucks overnight, these actually improve with time. The flavors meld together in a way that makes them taste even more apple-y and caramel-y on day two. I've hidden a batch in the back of the pantry (not admitting to anything specific here) and discovered them three days later, only to find they'd achieved some kind of cookie nirvana I didn't know was possible.
Your House Will Smell Incredible: I'm talking scented-candle-companies-should-bottle-this incredible. The aroma that wafts through your kitchen while these bake is so authentically fall, so perfectly autumnal, that I've had neighbors knock on my door asking what I'm making. One friend swears her husband proposed to her again after she made these cookies. Correlation? Causation? You decide.
Alright, let's break down exactly what goes into this masterpiece...
Inside the Ingredient List
The Flavor Base
The all-purpose flour here isn't just filler — it's the canvas that lets all the other flavors shine. I use exactly 2 1/2 cups because after testing dozens of batches, this ratio gives you structure without density. Too much flour and your cookies taste like you're eating apple-scented bread; too little and they spread into sad, greasy puddles. The baking soda and baking powder work in tandem like a chemical tag team, with the baking powder giving you lift and the baking soda helping with browning and that perfect chewy texture.
Now, about that salt — don't you dare skip it or try to use less. That 1/4 teaspoon is the difference between cookies that taste flat and one-dimensional versus cookies that make people close their eyes and sigh. Salt is like the conductor in an orchestra; it doesn't sing the melody, but without it, everything else falls apart. I use fine sea salt because it distributes evenly throughout the dough.
The Spice Symphony
Ground cinnamon gets top billing here, and quality matters more than you'd think. That jar that's been sitting in your spice cabinet since Obama's first term? Toss it. Fresh cinnamon (I grind my own from sticks when I'm feeling fancy) gives you this warm, sweet complexity that pre-ground can't touch. The nutmeg is the secret weapon — just 1/2 teaspoon adds this mysterious depth that makes people ask, "What is that flavor I can't quite place?" It's like adding a bass line to a song; you might not consciously hear it, but you'd notice if it disappeared.
Here's where I get a little controversial: I don't add allspice or cloves. Most apple recipes load up on every warm spice in the pantry until they taste like potpourri. We're making cookies, not mulled wine. The cinnamon and nutmeg dance together perfectly without stepping on each other's toes or overwhelming the apple's delicate flavor.
The Fat and Sugar Dream Team
Unsalted butter gives you control over the salt level, and it needs to be properly softened — not melty, not cold, but that perfect middle ground where your finger leaves an imprint but it still holds its shape. This matters more than you think for the final texture. The granulated sugar provides structure and helps with that slight crisp edge, while the brown sugar (please use fresh, soft brown sugar, not that rock-hard brick that's been in your pantry since the pandemic started) is where the chew comes from.
That single large egg is doing triple duty: binding everything together, adding richness, and helping with leavening. I always use room temperature eggs because they incorporate more evenly into the creamed butter and sugar. Cold eggs can cause your beautifully creamed mixture to seize up and look curdled, which affects the final texture.
The Liquid Gold
Apple cider is the star that most recipes completely waste by just dumping it in straight from the bottle. Here's what actually works: simmer 1 cup of cider down to 1/4 cup of concentrated syrup. This removes excess water while intensifying the apple flavor to levels that will make your head spin. The vanilla extract isn't just along for the ride — it enhances the apple flavor in ways that will make you feel like a kitchen wizard. It's like adding a frame to a painting; it makes everything else look better.
When selecting your cider, skip the clear, filtered juice that looks like apple-colored water. You want the cloudy, unfiltered stuff that still has apple sediment floating around. That's where the flavor lives. Fresh from an orchard is ideal, but in a pinch, that expensive bottle from the natural foods store works too. Just please, for the love of all that's holy, don't use apple juice from concentrate.
The Surprise Elements
Diced apples are where most recipes go wrong. They either leave them out entirely (criminal!) or add them raw and wonder why their cookies are soggy disasters. The trick is to peel and dice them small — think blueberry-sized pieces — then pat them dry with paper towels. This removes excess moisture that would otherwise steam your cookies from the inside out. I prefer Honeycrisp or Pink Lady for their balance of sweet-tart flavor and ability to hold their shape during baking.
The caramel sauce for drizzling should be the good stuff, not those plastic-wrapped squares pretending to be caramel. Look for a sauce that's thick but still pourable, with ingredients you can pronounce. And those sea salt flakes? They're not just for Instagram. The crunch and burst of salinity against the sweet caramel creates moments that make people involuntarily hum while eating.
Everything's prepped? Good. Let's get into the real action...
The Method — Step by Step
- Start with the cider reduction because this takes time and patience, two things most of us are short on but desperately need here. Pour 1 cup of apple cider into a small saucepan and bring it to a gentle simmer over medium heat. Now here's the crucial part: don't walk away. This isn't the time to check Instagram or start another project. Stir occasionally as it bubbles away, reducing down to exactly 1/4 cup of thick, syrupy liquid that coats the back of a spoon. Your kitchen will start smelling like an apple orchard in the best possible way, and you'll be tempted to drink it straight. Resist. This liquid gold is about to transform your cookies.
- Cream the butter and sugars like your life depends on it, because texturally, it kind of does. In your stand mixer (or with a hand mixer if you're feeling ambitious), beat the softened butter with both sugars for a full 3-4 minutes. I'm serious about this timing. Set a timer. Walk away if you must, but let it go until the mixture is light and fluffy, the color of a perfectly toasted marshmallow. This step incorporates air that gives you lift and ensures the sugar dissolves properly. Under-creamed butter leads to dense, greasy cookies that spread like they've got somewhere better to be.
- Add the egg and vanilla but pause for a moment of appreciation here. Crack that egg into a separate bowl first (trust me on this — nobody wants to fish out shell fragments later) and check that it's room temperature. Add it to your creamed mixture and beat until fully incorporated, about 1 minute. The mixture should look satiny and smooth, not curdled or separated. Now add your vanilla — and use the good stuff, not the imitation that smells like a candle store. Let it mix for another 30 seconds until the whole thing looks like the inside of a gourmet ice cream shop.
- Time for the cider syrup and this is where the magic really happens. Your reduced cider should be completely cool — warm cider will melt your butter and ruin the texture. With the mixer on low, slowly stream in the thick syrup. It'll incorporate surprisingly easily, turning your dough a beautiful light brown color with tiny flecks of concentrated apple. The aroma that hits you right now? That's the smell of success, my friend. Let it mix until just combined; overmixing here can make your cookies tough.
- Whisk together the dry ingredients in a separate bowl like the organized baker I know you can be. Flour, baking soda, baking powder, salt, cinnamon, and nutmeg all get whisked together until they're so well combined you can't see individual streaks of spice. This ensures even distribution because nobody wants to bite into a pocket of pure nutmeg or a chunk of baking soda. Use a whisk, not a spoon — it does a better job of aerating the flour and breaking up any clumps in your brown sugar that might have snuck in.
- Add the dry ingredients gradually because dumping them all in at once is how you end up with a snowstorm in your kitchen. With your mixer on the lowest speed, add the flour mixture in three additions, mixing just until the flour disappears. This is not the time to multitask. Stand there and watch as the dough comes together, scraping down the sides of the bowl once to make sure everything gets incorporated. The dough should pull away from the sides and form a soft, pliable mass that holds together when you squeeze it.
- Fold in those apples with the delicacy of someone handling precious gems. Dice your peeled apples into pieces no larger than a blueberry — any bigger and they'll create soggy pockets. Pat them dry with paper towels to remove excess moisture, then gently fold them into the dough using a spatula. You want them distributed evenly but not mashed into oblivion. Those little green and white cubes peeking out of the dough? They're going to become soft, apple-y pockets of joy in the finished cookies.
- Chill the dough and yes, I know this requires patience you might not possess, but it's non-negotiable. Cover the bowl with plastic wrap and refrigerate for at least 2 hours, preferably overnight. This step does three crucial things: it allows the flavors to meld and intensify, it firms up the butter so your cookies don't spread into pancakes, and it hydrates the flour fully for a better texture. If you're in a rush, you can speed-chill it in the freezer for 45 minutes, but the overnight method produces superior results.
- Time to bake and this is the moment of truth. Preheat your oven to 350°F (175°C) and line your baking sheets with parchment paper. Scoop the dough into balls about 2 tablespoons each — I use a medium cookie scoop for consistency. Place them 2 inches apart because they will spread slightly. Bake for 11-13 minutes, rotating the pan halfway through. They're done when the edges are set and lightly golden, but the centers still look slightly underbaked. They'll continue cooking on the hot pan after you remove them from the oven.
- The finishing touch happens while they're still warm and vulnerable. Let the cookies cool on the pan for 5 minutes — this is crucial for setting the structure — then transfer to a wire rack. While they're still slightly warm, drizzle with caramel sauce in a lazy zigzag pattern. The warmth helps the caramel sink in slightly while maintaining that gorgeous ribbon on top. Immediately sprinkle with a few flakes of sea salt. Not table salt, not kosher salt — you want those delicate flakes that crunch and dissolve on your tongue.
That's it — you did it. But hold on, I've got a few more tricks that'll take this to another level...
Insider Tricks for Flawless Results
The Temperature Rule Nobody Follows
Here's the thing that separates good bakers from great ones: ingredient temperature matters more than most celebrity chefs let on. Your butter should be cool room temperature — when you press it, your finger leaves an imprint but it doesn't slide through like oil. Eggs need to be room temperature too, but here's my shortcut: place them in a bowl of warm tap water for 5 minutes while you prep everything else. Cold eggs from the fridge will seize up your beautifully creamed butter, leading to cookies that look curdled and bake up dense. A friend tried skipping this step once and texted me photos of cookies that looked like they'd been through a war zone. Don't be that friend.
Why Your Nose Knows Best
After making these cookies dozens of times, I've developed a sixth sense for when they're perfectly baked — and it has nothing to do with timers. Stand near your oven during the last few minutes of baking. When you start smelling caramelized sugar and baked apple with a hint of toasty butter, they're almost done. The aroma hits your nose about 2 minutes before visual cues appear. This might sound like kitchen voodoo, but scent molecules are released when sugars caramelize and proteins brown. Your nose is literally detecting the Maillard reaction in real-time. Science is delicious.
The 5-Minute Rest That Changes Everything
When your timer goes off, resist every impulse to immediately transfer those cookies to a cooling rack. Let them sit on the hot pan for exactly 5 minutes. During this time, carryover cooking finishes setting the centers while the bottoms develop this perfect slight crisp edge. Remove them too early and you'll have cookies that fall apart when you pick them up. Wait too long and you'll need a chisel to get them off the pan. Five minutes is the sweet spot — set a timer and walk away if you must. This is also the perfect time to make yourself a cup of coffee or tea, because you're about to experience cookie nirvana.
The Apple Selection Secret
Not all apples are created equal for baking, and this isn't the place for your mealy Red Delicious. You want varieties that hold their shape and bring both sweetness and acidity. Honeycrisp is my go-to because it stays firm during baking and brings that perfect sweet-tart balance. Pink Lady works beautifully too, with a slightly more pronounced tartness. Avoid soft varieties like McIntosh or Cortland — they'll turn to applesauce in your cookies, creating soggy pockets of disappointment. And please, whatever you do, don't use green apples unless you enjoy making your guests pucker like they're sucking on lemons.
Storage That Actually Works
Here's where most cookie recipes fail you: they don't tell you how to store them properly. These cookies stay soft and chewy for up to 5 days if you store them with a slice of bread in an airtight container. The bread releases just enough moisture to keep the cookies soft without making them soggy. Replace the bread slice every other day. I've also discovered that they freeze beautifully — layer them between sheets of parchment paper in a freezer bag, and they'll keep for up to 3 months. Thaw them on the counter for 30 minutes, or pop them in the microwave for 8-10 seconds for that fresh-baked taste.
Creative Twists and Variations
This recipe is a playground. Here are some of my favorite ways to switch things up:
The Bourbon Caramel Edition
Add 1 tablespoon of good bourbon to your caramel sauce before drizzling. The alcohol burns off in the warm cookie, leaving behind this incredible depth that makes people ask if you've been taking secret pastry classes. It's particularly amazing for adult dinner parties where you want to show off without looking like you're trying too hard. The bourbon complements the apple and caramel in ways that will make you rethink everything you thought you knew about flavor combinations.
The Streusel-Topped Sensation
Before baking, press a small amount of streusel topping onto each cookie ball. Mix 1/4 cup flour, 2 tablespoons brown sugar, 2 tablespoons cold butter, and 1/2 teaspoon cinnamon with your fingers until crumbly. This creates a coffee cake-like topping that adds textural interest and makes them feel like you're eating apple crumble in cookie form. My grandmother swears these are better than her famous apple pie, which is either high praise or a sign I should start checking her will for changes.
The Cheddar Apple Fusion
Fold in 1/2 cup of finely shredded sharp white cheddar cheese with the apples. I know this sounds like culinary madness, but the salty, tangy cheese pairs incredibly with sweet apples and caramel. It's a nod to the classic New England tradition of serving apple pie with cheddar cheese. The cheese melts into tiny pockets that add savory notes, creating this sophisticated sweet-savory balance that works surprisingly well for cocktail parties or when you want to impress that friend who thinks they've tried everything.
The Maple Pecan Version
Replace the caramel drizzle with pure maple syrup that's been reduced to syrup consistency, and fold in 1/2 cup of toasted pecan pieces with the apples. This variation tastes like someone bottled up a Vermont autumn and baked it into cookie form. The maple brings a more complex sweetness than caramel, while the toasted pecans add richness and crunch. It's particularly stunning when served warm with a glass of cold apple cider on a crisp fall afternoon.
The Salted Brown Butter Upgrade
Brown your butter before creaming it with the sugars. Cook the butter over medium heat until it turns golden brown and smells nutty, then let it cool and solidify before using. This adds incredible depth and complexity that makes the cookies taste like they came from a French bakery. The nutty brown butter notes pair beautifully with the apple and caramel, creating a cookie that's sophisticated enough for the most discerning palates while still being approachable enough for kids.
The Gluten-Free Game Changer
Substitute the all-purpose flour with a high-quality gluten-free flour blend that includes xanthan gum. I've had incredible success with King Arthur's measure-for-measure flour. The cookies turn out every bit as delicious as the original, with no one able to tell the difference. Just make sure your blend includes a binding agent, or add 1/2 teaspoon of xanthan gum if using a blend without it. This variation has made me a hero at potlucks and family gatherings where gluten-free options usually taste like sweetened cardboard.
Storing and Bringing It Back to Life
Fridge Storage
Contrary to popular belief, these cookies don't need refrigeration and actually prefer room temperature storage. Keep them in an airtight container with a slice of sandwich bread — the bread acts like a humidity regulator, releasing moisture as needed to keep the cookies soft. Replace the bread slice every 48 hours, or whenever it becomes completely hard. Stored this way, they'll maintain their perfect texture for up to 5 days, though I've never personally witnessed them lasting that long in any household.
Freezer Friendly
These cookies freeze like champions, both baked and unbaked. For baked cookies, let them cool completely, then layer between sheets of parchment paper in a freezer bag. They'll keep for up to 3 months without any quality loss. For unbaked cookies, scoop the dough into balls and freeze on a baking sheet. Once solid, transfer to a freezer bag. Bake from frozen, adding 2-3 extra minutes to the baking time. This means fresh, warm cookies are never more than 15 minutes away, which is either the best or most dangerous thing I've ever discovered, depending on your relationship with self-control.
Best Reheating Method
While these cookies are fantastic at room temperature, warming them slightly transforms the experience. Microwave individual cookies for 8-10 seconds — just until the caramel becomes soft and the cookie feels warm in your hand. Alternatively, wrap in foil and warm in a 300°F oven for 5 minutes. The caramel becomes luxuriously soft, the apple pieces warm through, and suddenly you're eating a cookie that feels like it just came from the oven. Add a scoop of vanilla ice cream on the side and you've got dessert that rivals anything from a high-end restaurant.