I was standing in my kitchen, half‑asleep, when the oven timer let out a shrill beep that sounded like a fire alarm. I opened the door to discover a half‑baked batch of ordinary cherry bars that had collapsed into a soggy mess, and I swore I would never attempt a cherry dessert again. Then a daring friend tossed me a challenge: “Make something that’ll make people forget about that disaster and beg for seconds.” I laughed, grabbed a fresh can of cherry pie filling, and set out to create a bar that would rewrite the entire cherry‑pie‑bar playbook. I’m telling you now, this is the moment that sparked the birth of the ultimate cherry pie bars you’re about to devour.
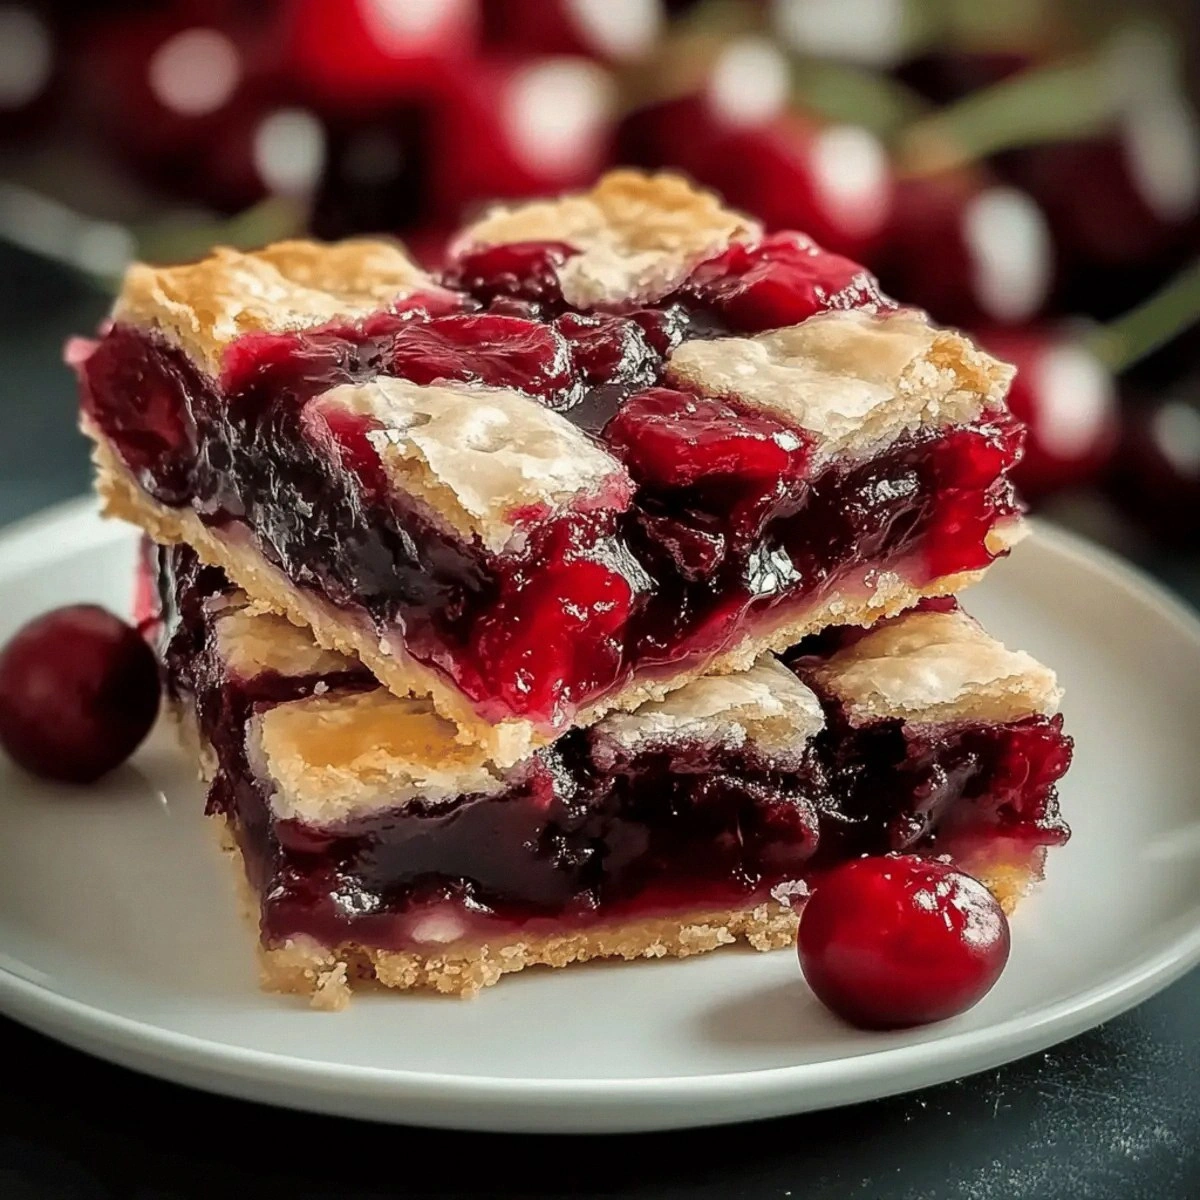
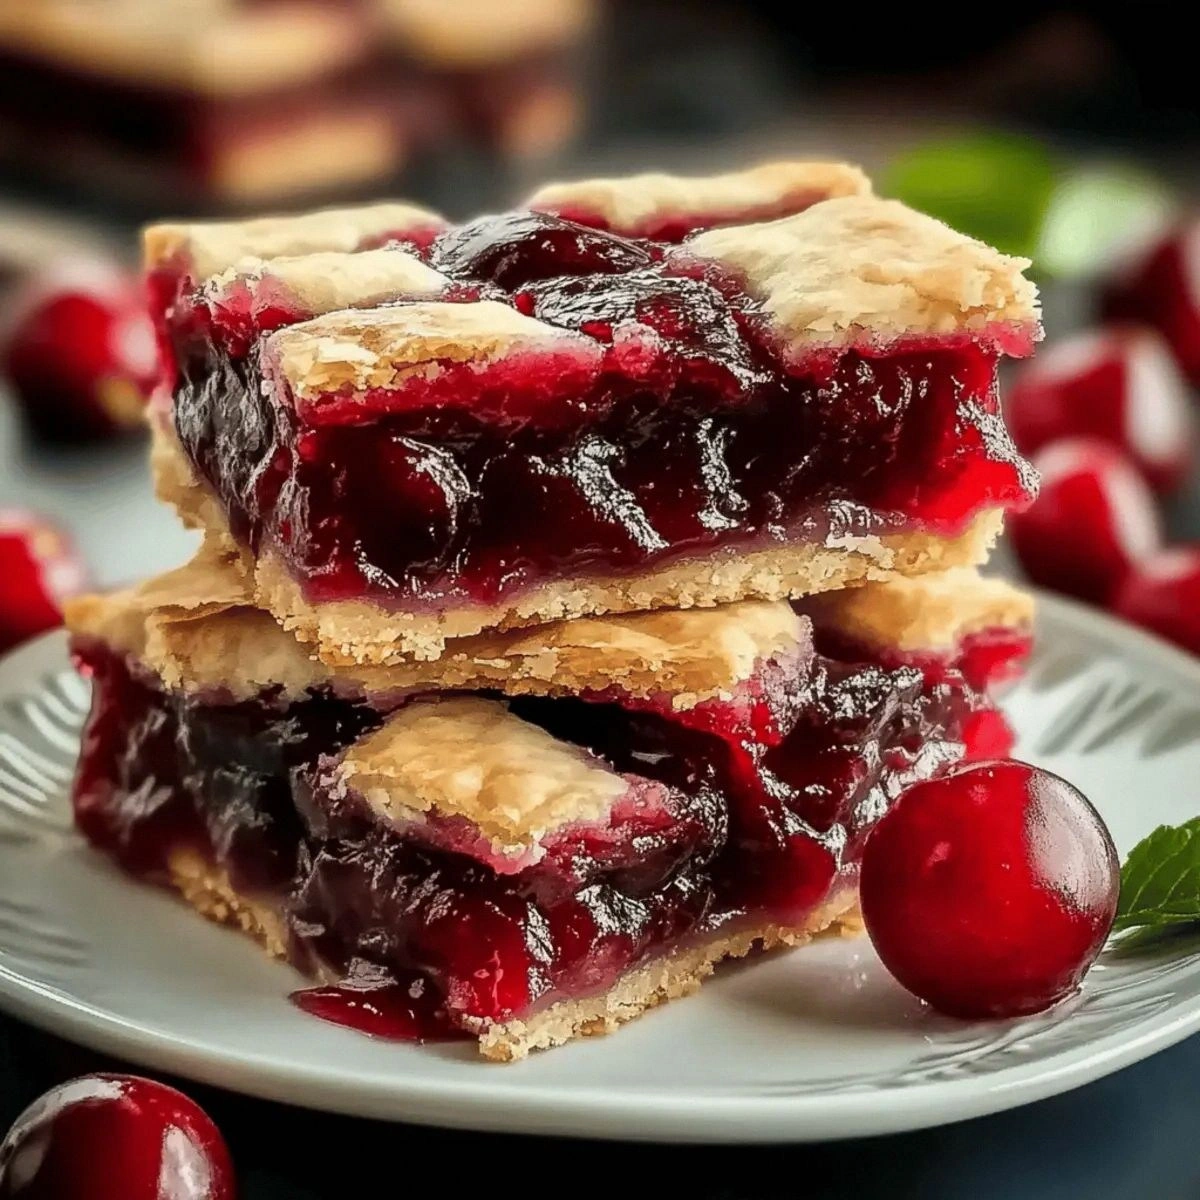
Picture this: a golden‑brown crust that cracks like fresh ice on a winter lake, a luscious cherry topping that glistens like rubies under a summer sun, and a silky, buttery glaze that slides over the surface like a satin ribbon. The kitchen fills with the sweet perfume of almond and vanilla, while the faint hiss of the oven whispers promises of caramelized edges. Your fingertips feel the warm metal of the pan, and the first bite delivers a symphony of textures—crunch, chew, and melt—all at once. It’s a sensory overload that makes your heart race and your taste buds do a happy dance.
Most cherry bar recipes out there are either too dry, too soggy, or drown the fruit in a cloying sugar glaze that feels like chewing on candy floss. This version, however, balances the buttery crust with a light, airy crumb, and the cherry filling stays bright and tangy, never turning mushy. I’ve swapped the usual heavy butter‑to‑flour ratio for a perfect 1:2 partnership, and added a splash of almond extract that lifts the flavor to new heights. The secret? A quick‑mix glaze that sets just enough to give a glossy finish without hiding the beautiful fruit underneath.
Let me walk you through every single step — by the end, you’ll wonder how you ever made it any other way. I dare you to taste this and not go back for seconds. Okay, ready for the game‑changer? This next part? Pure magic. Stay with me here — this is worth it.
What Makes This Version Stand Out
- Flavor Explosion: The almond extract mingles with vanilla to give the crust a subtle nutty depth that makes the cherry topping sing.
- Texture Harmony: A crisp, buttery base meets a soft, juicy cherry layer, while the glaze adds just enough snap to keep things interesting.
- Simplicity: Fewer steps, fewer ingredients, and no fancy equipment—just a mixing bowl, a pan, and your enthusiasm.
- Unique Twist: The glaze uses confectioners’ sugar and milk for a glossy finish that never turns gummy, unlike typical powdered‑sugar drizzles.
- Crowd‑Pleaser: Even the pickiest eaters rave; it’s the kind of dessert that disappears from the tray before you can say “more”.
- Ingredient Quality: Real butter (never margarine) provides a rich, creamy mouthfeel that cheap alternatives simply can’t match.
- Cooking Method: Baking at a moderate 350°F ensures even browning without burning the delicate cherry layer.
- Make‑Ahead Potential: These bars keep beautifully for up to three days, making them perfect for brunches, picnics, or a midnight snack.
Alright, let's break down exactly what goes into this masterpiece...
Inside the Ingredient List
The Flavor Base
Real butter is the cornerstone of any great pastry. Its 80% milk fat content creates a tender crumb and a buttery aroma that can’t be replicated with margarine or oil. If you ever skip the butter, expect a dry, crumbly texture that feels more like a biscuit than a bar. For the best flavor, choose unsalted butter and add a pinch of sea salt to enhance the overall taste profile.
Sugar: The cup of granulated sugar sweetens the crust without making it overly sugary. It also contributes to the Maillard reaction, giving those gorgeous golden edges. If you prefer a less sweet version, you can reduce the sugar by up to a quarter, but the crust may lose some of its caramelized charm.
Almond Extract: Just a teaspoon of this liquid gold transforms the flavor landscape, adding a subtle nuttiness that pairs beautifully with cherries. It’s a secret ingredient many recipes overlook, leading to a flat‑tasting base. If you’re allergic to nuts, a dash of orange zest can provide a bright, citrusy alternative.
Vanilla Extract: The vanilla rounds out the flavor, smoothing the edges of the almond’s boldness. Use pure vanilla extract for depth; imitation can taste harsh and metallic. A split‑vanilla bean (seeds only) can be a luxurious upgrade if you’re feeling fancy.
The Texture Crew
All‑Purpose Flour: Two cups of flour give the crust structure while still allowing it to stay tender. If you use bread flour, the bars become too chewy; cake flour would make them crumbly. For a gluten‑free twist, swap in a 1‑to‑1 blend of rice flour and tapioca starch, but expect a slightly denser bite.
Eggs: The two large eggs bind the dough, add richness, and help the crust rise just enough to be airy. Over‑beating can incorporate too much air, leading to a cakey texture. If you’re vegan, replace each egg with a “flax egg” (1 tbsp ground flax + 3 tbsp water) — the bars will still hold together, though the crumb will be a tad denser.
The Unexpected Star
Cherry Pie Filling: This canned delight is the hero of the recipe, delivering juicy cherries, a hint of spice, and a glossy sheen. Most home cooks use fresh cherries, which can be labor‑intensive and unpredictable in moisture content. The canned version guarantees consistent sweetness and texture, and it saves you from the dreaded “watery” disaster.
The Final Flourish
Confectioners’ Sugar & Milk (Glaze): The glaze is a quick blend of powdered sugar and milk, creating a thin, glossy coat that sets just enough to keep the cherry topping visible. Too much milk makes it runny; too little leaves it grainy. Adjust with a few drops of water if the glaze thickens after sitting.
Everything's prepped? Good. Let's get into the real action...
The Method — Step by Step
- Preheat your oven to 350°F (175°C) and line a 9×13‑inch baking pan with parchment paper, leaving an overhang for easy removal. As the oven warms, you’ll hear the faint whirr of the fan, a sound that promises even heat distribution. This step is crucial because a hot oven gives the crust that instant “snap” you crave.
- In a large mixing bowl, combine the real butter and granulated sugar. Using a handheld mixer on medium speed, beat until the mixture is pale, fluffy, and smells like a bakery on a Sunday morning. Kitchen Hack: Scrape the sides of the bowl with a silicone spatula halfway through beating to ensure an even, fully incorporated mixture.
- Add the two large eggs, one at a time, beating well after each addition. Then stir in the almond and vanilla extracts, letting their aromas mingle with the butter‑sugar base. The batter should look glossy and slightly thick, like a luxurious custard.
- Gradually fold in the all‑purpose flour, mixing just until no streaks remain. Over‑mixing will develop gluten, making the crust tough instead of tender. Watch Out: If you see lumps, stop mixing immediately; they’ll turn into chewy pockets once baked.
- Spread the dough evenly across the prepared pan, using a spatula to smooth the top. Press the edges gently to create a slight rim; this will help contain the cherry filling later. The surface should be uniformly golden‑brown in color, hinting at the caramelization to come.
- Drop the entire can of cherry pie filling over the crust, using a spatula to spread it into an even layer. You’ll hear a soft “squish” as the thick, ruby‑red sauce settles. Make sure the edges are slightly exposed; this will allow the glaze to seep into the cracks for extra flavor.
- In a small bowl, whisk together the confectioners’ sugar and milk until the glaze is smooth and pourable. Drizzle the glaze over the cherry layer, letting it cascade like a waterfall of sweet silk. The glaze should sit on top, not soak in; if it does, add a drop more milk to thin it out.
- Bake for 30‑35 minutes, or until the crust turns a deep golden brown and the glaze is set with a faint shimmer. Around the 20‑minute mark, you’ll notice the edges pulling away from the pan—this is the tell‑tale sign that the bars are ready. Resist the urge to open the oven door too often; each peek releases heat and can affect the rise.
- Allow the bars to cool in the pan for 10 minutes, then lift them out using the parchment overhang and transfer to a wire rack. As they cool, the glaze will firm up, creating a glossy finish that looks like a jeweler’s masterpiece. Slice into squares with a sharp knife—clean cuts mean perfect servings.
- Serve warm or at room temperature, and watch your guests’ faces light up. That first bite? It’s the buttery crunch, the sweet‑tart cherry, and the silky glaze all dancing together. I’ll be honest — I ate half the batch before anyone else got to try it. That’s it — you did it. But hold on, I've got a few more tricks that'll take this to another level...
Insider Tricks for Flawless Results
The Temperature Rule Nobody Follows
Always start with a cold pan and cold butter. When the butter is chilled, it melts slowly in the oven, creating steam pockets that lift the crust. If you use a warm pan, the butter melts too quickly, and you lose that delicate lift. A friend tried skipping this step once — let’s just say the bars turned out flat as a pancake.
Why Your Nose Knows Best
Trust the aroma. About five minutes before the timer dings, the kitchen will be filled with a buttery, nutty scent that signals the crust is perfectly browned. If you rely solely on color, you might over‑bake and end up with a bitter edge. Let your nose be the ultimate timer.
The 5‑Minute Rest That Changes Everything
After baking, let the bars rest for exactly five minutes before slicing. This short pause lets the glaze set and the cherry filling thicken, preventing a soggy slice. Skipping this rest can lead to a messy plate and a disappointing first bite.
Glaze Consistency Cheat
If your glaze thickens while you wait, whisk in a few drops of warm water until it reaches a pourable consistency. Too much water will make it runny, so add slowly. This hack saves you from a gummy finish that can ruin the whole bar.
The Secret of the Overhang
Leaving parchment paper overhang on the sides isn’t just for aesthetics; it makes lifting the entire slab a breeze, preserving those crisp edges. When you try to lift without the overhang, the bars often crumble, and you lose that picture‑perfect presentation.
Creative Twists and Variations
This recipe is a playground. Here are some of my favorite ways to switch things up:
Chocolate‑Cherry Fusion
Stir ½ cup of dark chocolate chips into the crust before baking. The chocolate melts into pockets of richness, pairing decadently with the bright cherry topping. Perfect for anyone who can’t decide between chocolate and fruit.
Nutty Crunch
Add ¼ cup of toasted slivered almonds to the dough. The nuts give an extra crunch that contrasts beautifully with the soft interior, and the almond flavor amplifies the almond extract in the base.
Spiced Autumn
Mix a pinch of ground cinnamon, nutmeg, and a dash of clove into the cherry filling before spreading. This warm spice blend turns the bars into a cozy, fall‑ready treat without sacrificing the bright cherry notes.
Citrus Zest Burst
Add the zest of one lemon or orange to the glaze. The citrus lifts the sweetness, giving the bars a fresh finish that feels like a spring breeze.
Gluten‑Free Glory
Replace the all‑purpose flour with a 1‑to‑1 blend of rice flour, almond flour, and tapioca starch. The texture changes slightly, becoming a bit denser, but the flavor remains spectacular.
Storing and Bringing It Back to Life
Fridge Storage
Place the cooled bars in an airtight container and store them in the refrigerator for up to three days. The chilled environment keeps the glaze from getting sticky and preserves the buttery crust’s integrity. Before serving, let them sit at room temperature for 10 minutes to soften.
Freezer Friendly
Wrap the parchment‑lined slab tightly in plastic wrap, then place it in a freezer bag. They’ll stay fresh for up to two months. When you’re ready to enjoy, thaw overnight in the fridge, then bring to room temperature and add a tiny splash of milk to the glaze for a fresh shine.
Best Reheating Method
Reheat individual squares in a preheated 300°F oven for 5‑7 minutes, or microwave for 15 seconds if you’re in a hurry. Add a tiny splash of water to the plate before microwaving; the steam revives the crumb and prevents the glaze from drying out.