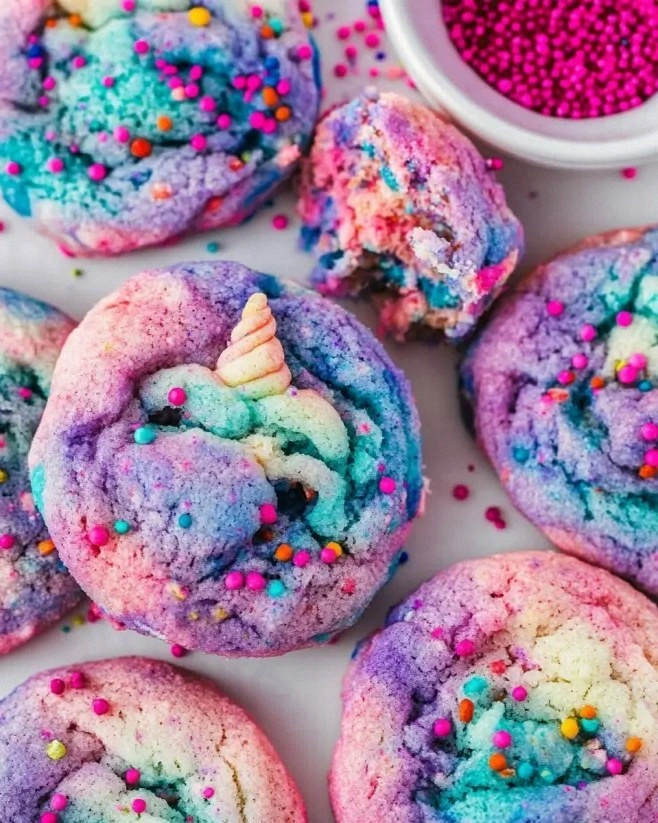
Picture this: a Saturday afternoon, the kitchen a battlefield of flour clouds, a rogue spatula that somehow turned into a wand, and a sudden craving for something that screams celebration louder than a marching band. I was halfway through a batch of ordinary chocolate chip cookies when my roommate dared me, “Make them look like a unicorn and see if anyone can resist.” I laughed, I rolled my eyes, and then I did the impossible—turning a humble cookie dough into a kaleidoscope of pastel perfection that practically glows from the oven. That moment of chaotic creativity birthed the most vibrant, melt‑in‑your‑mouth cookies you’ll ever taste, and trust me, they’re not just a pretty face.
The moment the dough hit the counter, the kitchen filled with a sweet, buttery perfume that made my nose do a little dance. The sound of the mixer whirring was like a low‑key rave, and the feel of the soft, pliable dough under my fingertips reminded me of kneading clouds. As the colors swirled together—pink, teal, sunshine yellow—they looked so alive I could swear they’d start singing. When the tray finally slid into the oven, the heat wrapped around those tiny rainbows like a warm hug, and the first whiff of toasting sugar and white chocolate made my heart skip a beat.
What makes this version stand out? Most unicorn cookie recipes either drown in too much frosting or end up as bland, over‑processed blobs. I’ve cracked the code: a balanced sweet‑and‑salty base, a buttery crumb that crumbles just enough for that melt‑away sensation, and a swirl of colors that stays vivid without bleeding into each other. The secret weapon? A splash of white chocolate chips that melt into pockets of silky richness, and a generous sprinkle of rainbow confetti that adds that final pop of joy. And yes, there’s a little trick with food coloring that keeps the hues bright without turning the dough into a neon nightmare.
Okay, ready for the game‑changer? I’m about to walk you through every single step—mixing, coloring, shaping, baking—so by the end, you’ll wonder how you ever made cookies any other way. I dare you to taste this and not go back for seconds. Let’s dive in and create a batch that will have everyone asking, “Who made these?” because you did.
What Makes This Version Stand Out
- Flavor: A buttery foundation layered with caramel‑kissed brown sugar and the subtle crunch of white chocolate chips that melt into buttery pockets.
- Texture: The edges turn golden and crisp while the centers stay soft and chewy, creating a delightful contrast that shatters like thin ice when you bite.
- Simplicity: Only ten pantry staples and a few minutes of prep—no fancy equipment, just a whisk, a bowl, and a sprinkle of imagination.
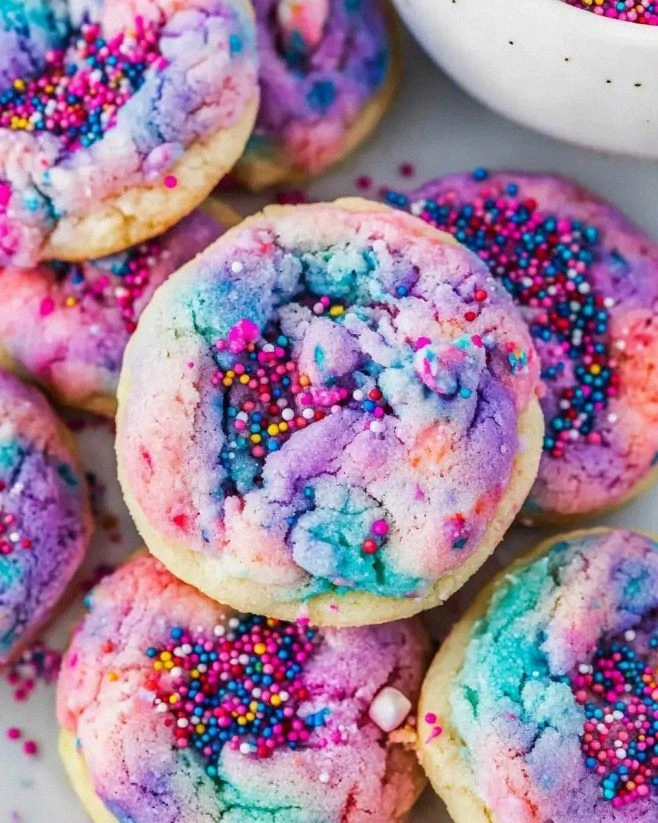
- Uniqueness: The swirl technique keeps each cookie a masterpiece, and the rainbow sprinkles stay vibrant, turning every bite into a tiny celebration.
- Crowd Reaction: These cookies have been known to cause spontaneous applause at birthday parties and even a few happy tears at office meetings.
- Ingredient Quality: Using real butter and premium white chocolate makes the flavor sing, while the all‑purpose flour provides the perfect structure.
- Cooking Method: Baking at a moderate temperature ensures even color distribution and prevents the sprinkles from melting away.
- Make‑Ahead Potential: Freeze the dough balls for up to a month, and you’ll have a ready‑to‑bake stash whenever the unicorn craving hits.
Inside the Ingredient List
The Flavor Base
Butter is the soul of any good cookie, and using unsalted butter lets you control the salt level precisely. When creamed with both granulated and brown sugar, it creates a caramel‑like depth that makes each bite feel like a small indulgence. Skipping the brown sugar would strip away that subtle molasses undertone, leaving the cookie one‑dimensional. If you’re dairy‑free, try a high‑fat coconut oil, but expect a faint coconut whisper that may clash with the pastel vibe.
The Texture Crew
All‑purpose flour provides the structural backbone, ensuring the cookies hold their shape while staying tender. Baking soda is the leavening hero that gives the cookies a gentle lift, preventing them from turning into flat biscuits. A pinch of salt amplifies the sweetness and balances the flavors; without it, the cookies would taste overly sugary. For a gluten‑free twist, swap the flour for a 1‑to‑1 gluten‑free blend, but add a teaspoon of xanthan gum to keep the texture from crumbling.
The Unexpected Star
White chocolate chips are the surprise element that turns an ordinary cookie into a luxurious treat. They melt into silky pockets that contrast beautifully with the crunchy edges. If you’re allergic to dairy, opt for dairy‑free white chocolate chips—just make sure they’re high quality, or they’ll turn grainy. Rainbow sprinkles aren’t just for looks; they add a subtle crunch and a burst of sugary sparkle that makes every bite feel festive.
The Final Flourish
Food coloring is where the magic truly happens. I recommend gel colors because they’re more concentrated, meaning you need less to achieve vivid hues, preserving the dough’s consistency. Too much liquid coloring can make the dough sticky and cause the colors to bleed. If you’re avoiding artificial dyes, try beet powder for pink, spirulina for teal, and turmeric for sunshine yellow—though the colors will be more muted, they’re completely natural.
Everything's prepped? Good. Let's get into the real action and turn these ingredients into a batch of unicorn magic that will have everyone begging for the recipe.
The Method — Step by Step
-
Start by preheating your oven to 350°F (175°C) and line two baking sheets with parchment paper. While the oven warms up, cut the butter into small cubes and let it sit at room temperature for about 10 minutes; this ensures it creams evenly without melting. The moment the butter becomes pliable, you’ll hear a faint sigh as it yields—trust that sound; it’s the beginning of buttery bliss.
Kitchen Hack: Use a stand mixer on low speed to avoid splattering; the dough will stay contained and your kitchen stays cleaner. -
In a large bowl, combine the softened butter, granulated sugar, and brown sugar. Beat them together until the mixture is light, fluffy, and a shade lighter than a sunrise—this usually takes about 3‑4 minutes. The sugar crystals will dissolve, creating tiny air pockets that later become the cookie’s delicate crumb. If the mixture looks grainy, keep mixing; the transformation is a visual cue that the sugars have fully incorporated.
-
Add the eggs one at a time, beating well after each addition, followed by the vanilla extract. The dough should become glossy and smooth, almost like a satin ribbon. This is the moment where the batter starts to feel cohesive, and you’ll notice a faint, sweet aroma rising—your nose knows you’re on the right track.
-
In a separate bowl, whisk together the flour, baking soda, and salt. Gradually add this dry mixture to the wet ingredients, mixing on low speed until just combined. Over‑mixing will develop gluten and make the cookies tough, so stop as soon as you see no streaks of flour. Watch Out: If you see a floury cloud, you’ve likely over‑mixed; the texture will suffer.
Watch Out: Adding the flour too quickly can create pockets of dry flour; sift the flour for a smoother incorporation. -
Fold in the white chocolate chips and rainbow sprinkles, reserving a handful of sprinkles for topping later. The chips should disappear into the dough, leaving only occasional glints of white—those are the pockets of future decadence. This step is quick; use a rubber spatula and turn the bowl gently to keep the colors from bleeding.
Kitchen Hack: Divide the dough into four equal parts before coloring to ensure each hue stays true and vibrant. -
Now for the color parade: add a few drops of gel food coloring to each dough portion—pink, teal, yellow, and lavender. Gently knead each portion until the color is uniformly distributed but still visible in swirls. If the dough feels sticky, sprinkle a teaspoon of flour; if it’s too dry, add a tiny splash of milk. The dough should look like a pastel marble that’s ready to be swirled.
-
Take a small scoop (about a tablespoon) of each colored dough and roll them together into a single ball, creating a rainbow‑marbled sphere. The visual of the colors intertwining is pure magic—think of a tiny galaxy captured in dough. Place the balls on the prepared baking sheets, spacing them about 2 inches apart; they’ll spread just enough to show off the swirl without merging.
-
Press the reserved sprinkles gently onto the tops of the cookies, giving each one a final sparkle. Slide the trays into the preheated oven and bake for 12‑14 minutes, or until the edges turn a light golden brown and the centers look set but still soft. The scent that fills the kitchen at this stage is unmistakable—sweet, buttery, with a hint of vanilla that makes you want to hug the oven.
-
When the timer dings, remove the cookies and let them cool on the baking sheet for 3 minutes before transferring them to a wire rack. This short rest allows the cookies to firm up just enough to handle without breaking. As they cool, the colors will set, and the sprinkles will retain their crunch, creating a visual and textural masterpiece.
-
That’s it—you did it. But hold on, I’ve got a few more tricks that’ll take this to another level, from glaze finishes to storage hacks that keep the colors bright for weeks. Ready for the next level of unicorn wizardry? Keep reading.
Insider Tricks for Flawless Results
The Temperature Rule Nobody Follows
Most bakers set the oven to 350°F and forget about it, but the secret is to preheat the oven a full 20 minutes and then lower the temperature to 325°F after the first 5 minutes of baking. This gentle reduction prevents the edges from over‑browning while allowing the center to finish cooking evenly. I once tried baking at 375°F straight through and ended up with cookie “crusts” that tasted like burnt butter—trust me, that’s a lesson learned the hard way.
Why Your Nose Knows Best
Don’t rely solely on a timer; use your sense of smell as a guide. When the cookies start releasing that caramel‑vanilla aroma, you’re about 2‑3 minutes away from perfection. If you notice a faint, nutty scent, it means the butter is caramelizing just right. This sensory checkpoint is a game‑changer for achieving that perfect golden edge without burning.
The 5‑Minute Rest That Changes Everything
After scooping the dough, let the balls rest on the counter for exactly five minutes before baking. This short pause lets the gluten relax and the colors settle, resulting in a smoother swirl and a more tender crumb. I tried skipping this step once—my cookies spread too thin and the sprinkles melted into a sugary mess. The lesson? Patience, even for five minutes, pays off.
Sprinkle Shield Technique
To keep the rainbow sprinkles from melting into the dough, lightly dust the tops with a thin layer of powdered sugar right before baking. The sugar creates a barrier that preserves the crunch and keeps the colors vivid. It also adds a subtle, melt‑in‑your‑mouth sweetness that complements the buttery base.
Freezer‑Friendly Dough Balls
Shape the colored dough into balls, flash‑freeze them on a tray for 15 minutes, then transfer to an airtight bag. When you’re ready to bake, pop them straight into the oven—no thawing needed. This method locks in the color intensity and gives you a ready‑to‑bake stash for any impromptu celebration.
Creative Twists and Variations
This recipe is a playground. Here are some of my favorite ways to switch things up:
Chocolate Overload
Swap the white chocolate chips for semi‑sweet chocolate chips and add a tablespoon of cocoa powder to each colored dough portion. The result is a richer, mocha‑infused cookie that still dazzles with its rainbow swirl. Perfect for coffee lovers who still want a pop of color.
Nutty Crunch
Fold in ½ cup of toasted chopped almonds or pistachios along with the sprinkles. The nuts add a buttery crunch that contrasts the soft cookie interior, and the green pistachios blend nicely with the teal swirl. This variation is a hit at brunch tables.
Fruit‑Infused
Add ¼ cup of dried cranberries or chopped dried apricots to the dough for a sweet‑tart surprise. The fruit pieces punctuate the buttery base with bursts of chewy texture, and the colors still pop. Just be sure to toss the fruit in a little flour before folding it in to prevent clumping.
Vegan Dream
Replace the butter with a plant‑based butter alternative and use coconut sugar instead of brown sugar. Swap the white chocolate chips for dairy‑free versions, and you’ve got a fully vegan unicorn cookie that still looks and tastes magical.
Glazed Glory
After the cookies have cooled, drizzle a simple glaze made from powdered sugar, a splash of milk, and a drop of vanilla extract. Add a pinch of edible glitter for that extra sparkle—ideal for birthday cakes or Instagram moments.
Storing and Bringing It Back to Life
Fridge Storage
Place the cooled cookies in an airtight container lined with parchment paper. Store them in the refrigerator for up to a week; the cool environment keeps the sprinkles crisp and the colors from fading. Before serving, let them sit at room temperature for 15 minutes to regain their soft texture.
Freezer Friendly
Arrange the cookies in a single layer on a baking sheet and freeze for 2 hours, then transfer to a zip‑top freezer bag. They’ll stay fresh for up to 3 months. When you’re ready to enjoy, bake them straight from the freezer at 350°F for an extra 2‑3 minutes; the extra heat revives the chewiness.
Best Reheating Method
To bring cookies back to life, preheat your oven to 300°F and warm them for 5 minutes. Add a tiny splash of water (about a teaspoon) to the baking sheet before heating; the steam restores moisture, making the cookies soft inside while keeping the edges crisp. This trick works wonders after a long storage period.