Okay, picture this: I was frantically rummaging through my pantry after a weekend of binge‑watching a cooking competition, and I realized I had a can of pineapple, a jar of cranberry sauce, and a half‑empty butter tub staring back at me like a culinary dare. I thought, “What if I turned this accidental stash into something that could out‑shine a bakery’s best‑selling upside‑down cake?” The kitchen filled with a mischievous hum, the kind you hear when a secret experiment is about to go down, and I could already smell the sweet‑tart perfume of pineapples mingling with that deep, caramelized brown sugar aroma. I’m telling you, that scent was like a siren song for my taste buds, promising a dessert that would make even the most stoic sweet‑tooth swoon.
I threw together a quick batter, but I wasn’t just tossing flour and eggs into a bowl like a lazy Sunday. I added a splash of orange zest that danced like fireworks on the tongue, and I swapped ordinary butter for a half‑cup of pure, creamy goodness that would melt into a glossy glaze. The moment the butter hit the pan and started to sizzle, I knew I was on to something—that sizzle when it hits the pan? Chef’s kiss. The caramel turned a gorgeous amber, the pineapples began to soften, and the cranberry sauce swirled in, creating a ruby‑red river that promised a burst of tangy joy with every bite.
Now, most upside‑down cake recipes get this completely wrong—they either drown the fruit in a syrupy swamp or bake a dry, flavorless sponge that can’t hold its own against the topping. I’ve cracked the code: a light, buttery cake that stays moist, a topping that’s neither too runny nor too stiff, and a balance of sweet and tart that makes your palate do a happy dance. I’ll be honest — I ate half the batch before anyone else got to try it, and that’s a confession worth sharing because it proves just how addictive this version truly is.
So, are you ready for the game‑changer? Let me walk you through every single step — by the end, you’ll wonder how you ever made it any other way. I dare you to taste this and not go back for seconds. Okay, ready for the magic? Let’s dive in.
⚡ What Makes This Version Stand Out
- Taste: The marriage of bright cranberry tang with sweet pineapple creates a flavor duet that feels like a tropical sunrise meeting a holiday sparkle.
- Texture: A buttery, tender crumb that hugs the fruit, while the caramelized topping offers a crisp edge that shatters like thin ice under a spoon.
- Simplicity: Only nine pantry staples, no fancy equipment, and a single‑pan method that saves you time and dishes.
- Uniqueness: The surprise dash of orange zest lifts the whole cake into a fragrant realm you didn’t know existed.
- Crowd Reaction: Guests instantly ask for the recipe, and you’ll hear the “wow” chorus before the first bite even hits the plate.
- Ingredient Quality: Using real canned pineapple (not the mushy kind) and a good‑quality cranberry sauce makes all the difference.
- Cooking Method: The upside‑down technique ensures the fruit stays juicy while the cake bakes evenly, giving you that classic glossy finish.
- Make‑Ahead Potential: This cake actually tastes better the next day as the flavors meld, so you can prep it ahead for a stress‑free dessert.
Alright, let's break down exactly what goes into this masterpiece...
🍋 Inside the Ingredient List
The Flavor Base
Butter (1/2 cup): This is the golden glue that binds everything together, turning the sugar into a glossy caramel that coats the pineapple and cranberries. If you skip it, you’ll end up with a dry, crumbly topping that lacks that luxurious sheen. For a richer flavor, opt for unsalted European‑style butter; its higher fat content makes the caramel smoother. Pro tip: Let the butter soften at room temperature for a minute before melting—it prevents sudden temperature shocks that can cause the sugar to seize.
Brown Sugar (1/2 cup): The deep molasses notes in brown sugar give the topping its signature amber hue and a subtle hint of caramel that whispers on the palate. Using light brown sugar keeps the flavor bright; dark brown would dominate the cranberry’s tartness. If you’re out of brown sugar, mix 1/2 cup white sugar with 1 tablespoon molasses for a DIY version that works just as well.
Granulated Sugar (1 cup): This adds sweetness and helps the caramel achieve that perfect glossy finish. Too much, and the cake could become cloyingly sweet; too little, and the topping may not set properly. A good quality cane sugar dissolves more evenly, giving you a smoother glaze.
The Texture Crew
All‑Purpose Flour (1 cup): The flour provides structure without weighing the cake down, ensuring a light, airy crumb that still holds up under the fruit’s weight. Using cake flour would make it too delicate, while bread flour would create a dense, bread‑like texture. Sift the flour with the baking powder to avoid lumps and guarantee a uniform rise.
Baking Powder (1 tsp): This is the silent hero that lifts the batter, giving the cake that subtle puff and delicate texture. Over‑baking the cake can cause the crumb to become rubbery, so trust the timer and keep an eye on the edges turning golden.
Eggs (2 large): Eggs act as the binder and add richness, creating a custardy interior that’s moist and tender. If you substitute, use 2 tablespoons of unsweetened applesauce per egg for a vegan-friendly twist, but expect a slightly different crumb.
The Unexpected Star
Orange Juice/Zest (1/4 cup): The citrus brightens the entire cake, cutting through the sweetness and amplifying the cranberry’s tang. Zest adds a fragrant oil burst that’s more aromatic than juice alone. If you’re out of fresh oranges, a splash of orange extract (¼ teaspoon) works in a pinch.
Cranberry Sauce (1 cup): This is the ruby‑red river that runs through the cake, delivering that signature tartness that balances the pineapple’s mellow sweetness. Opt for a sauce with whole cranberries for texture; a smooth puree will still taste great but lacks that little pop. When choosing a brand, look for one with minimal added corn syrup to keep the flavor authentic.
The Final Flourish
Pineapple Slices (1 can): The star of the topping, canned pineapple brings juicy sweetness and a caramelizable surface that turns into a golden crown. Drain the slices but reserve the juice—use it in a smoothie or cocktail later; don’t waste it! If you prefer fresh pineapple, slice it thinly and toss with a little sugar before arranging; the fresh version adds a brighter, more tropical aroma.
Everything's prepped? Good. Let's get into the real action...

🔥 The Method — Step by Step
Preheat your oven to 350°F (175°C). While the oven warms up, melt the butter in a 9‑inch cast‑iron skillet or a sturdy oven‑safe pan over medium heat. Once the butter is bubbling, sprinkle in the brown sugar and granulated sugar, stirring constantly until the mixture turns a deep amber and the sugar dissolves completely. This is the moment of truth—if you hear a gentle crackle, you’re on the right track.
Now, arrange the pineapple slices in a single layer on the caramel, pressing them gently so they hug the pan. Spoon the cranberry sauce over and around the pineapple, letting it cascade like a ruby waterfall. If you want a more even distribution, use a spoon to swirl the sauce in a lazy spiral. Watch out: Don’t over‑load the pan; too much fruit can cause the cake to sink in the middle.
👀 Watch Out: If the caramel starts to smoke, reduce the heat immediately—burnt sugar will give a bitter aftertaste that ruins the whole cake.In a medium bowl, whisk together the flour and baking powder. In a separate large bowl, beat the eggs until they’re light and frothy, about 1 minute. Add the orange juice (or zest plus juice) and continue whisking. This is where the magic starts to happen—the citrus aroma will fill the kitchen like a fresh‑cut orange grove.
Gradually fold the dry flour mixture into the wet egg mixture, stirring just until combined. Over‑mixing will develop gluten and make the cake tough, so stop as soon as you see no streaks of flour. Finally, gently fold in the remaining granulated sugar, which will melt into the batter during baking, adding extra caramel notes.
🪄 Kitchen Hack: Use a rubber spatula to fold the batter; it preserves air bubbles, ensuring a fluffy crumb.Pour the batter over the fruit and caramel, spreading it evenly with the spatula. The batter should gently cover the fruit without drowning it—think of a soft blanket, not a cement slab. Give the pan a slight tap on the counter to settle the batter and release any trapped air bubbles.
Place the pan in the preheated oven and bake for 30‑35 minutes, or until the top is golden brown and a toothpick inserted into the center comes out clean. Around the 20‑minute mark, you’ll notice the edges pulling away from the pan—a visual cue that the cake is done. The aroma at this stage is intoxicating, like a tropical vacation meets a holiday feast.
While the cake bakes, prepare a cooling rack and have a large serving plate ready. When the timer dings, turn off the oven but leave the door ajar for 5 minutes; this gentle cooling prevents the caramel from cracking.
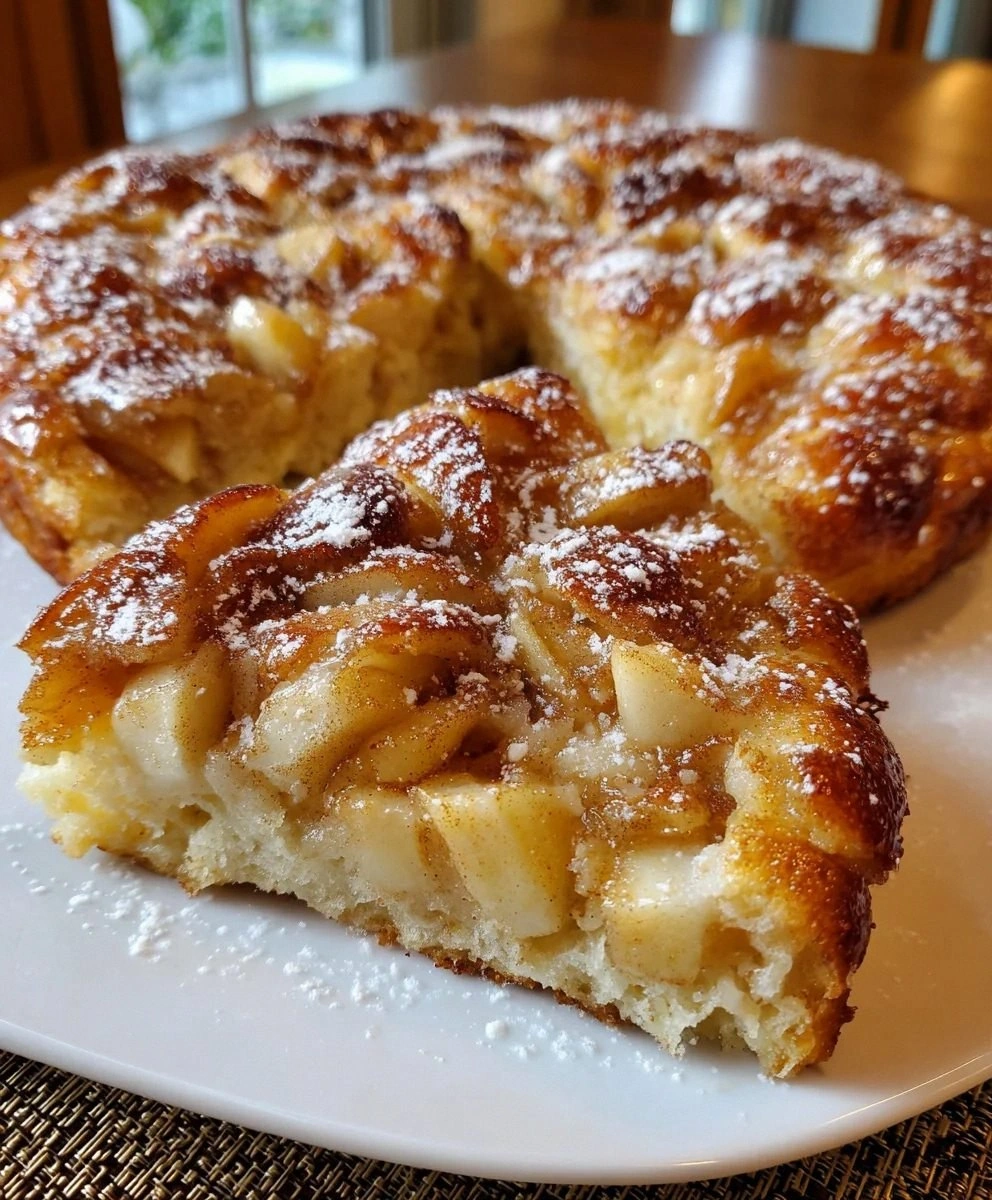
Now comes the dramatic flip: place the serving plate upside‑down over the pan, hold both firmly, and invert the cake in one swift motion. The caramel‑glazed fruit should cascade down, forming a glossy crown that looks like a sunrise over a tropical sea. If any fruit sticks, run a thin metal spatula around the edges to release it.
Let the cake rest for 10 minutes before slicing. This short pause lets the caramel set, so you won’t lose any of that gorgeous sauce when you cut. Serve warm, maybe with a dollop of whipped cream or a scoop of vanilla ice cream, and watch your guests' eyes widen in anticipation.
That's it — you did it. But hold on, I've got a few more tricks that'll take this to another level...
🏆 Insider Tricks for Flawless Results
The Temperature Rule Nobody Follows
Most home bakers crank the oven up to 375°F hoping for a quicker bake, but this cake thrives at a steady 350°F. The moderate heat lets the caramel develop without scorching, and the batter rises evenly. If you live at high altitude, add an extra 5 minutes to the bake time to compensate for lower air pressure. Trust the thermometer, not the oven dial—precision is the secret sauce.
Why Your Nose Knows Best
Your sense of smell is a far better indicator of doneness than any timer. When the caramel starts to emit a buttery, nutty fragrance and the fruit’s scent becomes fragrant rather than raw, you’re close. If you catch a faint burnt smell, pull the cake out immediately; a burnt caramel is unforgivable.
The 5‑Minute Rest That Changes Everything
After flipping, let the cake sit for exactly five minutes before cutting. This short rest allows the caramel to thicken just enough to cling to each slice, preventing a soggy bottom. I once sliced straight away and the sauce pooled on the plate—big regret. So set a timer; patience pays off in glossy, picture‑perfect slices.
Don’t Over‑Mix the Batter
Over‑mixing creates gluten strands that make the crumb dense and rubbery. Think of mixing like a gentle conversation—just enough to introduce the ingredients, then let them get along on their own. If you see flour pockets, use a rubber spatula to fold them out rather than whisking vigorously.
The Secret of the Orange Zest
A little zest goes a long way; it lifts the entire flavor profile without adding extra liquid. Grate the zest directly over the batter and give it a quick stir—this releases essential oils that perfume the cake from within. Pro tip: Use a microplane for the finest zest, which integrates seamlessly.
🎨 Creative Twists & Variations
This recipe is a playground. Here are some of my favorite ways to switch things up:
Tropical Coconut Splash
Swap half the butter for coconut oil and sprinkle toasted coconut flakes over the fruit before baking. The result is a subtle coconut aroma that pairs beautifully with pineapple, turning the cake into a mini vacation in a bite.
Spiced Autumn Version
Add a teaspoon of ground cinnamon and a pinch of ground nutmeg to the batter. The warm spices complement the cranberry’s tartness, making this variation perfect for a cozy fall gathering.
Berry‑Burst Fusion
Replace half the cranberry sauce with raspberry or strawberry preserves. The mixed berries create a vibrant color palette and a layered fruit flavor that’s both sweet and slightly tangy.
Gluten‑Free Adaptation
Use a 1:1 gluten‑free flour blend in place of all‑purpose flour. Make sure the blend contains xanthan gum to mimic the binding properties of wheat, ensuring the cake still rises nicely.
Alcohol‑Infused Elegance
Add a tablespoon of dark rum or bourbon to the batter for an adult‑only version. The spirit’s caramel notes deepen the flavor, and the alcohol evaporates during baking, leaving behind a sophisticated undertone.
Vegan Dream
Swap the butter for vegan margarine, use flax‑egg replacer (1 tbsp ground flaxseed + 3 tbsp water per egg), and choose a plant‑based orange juice. The texture remains moist, and the fruit topping stays just as vibrant.
❄️ Storing & Bringing It Back to Life
Fridge Storage
Allow the cake to cool completely, then cover it loosely with foil or a cake dome. Store in the refrigerator for up to 3 days. The caramel may thicken; gently reheat a slice in the microwave for 15 seconds to soften it before serving.
Freezer Friendly
Wrap individual slices tightly in plastic wrap, then place them in a freezer‑safe zip‑top bag. Freeze for up to 2 months. To revive, let a slice thaw at room temperature for 20 minutes, then microwave for 20‑30 seconds with a splash of water to steam it back to life.
Best Reheating Method
Preheat your oven to 300°F (150°C). Place the whole cake (or slices) on a baking sheet and warm for 8‑10 minutes. Adding a tiny splash of water to the pan creates steam, which keeps the cake moist while the caramel regains its glossy sheen.