I remember the night I was scrambling to salvage a dinner that had gone catastrophically wrong. I had accidentally overcooked a batch of ground turkey, leaving it dry and flavorless, and the whole kitchen smelled like regret. In that moment, I reached for a jar of lemon zest, a splash of olive oil, and a handful of fresh herbs, and the air turned electric with possibility. That instant sparked the creation of what I now call the Easy Lemon Herb Turkey Skillet, a dish that turns humble ground turkey into a vibrant, juicy masterpiece. I dare you to taste this and not go back for seconds, because the flavor punch will leave you craving more.
Picture yourself pulling this out of the skillet, the whole kitchen smelling incredible, the aroma of lemon and rosemary dancing around the room. The sizzling sound when the turkey hits the pan is absolute perfection, and the bright colors of bell peppers and cherry tomatoes promise a feast for the eyes. I’ve spent years experimenting with flavor pairings, and this combination is hands down the best version you'll ever make at home. The citrus tang cuts through the richness of the meat, while the herbs add depth and a subtle earthiness that feels like a hug. The result is a dish that feels both comforting and adventurous, a culinary win that will impress even the most discerning palate.
Why does this version stand out from every other recipe out there? Because it balances simplicity with bold flavor, using ingredients that are usually on hand yet rarely combined so effectively. The technique of browning the turkey first, then deglazing with lemon juice, locks in moisture and creates a savory glaze that coats the vegetables like velvet. The final touch of fresh parsley gives a pop of color and a burst of freshness that lifts the entire dish. I’ll be honest — I ate half the batch before anyone else got to try it, and the leftovers still taste as good as the first serving. If you've ever struggled with ground turkey, you're not alone — and I've got the fix that turns it into a showstopper.
Most recipes get this completely wrong, focusing on dry, bland meat or overcomplicating the sauce. Here’s what actually works: cook the turkey until it's nicely browned, then add the aromatics in the right order to build layers of flavor. The lemon zest should be added early to release its oils, and the juice should be poured in after the turkey is browned to create a bright, acidic glaze. The vegetables are tossed in last, allowing them to soften without losing their crunch. This method keeps the dish light yet satisfying, with a texture that feels both tender and crisp.
And now the fun part. The next section will break down exactly what goes into this masterpiece, from the flavor base to the final flourish. You'll learn why each ingredient matters, what happens if you skip it, and how to swap for different tastes or dietary needs. By the end, you'll wonder how you ever made it any other way. Stay with me here — this is worth it. Let me walk you through every single step — by the end, you'll wonder how you ever made it any other way.
What Makes This Version Stand Out
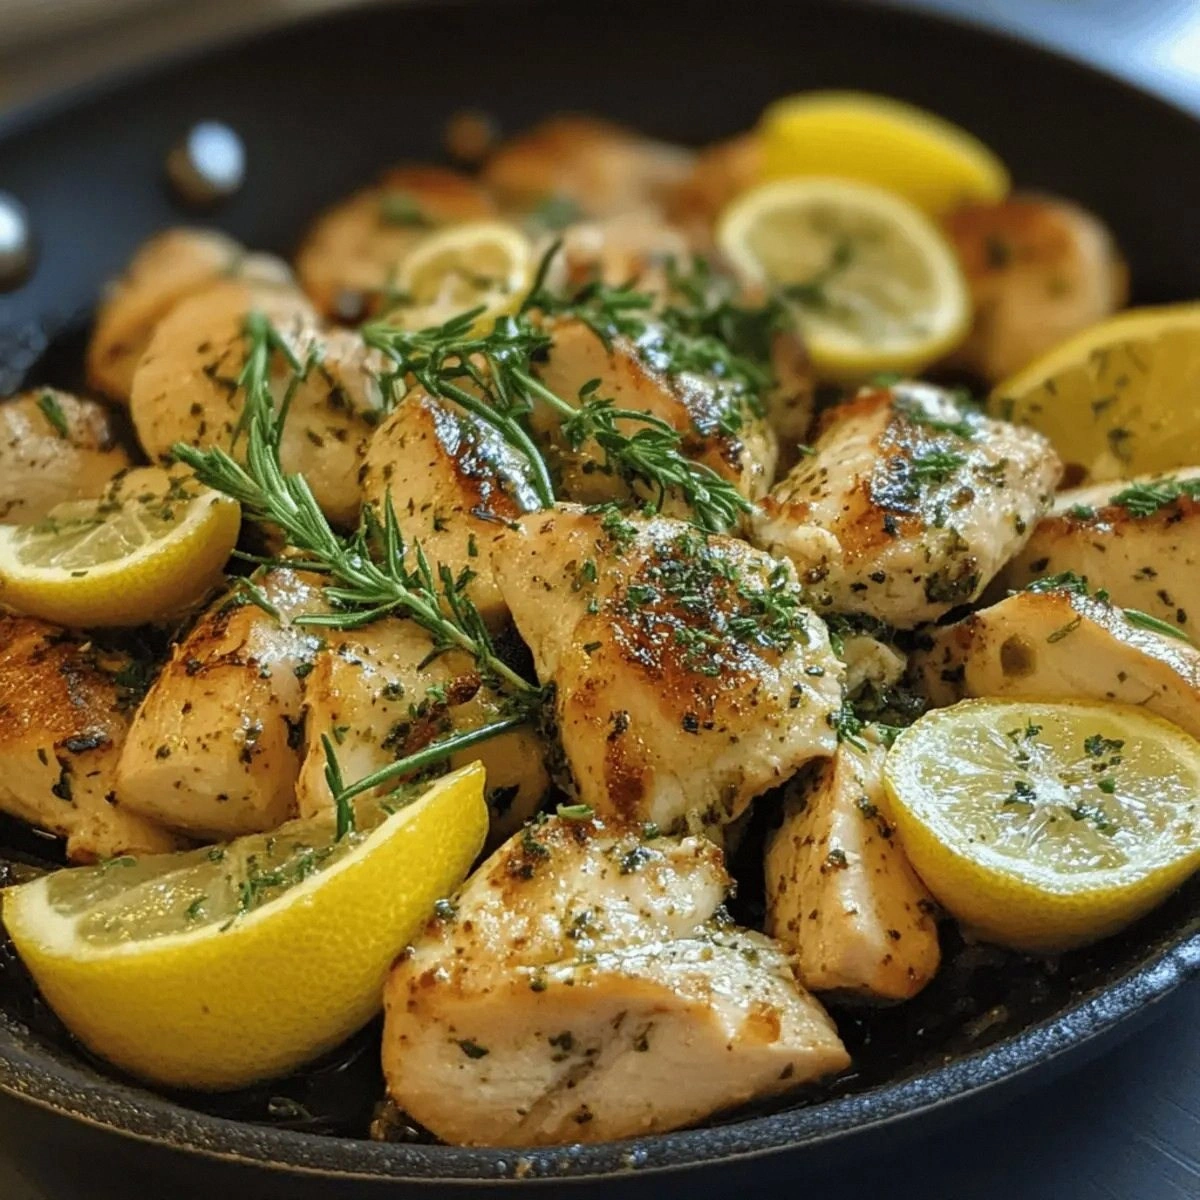
- Flavor: The bright lemon zest and juice create a citrusy backbone that lifts the savory turkey, while fresh thyme and rosemary add aromatic depth. The result is a sauce that coats the skillet like velvet, delivering a burst of freshness with every bite.
- Texture: The turkey is browned to a golden crisp on the outside, yet remains juicy inside, thanks to the quick sear and the deglazing technique. The vegetables maintain a satisfying bite, with bell peppers crisp and spinach wilting just enough to release its natural sweetness.
- Simplicity: With only a handful of pantry staples and fresh herbs, you can whip up a gourmet meal in under 30 minutes. No special equipment required—just a skillet and a good sense of timing.
- Uniqueness: The combination of lemon, herbs, and a splash of olive oil is a twist on classic turkey skillet recipes, giving it a Mediterranean flair that sets it apart from the usual comfort food.
- Crowd Reaction: Friends and family always ask for the recipe after the first plate, and the dish is a hit at gatherings. The bright colors and aromatic scent alone make it a conversation starter.
- Ingredient Quality: Using fresh herbs instead of dried elevates the flavor profile, and a good olive oil adds a silky mouthfeel that enhances every component.
- Cooking Method: The stepwise approach—browning, deglazing, and finishing with vegetables—ensures each element is cooked to perfection, avoiding the common pitfalls of overcooked turkey.
- Make‑Ahead Potential: This skillet can be prepared ahead and reheated without losing its vibrant flavors, making it perfect for busy weeknights or meal prep.
Alright, let's break down exactly what goes into this masterpiece. The next section will guide you through the ingredient groups and why each one matters.
Inside the Ingredient List
The Flavor Base
Ground turkey is the star, offering lean protein with a neutral canvas that takes on any seasoning. Using 1 lb ensures a generous portion that stays juicy when cooked properly. If you skip the turkey, you lose the hearty foundation that balances the bright vegetables. For a vegetarian twist, replace it with crumbled tofu or a plant-based ground meat alternative.
Lemon zest is the first aromatic that sets the dish al fresco. It releases essential oils that infuse the turkey with a bright, citrusy aroma. Skipping the zest would result in a flatter, more one-dimensional flavor. When choosing a lemon, look for one that feels slightly heavy for its size; this indicates juiciness and more zest.
Lemon juice provides acidity that cuts through the richness of the turkey and brightens the entire skillet. A splash of 2 tbsp is enough to coat the meat without overwhelming it. If you prefer a milder taste, reduce the juice to 1 tbsp but keep the zest for that citrus punch. Freshly squeezed juice always beats bottled for the best flavor.
Garlic cloves add depth and warmth, pairing beautifully with the lemon and herbs. Crushing the cloves before adding releases more flavor than minced. If you’re sensitive to garlic, use a smaller amount or opt for roasted garlic for a sweeter note.
The Texture Crew
Fresh thyme and rosemary bring an earthy aroma that complements the citrus. The combination of 1 tbsp each creates a balanced herbaceous profile. If you’re short on thyme, use dried thyme but reduce the quantity by half to avoid overpowering the dish.
Olive oil is the medium that brings everything together, helping the turkey brown evenly and preventing sticking. A tablespoon is enough to coat the skillet and enhance the flavors. For a lighter version, substitute half of the olive oil with a neutral oil like grapeseed.
Salt and black pepper are essential for seasoning the meat and vegetables. The 1 tsp each is a baseline; adjust to taste if you prefer a saltier or spicier profile. If you’re watching sodium, use a salt substitute or reduce the amount to ½ tsp.
The Unexpected Star
Bell peppers add a sweet crunch and a splash of color that makes the skillet visually appealing. One cup chopped into bite-sized pieces keeps them from turning mushy. If you’re in a pinch, any colorful pepper works—red, yellow, or orange will add a different hue and sweetness.
Cherry tomatoes burst with juicy sweetness, cutting through the savory turkey and herbs. One cup provides a balanced contrast to the bell peppers. If you’re out of cherry tomatoes, small grape tomatoes or even diced regular tomatoes can work, though the texture may differ slightly.
The Final Flourish
Baby spinach is the leafy green that adds a tender, earthy element. Two cups of spinach wilt quickly, absorbing the lemony glaze and becoming silky. If you prefer a heartier green, use chopped kale or collard greens, but adjust the cooking time accordingly.
Red onion provides a sharp bite that balances the sweetness of the peppers and tomatoes. One medium onion, sliced thinly, caramelizes slightly, adding depth. If you dislike onions, substitute with scallions or skip it entirely; the dish will still shine.
Fresh parsley is the final garnish that adds a bright, herbaceous finish. A tablespoon chopped adds a pop of green and a subtle peppery note. If you’re allergic to parsley, dill or cilantro can serve as alternatives, each offering a unique twist.
Everything's prepped? Good. Let's get into the real action.
The Method — Step by Step
- Heat a large skillet over medium-high heat and add the tablespoon of olive oil. Let the oil shimmer but not smoke; this indicates the right temperature. As the oil heats, the pan should feel warm to the touch, which is the sweet spot for browning.
- Add the ground turkey in a single layer, breaking it apart with a spatula. Resist the urge to stir constantly; allow it to sear for 3-4 minutes on one side. The moment the edges start to brown, it’s time to flip and continue until evenly browned.
- Once the turkey is browned, sprinkle the minced garlic, fresh thyme, and rosemary over the meat. The herbs will release their oils, creating a fragrant base. Sauté for 30 seconds, just enough to let the garlic soften without burning.
- Deglaze the pan by pouring in the 2 tablespoons of lemon juice. Scrape the bottom of the skillet with a wooden spoon to lift all the flavorful browned bits. The liquid should sizzle and reduce slightly, forming a bright glaze.
- Add the chopped red onion, bell peppers, and cherry tomatoes to the skillet. Stir to combine, ensuring the vegetables are coated in the lemony sauce. Cook for 4-5 minutes, allowing the peppers to soften but still retain a crisp bite.
- Toss in the 2 cups of baby spinach, covering it with the sauce. The spinach will wilt quickly, absorbing the citrusy flavors. Stir until the spinach is just tender, about 1-2 minutes.
- Season the skillet with 1 teaspoon each of salt and black pepper. Taste and adjust the seasoning if needed; the lemon will brighten the saltiness.
- Finish the dish by adding the 1 tablespoon of lemon zest and the chopped parsley. Stir gently to distribute the zest and parsley evenly. The final aroma should be bright, herbaceous, and inviting.
- Turn off the heat, cover the skillet for 2 minutes, and let the flavors meld. This resting period allows the juices to redistribute and the herbs to settle.
- Serve hot, spooning the mixture into bowls or onto plates. Garnish with extra parsley if desired and pair with crusty bread or a side of quinoa for a complete meal.
That's it — you did it. But hold on, I've got a few more tricks that'll take this to another level. These insider tips will help you avoid common pitfalls and elevate the dish to a professional standard.
Insider Tricks for Flawless Results
The Temperature Rule Nobody Follows
Many cooks try to keep the heat low to avoid burning, but this actually leads to a soggy turkey. The right approach is to start with a hot pan, letting the oil shimmer, and then adjust to medium if the turkey begins to smoke. This ensures a caramelized crust that locks in juices. If you’re using a cast iron skillet, preheat it for a full 5 minutes before adding oil.
Why Your Nose Knows Best
Smell is your secret weapon; a bright, citrusy scent means the lemon is properly integrated. If the aroma feels flat, give the skillet a quick stir to redistribute the juices. The nose can detect subtle flavor imbalances before your taste buds do, guiding you to tweak seasoning on the fly.
The 5-Minute Rest That Changes Everything
Covering the skillet for 2 minutes after cooking allows the flavors to meld and the juices to redistribute. This resting period is critical; if you cut into the dish immediately, the juices will spill out, leaving a drier result. Think of it as letting the flavors settle like a well-mixed smoothie before pouring.
The Secret to Juicy Turkey
Ground turkey can dry out quickly if overcooked. To keep it moist, avoid pressing the meat together; instead, let it cook in its own juices. Adding a splash of water or broth during the first minute of cooking can also help maintain moisture.
Balancing Acidity with Fat
The lemon juice adds bright acidity, but without enough fat it can feel sharp. The olive oil not only prevents sticking but also softens the citrus bite, creating a balanced, harmonious flavor. If you prefer a lighter version, use half the olive oil and add a tablespoon of Greek yogurt at the end for creaminess.
The Perfect Plate Presentation
Serve the skillet dish directly on a rustic wooden board or a cast iron skillet for an authentic look. Garnish with a few fresh parsley leaves and a wedge of lemon on the side. This visual appeal elevates the eating experience and makes the dish Instagram-worthy.
Creative Twists and Variations
This recipe is a playground. Here are some of my favorite ways to switch things up:
Spicy Kick
Add a pinch of red pepper flakes or a sliced jalapeño during the sauté. The heat pairs nicely with the citrus, creating a bold, vibrant flavor. This variation is perfect for those who love a little fire in their meals.
Mediterranean Bowl
Serve the skillet mixture over a bed of couscous or quinoa, and drizzle with a dollop of tzatziki. The cool yogurt balances the citrusy heat, while the grains provide a hearty base. This version is ideal for a wholesome, Mediterranean-inspired dinner.
Cheesy Finale
Sprinkle shredded mozzarella or feta over the top during the last minute of cooking. The cheese melts into the sauce, adding a creamy texture that contrasts with the bright lemon. This twist turns the dish into a comforting, melty delight.
Vegan Version
Replace the ground turkey with crumbled tempeh or a plant-based ground meat alternative. Use a vegan olive oil and ensure all herbs are fresh. The result is a protein-packed, plant-friendly meal that still delivers the same citrusy zing.
Breakfast Boost
Add a couple of eggs, either fried or scrambled, on top of the skillet mixture. The yolk adds richness and a silky texture that complements the bright flavors. This variation makes for a hearty, protein-rich breakfast.
Summer Salad
Cool the skillet mixture and toss it with mixed greens, a drizzle of olive oil, and a splash of balsamic vinegar. The lemon and herbs bring a fresh, summery feel that pairs well with a light salad. This version is ideal for a quick, refreshing lunch.
Storing and Bringing It Back to Life
Fridge Storage
Cool the skillet dish to room temperature, then transfer to an airtight container. Store in the refrigerator for up to 3 days. The flavors will continue to meld, making the dish even more delicious the next day.
Freezer Friendly
Place the cooled dish in a freezer-safe container or zip-top bag. It can be frozen for up to 2 months. When reheating, thaw overnight in the refrigerator to maintain texture.
Best Reheating Method
Reheat in a skillet over medium heat, adding a splash of water or broth to prevent drying out. Stir occasionally until heated through. The tiny splash of liquid will steam the dish back to its original juicy state.