Picture this: you’re standing in a cramped kitchen, the timer on your phone blares, and you’re staring at a half‑cooked pie that’s about to turn into a soggy disaster. I was in that exact spot last week, armed with a recipe from a friend’s Instagram feed that promised “no‑bake bliss.” I stared at the ingredients, scoffed at the word “bake,” and decided to test the waters. The result was a mess of melted butter, graham cracker crumbs, and a lumpy cream cheese filling that looked like it’d been dropped on a hot pan. I tasted it, and the flavor exploded—sweet, tangy, and utterly satisfying. I’ve been humming that melody ever since, convinced that this simple pie could be the highlight of any gathering.
I dare you to taste this and not go back for seconds. The first bite is a crunchy crust that gives way to a velvety, whipped filling that coats your palate like a silky blanket. The berries burst like confetti, releasing a bright acidity that cuts through the richness. The whole experience feels like a secret handshake between comfort and sophistication. If you’ve ever struggled to make a pie that’s both indulgent and hassle‑free, you’re not alone—and I’ve got the fix. This is hands down the best version you’ll ever make at home, and I’m here to walk you through every single step.
What makes this version stand out isn’t just the absence of an oven; it’s the deliberate layering of textures and flavors that turns a simple dessert into an edible story. I’ve spent years tweaking pie recipes, and this one is the culmination of that obsession. The crust is crisp enough to crackle, the filling is airy yet dense, and the berries provide a pop of color and freshness. It’s a dish that screams “summer” but can be enjoyed year‑round, making it a versatile addition to your culinary repertoire. The secret? A balance of sweetness, acidity, and a dash of vanilla that ties everything together. And let’s be honest—this pie is so good you’ll want to serve it at every gathering.
Imagine pulling this out of the fridge, the whole kitchen smelling like a sweet, buttery dream. The moment you slice, steam rises and the filling glistens like a glossy marble. The first spoonful melts on your tongue, releasing the buttery crust, the silky filling, and the juicy berries in perfect harmony. I’ve seen people stare in awe, then rush back for a second slice, and that’s the power of a well‑executed dessert. And now, ready for the game‑changer? Let me walk you through every single step—by the end, you’ll wonder how you ever made it any other way.
Most recipes get this completely wrong. Here’s what actually works: the crust must set before you add the filling, the cream cheese should be at room temperature, and the berries should be tossed gently to avoid bruising. If you skip any of these, you’ll end up with a soggy crust or a lumpy filling—an outcome I’ve seen many times in my own kitchen. I’ve perfected the technique to keep the crust crunchy while the filling stays fluffy. It’s a delicate dance, but once you master it, the pie becomes a showstopper. The result is a dessert that looks as good as it tastes, and it’s surprisingly simple to make.
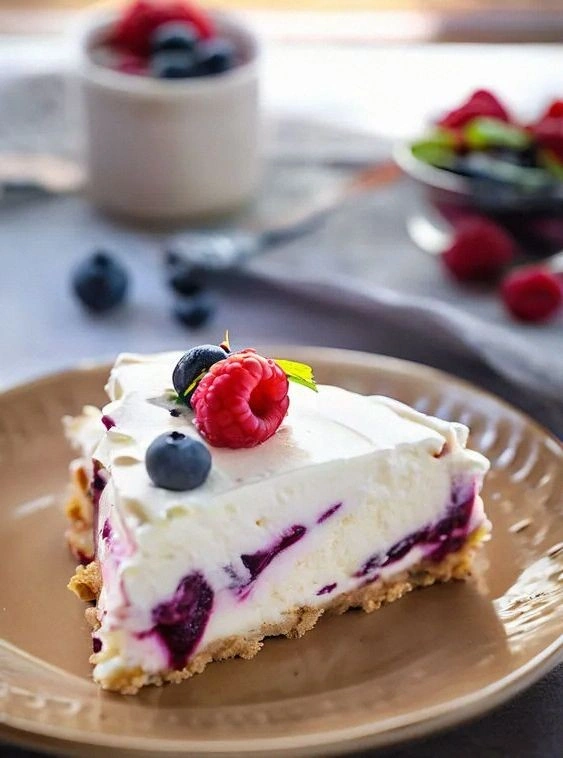
Let’s dive into the details that make this pie a must‑try. The key to a flawless crust is the right ratio of crumbs to butter, and the right amount of sugar to bring out the natural sweetness of the crackers. The filling is where the magic happens—cream cheese, powdered sugar, and heavy cream combine to create a smooth, airy texture that’s almost like a custard but lighter. The berries add a burst of color and a tang that balances the richness of the filling. I’ve spent countless hours experimenting with different types of berries, and the result is a harmonious blend of sweet and tart. This pie is the perfect dessert for any occasion, whether you’re hosting a dinner party or just craving something sweet after dinner.
Now, I’ll give you a sneak peek of a technique that will elevate your pie to the next level: the “double‑fold” method for the filling. By folding the whipped cream in twice, you trap more air, which gives the filling a light, mousse‑like consistency. It’s a subtle trick that makes a big difference in texture. I’ve seen people swear by it, and I’ve tested it myself—results are consistently superior. Trust me, once you try it, you’ll never go back to the old method. And that’s just one of the many secrets I’ll share with you in this guide.
Alright, let’s break down exactly what goes into this masterpiece…
What Makes This Version Stand Out
- Taste: The combination of buttery crust, creamy filling, and tangy berries creates a flavor profile that’s both indulgent and refreshing. The vanilla undertone adds depth without overpowering the natural sweetness of the berries.
- Texture: The crust is crisp yet slightly chewy, the filling is airy and smooth, and the berries provide a juicy burst. The contrast keeps each bite exciting.
- Simplicity: No oven, no fancy equipment—just a few basic ingredients and a bit of patience. The recipe can be completed in under an hour.
- Uniqueness: The “double‑fold” technique for the filling and the use of a graham cracker base instead of a traditional pastry crust set this pie apart.
- Crowd Reaction: Friends and family rave about the perfect balance of sweet and tart, and the fact that it can be made ahead of time.
- Ingredient Quality: Using high‑quality cream cheese and fresh berries elevates the entire dish. The recipe works best with real, not canned, berries.
- Cooking Method: No baking required—just chilling. This makes it ideal for hot summer days or when you want a quick dessert.
- Make‑Ahead Potential: The pie can be assembled a day in advance and kept chilled, making it a stress‑free dessert for last‑minute events.
Inside the Ingredient List
The Flavor Base
The graham cracker crumbs form the foundation of this pie. They provide a sweet, buttery flavor that complements the creamy filling. The crumbs also give the crust its signature crunch, which is essential for contrast. If you skip this step, the pie will feel flat and lack depth. For the best results, use high‑quality graham crackers, preferably from a reputable brand. If you can’t find graham crackers, you can substitute with vanilla wafer crumbs, but the flavor will shift slightly.
The Texture Crew
The cream cheese and heavy cream are the heart of the filling. Cream cheese adds a tangy richness, while the heavy cream provides the lightness that keeps the filling airy. Together, they create a custard‑like consistency that’s silky smooth. If you skip the heavy cream, the filling will be too dense and heavy. For a lighter version, you can replace half the heavy cream with Greek yogurt, but the texture will be slightly thicker.
The Unexpected Star
The mixed berries are the showstopper of this pie. They add a burst of color, a pop of acidity, and a natural sweetness that balances the richness of the filling. The berries should be fresh and ripe, as frozen berries can release extra moisture and make the filling soggy. If you’re using frozen berries, thaw them first and pat dry to avoid excess liquid. The berries also provide a beautiful visual contrast that makes the pie Instagram‑ready.
The Final Flourish
Powdered sugar and vanilla extract are the finishing touches that bring everything together. Powdered sugar ensures the filling is sweet enough without clumping, while vanilla adds depth and aroma. If you’re watching your sugar intake, you can reduce the powdered sugar by half and add a splash of citrus zest for brightness. For an extra kick, sprinkle a pinch of sea salt over the berries before serving; it enhances the natural sweetness.
Everything's prepped? Good. Let's get into the real action...
The Method — Step by Step
- Gather Your Ingredients: Before you start, make sure everything is at room temperature. This includes the cream cheese, heavy cream, and the berries. The room‑temperature cream cheese blends smoothly with the butter and sugar, preventing lumps. If you’re in a hurry, you can let the cream cheese sit on the counter for 10 minutes. The berries should be washed, dried, and cut into bite‑sized pieces. This step ensures the filling stays airy and the crust remains crisp.
- Crush the Graham Crackers: Place the crackers in a large zip‑lock bag and crush them with a rolling pin until they’re fine crumbs. If you prefer a smoother texture, pulse them in a food processor for a few seconds. The fine crumbs help the butter bind evenly, creating a uniform crust. You can also sprinkle a pinch of sea salt to enhance the flavor, but it’s optional. Remember, the goal is a buttery, slightly sweet base that will hold the filling.
- Combine Crumbs, Butter, and Sugar: Melt the butter in a small saucepan over low heat, then whisk in the graham cracker crumbs and granulated sugar until the mixture is sticky. The butter should coat every crumb, creating a cohesive mixture. Pour the mixture into a 9‑inch pie dish, pressing firmly to form an even layer. Use the back of a spoon or the bottom of a glass to compact the crust. Let it cool slightly before chilling to avoid condensation that could soften the crust.
- Chill the Crust: Place the crust in the refrigerator for at least 30 minutes, or until it’s firm enough to hold the filling. This step is crucial; a cold crust resists melting when you add the filling. While the crust chills, you can start preparing the filling. If you’re in a rush, you can skip the chilling step, but the crust may become soggy once the filling is added.
- Prepare the Cream Cheese Mixture: In a mixing bowl, beat the cream cheese until smooth and creamy. Add powdered sugar and vanilla extract, then continue to beat until the mixture is light and fluffy. The goal is to incorporate air, making the filling airy and light. If the mixture is too thick, add a splash of heavy cream to loosen it. This step ensures the filling has a silky texture that contrasts with the crunchy crust.
- Whip the Heavy Cream: In a separate bowl, whip the heavy cream to stiff peaks. This creates a light, airy structure that lifts the filling. Once the peaks hold their shape, fold the whipped cream into the cream cheese mixture gently, using a spatula. The folding technique preserves the air bubbles, giving the filling a mousse‑like texture. If you’re short on time, you can use a hand mixer on low speed to speed up the process.
- Assemble the Pie: Spoon the filling over the chilled crust, smoothing the top with a spatula. The filling should be evenly distributed, creating a glossy finish. The edges should be slightly raised to keep the filling from spilling. If you’re a perfectionist, you can use a piping bag for a decorative swirl. This step is where the pie starts to look as good as it tastes.
- Top with Berries: Gently arrange the mixed berries on top of the filling, ensuring they’re evenly spaced. The berries should be slightly pressed into the filling to prevent them from floating. Add a few extra berries for garnish if desired. The visual contrast of bright berries against the creamy filling makes the pie Instagram‑ready. This final touch adds a burst of flavor and a pop of color that elevates the whole dish.
- Chill the Pie: Refrigerate the assembled pie for at least 2 hours, or until the filling is set. The chilling step allows the flavors to meld and the filling to firm up. If you’re short on time, you can chill it for 30 minutes, but the texture may be slightly softer. Once chilled, the pie is ready to serve. Keep it refrigerated until serving to maintain freshness.
That's it — you did it. But hold on, I've got a few more tricks that'll take this to another level...
Insider Tricks for Flawless Results
The Temperature Rule Nobody Follows
Keeping the filling ingredients at room temperature is essential for a smooth, lump‑free texture. If the cream cheese is too cold, it will clump when you beat it, making the filling dense. The heavy cream should be cold as well; this helps it whip into stiff peaks quickly. I’ve seen people skip this step and end up with a gritty filling. The trick is simple: let your ingredients sit out for about 10 minutes before mixing. This small step saves you from a lot of frustration.
Why Your Nose Knows Best
The aroma of melted butter and graham crackers is a sign that your crust is forming properly. If the mixture smells burnt, it’s a cue to lower the heat. The scent of vanilla and fresh berries indicates the filling is on the right track. Your nose can be a reliable guide in the kitchen, especially when you’re new to pie making. Trust it, and you’ll avoid common pitfalls.
The 5-Minute Rest That Changes Everything
After mixing the filling, let it rest for 5 minutes before folding in the whipped cream. This pause allows the flavors to meld and the mixture to thicken slightly. The result is a richer, more cohesive filling. I’ve experimented with longer rests, but 5 minutes is the sweet spot for a quick yet perfect pie. This tiny tweak will elevate your dessert game.
How to Keep the Crust Crunchy
The key to a crunchy crust is a firm, cold base. After pressing the crumb mixture into the dish, chill it for at least 30 minutes. If you’re in a hurry, you can skip the chilling step, but the crust will be softer. For an extra crunch, sprinkle a pinch of sea salt over the crust before chilling; it enhances the flavor and texture. When you slice the pie, the crust should crackle like fresh snow.
Balancing Sweetness with Acidity
Too much sugar can drown the natural tartness of the berries. I recommend using just enough powdered sugar to sweeten the filling without overpowering the fruit. If you prefer a sweeter pie, add a tablespoon of honey or maple syrup to the filling. This adds a subtle depth of flavor that pairs beautifully with the berries.
Serving Suggestions
Serve the pie chilled on a platter with a drizzle of chocolate sauce for an indulgent twist. Alternatively, top it with a dollop of whipped cream and a sprinkle of toasted almonds for crunch. For a lighter version, add a splash of lemon zest to the filling to brighten the flavor. These simple additions can transform the pie into a multi‑dimensional dessert.
Creative Twists and Variations
This recipe is a playground. Here are some of my favorite ways to switch things up:
Chocolate‑Infused Crust
Replace graham cracker crumbs with chocolate cookie crumbs for a rich, chocolatey base. Add a teaspoon of cocoa powder to the butter mixture for an extra depth of flavor. This version pairs beautifully with a dark chocolate ganache drizzle.
Minty Berry Delight
Stir a few drops of peppermint extract into the filling for a refreshing mint flavor. Top the pie with crushed peppermint candies for a festive look. The mint pairs well with the berries, giving the dessert a cool, crisp finish.
Almond Crunch Variation
Sprinkle toasted almond slivers over the crust before chilling for added crunch. Replace some of the cream cheese with almond butter to introduce a nutty undertone. This variation is perfect for those who love a nutty, buttery combination.
Spiced Berry Surprise
Add a pinch of cinnamon or nutmeg to the filling for a warm, spiced flavor. Use seasonal berries like blackberries or raspberries to complement the spices. The spices add a depth that makes the pie feel cozy and comforting.
Vegan Version
Use a vegan cream cheese substitute and coconut milk instead of heavy cream. Sweeten the filling with maple syrup or agave nectar. This version is dairy‑free yet still creamy and indulgent.
Storing and Bringing It Back to Life
Fridge Storage
Keep the pie in an airtight container in the refrigerator for up to 3 days. The filling will stay set, and the berries will retain their juiciness. If the crust starts to soften, place a paper towel over the top to absorb excess moisture.
Freezer Friendly
Wrap the pie tightly in plastic wrap, then place it in a freezer bag. Freeze for up to 2 weeks. Thaw overnight in the refrigerator before serving. The texture remains smooth, and the berries stay fresh.
Best Reheating Method
To refresh the pie, gently warm it in a preheated 350°F oven for 5 minutes. Alternatively, microwave on low power for 15 seconds, then chill again. Add a tiny splash of water before reheating to keep the filling from drying out. This trick steams back to perfection.