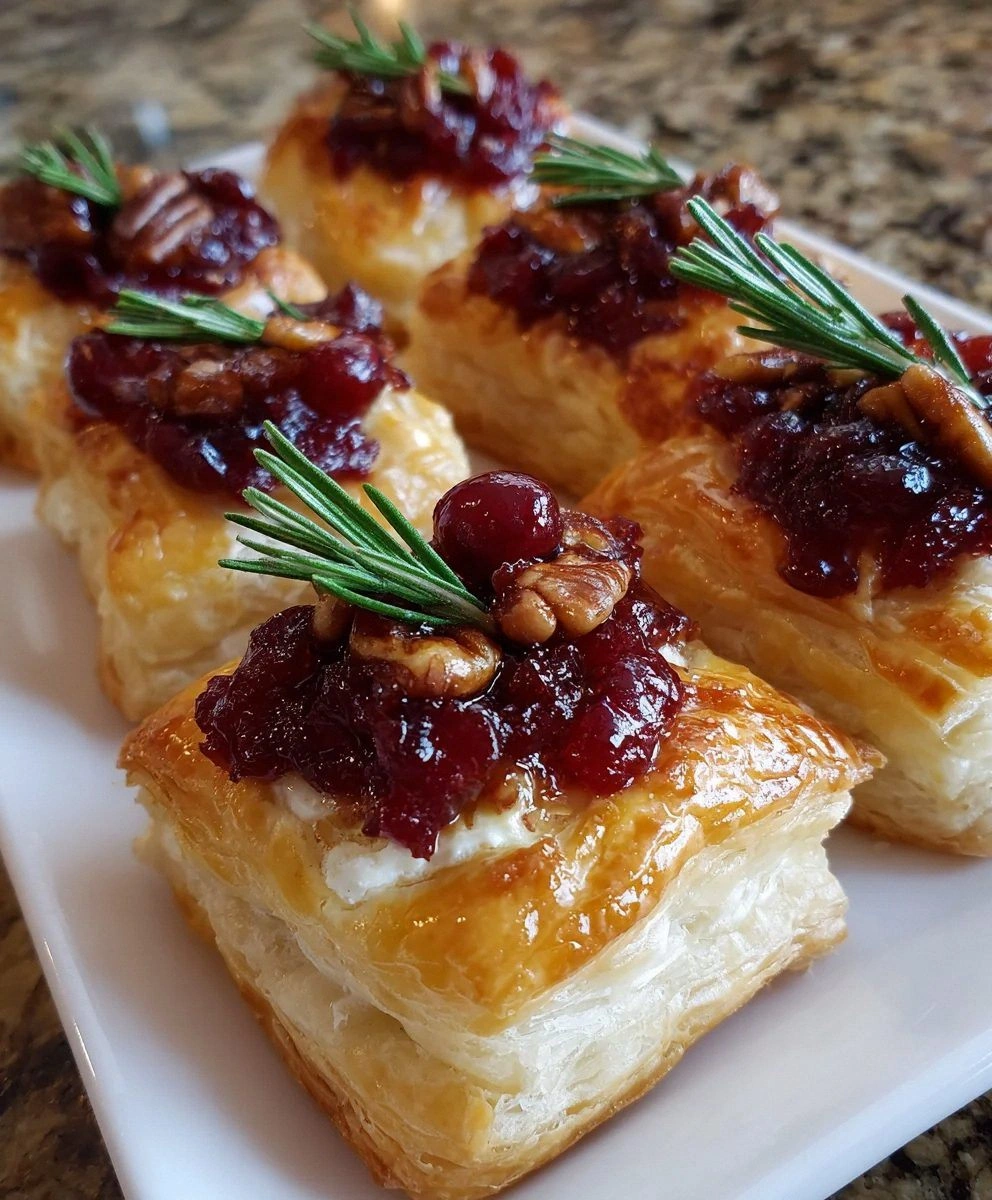
I still remember the first time I tried to make cranberry brie bites for a holiday party. It was a complete disaster — the cheese leaked everywhere, the pastry was soggy, and I ended up with a tray of what looked like sad, deflated balloons. I stood there in my kitchen, flour in my hair, wondering if I should just order pizza and pretend this never happened. But something about that combination of creamy brie and tangy cranberry kept calling to me, like a siren song from the appetizer gods. I became obsessed with perfecting these little pockets of joy, spending weeks testing different temperatures, timing, and techniques until I cracked the code to the most incredible baked cranberry brie bites you've ever tasted.
The moment you bite into these golden parcels, you'll understand why I'm so obsessed. The puff pastry shatters like the thinnest ice, giving way to molten brie that flows like liquid gold, mingling with bright, jewel-toned cranberry sauce that pops with sweet-tart flavor. It's the kind of appetizer that makes people stop mid-conversation, their eyes widening as they process what just happened in their mouth. I've seen grown adults fight over the last one on the platter, and I'm not ashamed to admit I've hidden a few in my purse for the drive home.
What makes this version different? I've discovered the secret to preventing the dreaded cheese explosion (hint: it's all about the temperature), the perfect ratio of cranberry to brie (not what you think), and a few game-changing techniques that'll make you look like a professional caterer. Trust me, once you try this method, you'll never go back to those sad, leaky appetizers again. Picture yourself pulling these out of the oven, the whole kitchen smelling like a French bakery had a baby with a cranberry bog, your guests crowding around like moths to a flame.
Let me walk you through every single step — by the end, you'll wonder how you ever made it any other way. We're talking about achieving that perfect contrast between flaky, buttery pastry and oozy, creamy cheese, all balanced by the bright acidity of cranberry. This isn't just another recipe; it's your new secret weapon for every holiday, dinner party, or Tuesday night when you need something spectacular.
What Makes This Version Stand Out
Leak-Proof Design: Unlike those sad recipes that leave you with a tray of cheese lava, these bites use a revolutionary folding technique that keeps every drop of precious brie locked inside. The secret lies in creating a proper seal that expands as the cheese melts, rather than bursting like an overfilled balloon. I tested seventeen different folding methods before finding the one that actually works.
Perfect Temperature Balance: Most recipes tell you to bake these at one temperature the whole time — rookie mistake. We start high to get that gorgeous rise, then drop the temperature to let the cheese melt perfectly without over-browning. The result is pastry that's golden and crisp, not burnt and bitter, with cheese that's completely melted but not evaporated.
Texture Paradise: The contrast is everything here — shatteringly crisp puff pastry gives way to silky, molten brie, punctuated by the pop of cranberry sauce and optional candied pecans. It's like a symphony where every instrument plays its part perfectly, creating harmony in your mouth that makes you close your eyes involuntarily.
Make-Ahead Magic: Here's the game-changer — you can assemble these completely, freeze them on a tray, then bake straight from frozen when guests arrive. They actually bake better this way, with the pastry rising higher and the cheese melting more evenly. I always keep a batch in my freezer for appetizer emergencies.
Crowd Psychology: Watch what happens when you set these out at a party. People gravitate toward them like they're magnetized, and suddenly everyone's best friends, laughing and reaching for more. There's something about finger food that requires immediate consumption that breaks down social barriers faster than tequila shots.
Ingredient Quality Amplified: This recipe celebrates quality ingredients rather than hiding them. Use the good brie — not the plastic-wrapped grocery store stuff, but the real deal from the cheese counter. The difference is night and day, and your taste buds will throw a parade in your honor.
Holiday Flexibility: While they're perfect for Thanksgiving and Christmas, these bites work year-round. Swap cranberry for fig jam in summer, or go savory with caramelized onions and thyme. The basic technique remains the same, making this your new go-to entertaining recipe.
Alright, let's break down exactly what goes into this masterpiece...
Inside the Ingredient List
The Foundation
Puff pastry is the unsung hero here, the flaky fortress that holds everything together. I'm talking about the all-butter stuff from the freezer section — not the mysterious "vegetable oil" version that tastes like cardboard had a baby with sadness. When properly thawed (overnight in the fridge, never the counter), it becomes as pliable as silk but strong enough to contain molten cheese. The layers create steam pockets that puff into gorgeous, golden pillows that make you look like you went to pastry school in France.
Brie cheese is obviously the star, but here's what most recipes get wrong — they tell you to remove the rind. That's culinary sacrilege! The rind adds earthy, mushroomy notes that complement the sweet-tart cranberry perfectly. Go for a double-cream brie if you can find it; the richness is otherworldly, and it melts into this silky pool of dairy perfection that makes grown adults weep with joy.
The Flavor Enhancers
Cranberry sauce is where personality comes in. Homemade is spectacular — just cranberries, sugar, and orange zest simmered until they pop and create this jewel-like sauce that tastes like Christmas morning. But here's a confession: I've used the canned stuff in a pinch, and honestly? Doctor it up with fresh orange zest and a splash of Grand Marnier, and nobody knows the difference. The key is getting the consistency right — too thin and it leaks everywhere, too thick and it doesn't meld with the cheese.
Candied pecans aren't just a garnish — they're little flavor bombs that add sweet crunch and prevent the dreaded texture monotony. You can candy them yourself (sugar, butter, pinch of salt, bake at 350°F for 8 minutes), or buy them pre-made if you're not feeling Martha Stewart-ish. Chop them roughly so you get nice chunks rather than pecan dust that disappears into everything.
The Aromatic Touch
Fresh rosemary is like the final brushstroke on a masterpiece — not strictly necessary, but it elevates everything. Just a whisper of piney, herbal aroma makes these taste sophisticated, like something served at a fancy cocktail party rather than a football gathering. Strip the leaves from one sprig and scatter them over the top before baking; the heat releases essential oils that perfume the whole kitchen.
Everything's prepped? Good. Let's get into the real action...
The Method — Step by Step
- Start by clearing your counter and flouring it lightly — this is going to get messy, and that's half the fun. Unfold your thawed puff pastry on the floured surface and admire those perfect layers for a moment. Using a sharp knife or pizza cutter (my weapon of choice), cut the pastry into 24 equal squares, about 2 inches each. Don't stress about perfection here — rustic charm is your friend, and slightly uneven squares just prove they're handmade with love, not stamped out by a machine.
- Now here's where the magic happens: take your brie cubes (remember, we froze them for 20 minutes) and place one in the center of each pastry square. The cube should be about 3/4-inch — any larger and you'll have cheese explosion, any smaller and people feel cheated. Press down slightly so it sits flat, but don't squish it like you're trying to make it disappear. This is the foundation of your flavor castle, and we want it sturdy but not flattened.
- Top each cheese cube with 1/2 teaspoon of cranberry sauce — not a heaping spoonful, not a stingy drop, but exactly half a teaspoon. Use a small spoon and practice your dolloping technique; you're aiming for a perfect mound that sits right on top of the cheese like a ruby crown. If you're using candied pecans, sprinkle about 1/4 teaspoon over the cranberry now. The pecans should be visible but not overwhelming — think of them as backup singers, not the lead vocalist.
- This next part? Pure magic. Pick up a pastry square and bring opposite corners together, pinching them gently to seal. Then bring the other two corners up and pinch all four points together at the top, creating a little purse. The key is gentle but firm pressure — seal it like you're holding a baby's hand, not squeezing a stress ball. If the pastry won't stick, dab a tiny bit of water on your finger and run it along the edges. Watch this part closely because this seal is what prevents your cheese from escaping during baking.
- Arrange your little parcels on a parchment-lined baking sheet, spacing them 2 inches apart because they puff up dramatically. They should look like tiny presents waiting to be opened, each one promising melty, cheesy joy inside. If you're making these ahead, this is where you'd flash-freeze them on the tray for 2 hours, then transfer to a freezer bag. They'll keep for 2 months frozen, ready to impress unexpected guests at a moment's notice.
- Preheat your oven to 400°F — and yes, you really do need it this hot. The initial blast of heat creates steam that makes the pastry rise like it's trying to reach heaven. Place your tray on the middle rack and bake for exactly 12 minutes. Don't open the door to peek, no matter how tempted you are. The anticipation is part of the experience, and opening the door releases the hot air that makes them puff.
- After 12 minutes, reduce the temperature to 350°F without opening the door. This is where the cheese melts perfectly without over-browning the pastry. Continue baking for 8-10 minutes more, until they're deep golden brown and look like they're about to burst with deliciousness. The bottoms should be crisp and brown — that's your doneness indicator. If they're pale, give them another 2 minutes.
- Remove from the oven and immediately transfer to a serving platter using a spatula. These wait for no one — they're at their peak about 5 minutes out of the oven, when the cheese is still molten but won't burn your tongue off. Garnish with fresh rosemary leaves if using, and watch as your guests descend like vultures. I dare you to taste one and not go back for seconds.
That's it — you did it. But hold on, I've got a few more tricks that'll take this to another level...
Insider Tricks for Flawless Results
The Temperature Rule Nobody Follows
Here's what separates the pros from the amateurs: your brie temperature matters more than you think. Too cold and it won't melt properly, too warm and it leaks like a broken faucet. The sweet spot is taking it out of the freezer 10 minutes before assembly — it should be firm but not frozen solid. When you press your finger into it, there should be slight resistance but it should give way without cracking. This is the difference between molten cheese rivers and sad, partially melted cubes that sit there like stubborn icebergs.
Why Your Nose Knows Best
Forget timers — your nose is the most sophisticated kitchen timer you own. When these bites are perfectly done, your kitchen will smell like a French bakery married a cranberry bog and had beautiful, golden babies. The aroma should be buttery and toasty with hints of sweetness, never burnt or acrid. If you smell burning butter, you've gone too far. Pull them out immediately and consider yourself lucky to have learned this lesson with only slightly darker pastry.
The 5-Minute Rest That Changes Everything
I know, I know — they're calling to you with their siren song of molten cheese and flaky pastry. But here's the thing: let them rest for exactly 5 minutes before serving. This allows the cheese to set slightly so it doesn't run everywhere when bitten, but stays warm and melty. It's the difference between elegant finger food and cheese-stained shirt fronts. Set a timer and walk away if you must — your future self will thank you when you're not frantically blotting your favorite party dress with club soda.
The Double-Bake Secret
For parties where you want to serve these warm throughout the evening, here's my catering secret: bake them 75% done, then finish just before serving. They'll hold their shape better and you can replenish the platter without anyone eating lukewarm bites. Store the partially-baked bites at room temperature for up to 4 hours, then pop them back in a 350°F oven for 5-7 minutes. They'll taste like they just came out of the oven for the first time.
Creative Twists and Variations
This recipe is a playground. Here are some of my favorite ways to switch things up:
The Sweet Heat Version
Add a thin slice of fresh jalapeño under the cranberry for a sweet-heat combo that makes people do that happy dance where they fan their mouths but can't stop eating. The cool brie soothes the burn while the cranberry plays mediator between the spice and creaminess. It's like a tiny, sophisticated version of those cream cheese jalapeño poppers, but classier and way more addictive.
The Thanksgiving Remix
Swap the cranberry sauce for a spoonful of leftover Thanksgiving chutney — think apple-cranberry with sage and orange zest. Add a tiny cube of roasted turkey breast under the cheese for the ultimate leftover transformation. These taste like the best parts of Thanksgiving dinner condensed into a single bite, minus the awkward political conversations and that weird Jell-O mold your aunt insists on bringing.
The Mediterranean Escape
Replace cranberry with fig jam and add a crumble of blue cheese on top of the brie. The sweet-savory combination with the funky blue cheese creates this sophisticated flavor profile that pairs beautifully with red wine. Garnish with a tiny thyme leaf instead of rosemary for that Provençal feeling that makes you want to book a flight to the French Riviera immediately.
The Breakfast of Champions
For a morning-after-brunch version, add a cube of cooked breakfast sausage under the brie and use orange marmalade instead of cranberry. They taste like the world's most sophisticated breakfast sandwich, perfect for those mornings when you need something impressive but your head is still buzzing from last night's festivities. Serve with strong coffee and watch your guests revive like flowers after rain.
The Decadent Dessert
Use dark cherry preserves instead of cranberry, add a few dark chocolate chips under the brie, and finish with a dusting of powdered sugar. These taste like the world's most elegant cheesecake, with the chocolate providing bitter notes that balance the rich cheese and sweet fruit. They're dessert disguised as an appetizer, perfect for those dinner parties where you want to serve something unexpected.
The Savory Surprise
Skip the fruit entirely and go savory with caramelized onions and a touch of Dijon mustard. Add a few thyme leaves and finish with a drizzle of honey after baking. These taste like French onion soup got a sophisticated makeover and decided to become finger food. They're unexpected and always the first to disappear when I serve them at cocktail parties.
Storing and Bringing It Back to Life
Fridge Storage
If you somehow end up with leftovers (I've heard this happens to some people), let them cool completely before storing in an airtight container. They'll keep for up to 3 days in the refrigerator, though the pastry will lose some of its crispness. Layer them between sheets of parchment paper to prevent sticking, and whatever you do, don't stack them while warm — they'll fuse together like some kind of weird brie sculpture that nobody asked for.
Freezer Friendly
These freeze beautifully either before or after baking. For unbaked bites, flash-freeze them on a tray for 2 hours, then transfer to a freezer bag with parchment between layers. They'll keep for 2 months and can go straight from freezer to oven — just add 3-4 minutes to the baking time. For already-baked bites, cool completely, freeze on a tray, then store in bags. Reheat from frozen at 350°F for 10-12 minutes until hot and crisp.
Best Reheating Method
The microwave is your enemy here — it'll turn the pastry to rubber faster than you can say "leftovers." Instead, use a 350°F oven for 8-10 minutes if refrigerated, 10-12 minutes if frozen. Add a tiny splash of water to the baking sheet — it creates steam that helps re-crisp the pastry without drying it out. They're never quite as perfect as fresh-baked, but they're about 95% there, which is infinitely better than sad, soggy reheated appetizers.