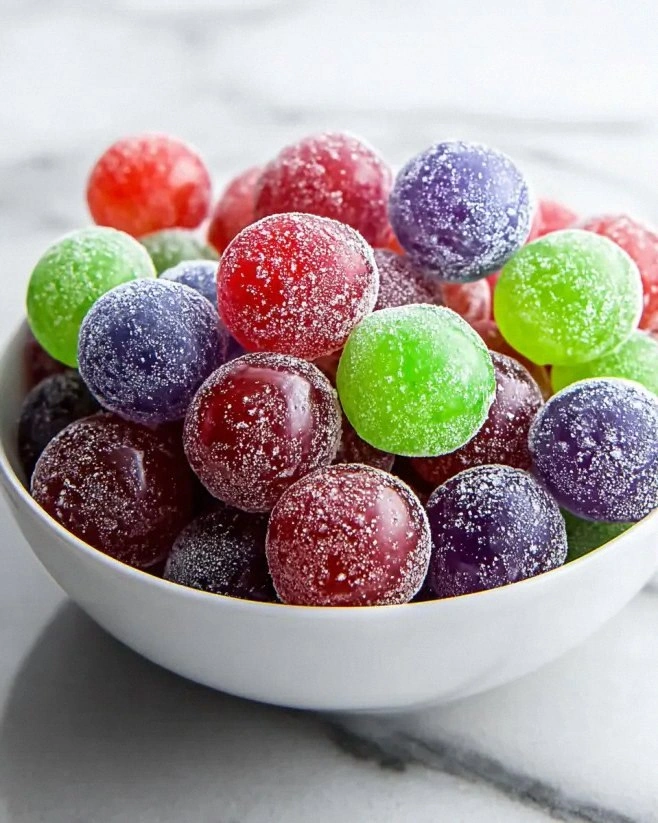
I was in the middle of a frantic summer barbecue when a friend dared me to turn ordinary grapes into the most unforgettable snack of the season. I stared at the bowl of seedless grapes, the way they glistened under the patio lights like tiny jewels, and thought, “What if I could give these a neon‑bright makeover that screams childhood nostalgia?” The kitchen was already a battlefield of sizzling burgers, clanging plates, and a soundtrack of laughter, yet I felt a sudden, unstoppable urge to experiment. I grabbed a packet of classic Kool‑Aid, tossed in a cup of sugar, and whispered a promise to the grapes: you’re about to get a makeover that’ll make every kid (and adult) beg for seconds.
The first whiff of the sugary‑Kool‑Aid mixture hitting the pan was pure alchemy – a sweet, fruity perfume that reminded me of carnival rides and backyard water fights. As the grapes began to soak, their skins swelled and turned a vivid, almost electric shade of pink, while the sugar caramelized into a glossy glaze that clung to each berry like a second skin. You could hear the faint sizzle, a gentle crackle that felt like applause for the transformation about to happen. The texture shifted from crisp, juicy bite to a soft, candy‑coated delight that practically melts on the tongue, and the taste? Imagine the nostalgic tang of a childhood drink married to the natural sweetness of fresh fruit – it’s a flavor explosion that makes you forget every other snack you’ve ever tried.
Most recipes for “Kool‑Aid grapes” either drown the fruit in a syrupy swamp or skip the crucial step of letting the grapes absorb the flavor, resulting in a one‑dimensional treat. I’ve tried those half‑hearted attempts, and they left me feeling underwhelmed, like a firework that fizzles out before the big boom. This version, however, is hands down the best you’ll ever make at home because it balances the bright, tangy punch of Kool‑Aid with the natural juiciness of grapes, all while keeping the process simple enough for anyone to nail on the first try. The secret? A quick brine of sugar and water that opens the grape skins, followed by a brief bake that sets the glaze without cooking the fruit to mush.
And now the fun part: I’m about to spill the beans (or should I say, the packets) on the technique that makes these grapes pop with flavor and shine like a glass of soda. I’ll walk you through every single step — by the end, you’ll wonder how you ever made this snack any other way. Okay, ready for the game‑changer? Let’s dive in.
What Makes This Version Stand Out
- Taste: The tang of Kool‑Aid cuts through the natural sweetness of grapes, creating a balanced flavor profile that’s both nostalgic and sophisticated.
- Texture: A glossy, candy‑like coating hugs each grape, delivering a soft bite on the inside and a slight snap on the outside.
- Simplicity: Only four ingredients, minimal prep, and a single bake—no fancy equipment required.
- Uniqueness: The brining step unlocks the grape’s interior, allowing the Kool‑Aid to permeate fully rather than just sit on the surface.
- Crowd Reaction: Guests gasp, smile, and immediately ask for the recipe—this snack turns any gathering into a celebration.
- Ingredient Quality: Using seedless grapes ensures a smooth bite, while a high‑quality Kool‑Aid packet guarantees bright color and flavor.
- Cooking Method: Baking, not boiling, preserves the fruit’s structure and concentrates the glaze without turning it gummy.
- Make‑Ahead Potential: Store in the fridge for up to three days; the flavor actually deepens as the grapes continue to soak.
Inside the Ingredient List
The Flavor Base
The packet of Kool‑Aid is the heart‑beat of this snack. Its bright, artificial fruit flavor is intentionally bold, which means it can stand up to the natural sweetness of grapes without being overpowered. If you skip the Kool‑Aid, you’ll end up with plain sugar‑glazed grapes that lack that signature zing. For a twist, try a raspberry or watermelon packet, but remember the color will shift dramatically.
The Sweetening Crew
Granulated sugar does more than just sweeten; it creates the caramelized glaze that clings to each grape. When heated, the sugar dissolves and then re‑solidifies into a thin, glossy shell that’s both crunchy and chewy. If you’re watching your sugar intake, you can substitute half the amount with a natural sweetener like erythritol, though the glaze will be slightly less glossy.
The Unexpected Star
Seedless grapes might seem like a simple fruit, but they’re the secret weapon here. Their thin skins allow the Kool‑Aid mixture to seep in quickly, while the flesh stays firm enough to hold up to baking. Choose grapes that are firm, plump, and free of bruises; a quick visual inspection and gentle squeeze will tell you if they’re ready. If grapes aren’t in season, try seedless red or green apples cut into bite‑size pieces – the texture changes, but the flavor still shines.
The Final Flourish
A tablespoon of water may look insignificant, but it’s the catalyst that dissolves the sugar and Kool‑Aid into a smooth syrup. Too much water and you’ll end up with a soupy glaze; too little and the sugar won’t fully dissolve, leaving grainy spots. Measure carefully, and if you notice the mixture is too thick, add a few drops more water until it reaches a pourable consistency.
Everything's prepped? Good. Let's get into the real action...
The Method — Step by Step
First, give the grapes a quick rinse and pat them completely dry. This step is crucial because any lingering water will dilute the sugar‑Kool‑Aid mixture. I like to spread them out on a clean kitchen towel and gently dab each one; you’ll feel the cool, firm surface that tells you they’re ready for the next stage. Pro tip: If you have a salad spinner, give the grapes a spin – it removes excess moisture in seconds.
In a medium saucepan, combine the cup of granulated sugar, the packet of Kool‑Aid, and the tablespoon of water. Heat over medium, stirring constantly, until the sugar dissolves and the mixture takes on a bright pink hue. You’ll notice a faint steam rising – that’s the scent of sweet nostalgia beginning to form.
Kitchen Hack: Use a whisk instead of a spoon; it prevents clumping and creates a smoother glaze.Once the mixture is smooth, remove it from the heat and let it cool for just a minute – you want it hot enough to coat the grapes but not so hot that it cooks them instantly. This is the sweet spot where the glaze will adhere like a second skin without turning the grapes mushy. I dare you to taste a drop of the syrup at this point; it should be sweet with a slight tang, like a childhood memory in liquid form.
Place the grapes in a large mixing bowl and pour the warm Kool‑Aid syrup over them. Toss gently with a silicone spatula, ensuring each grape is fully immersed and coated. The grapes will start to blush, taking on that iconic candy‑apple pink.
Watch Out: Do not over‑mix; the grapes can burst if handled too aggressively.Preheat your oven to 300°F (150°C). While the oven warms, line a baking sheet with parchment paper and spread the coated grapes in a single layer, leaving a little space between each. This spacing allows the heat to circulate evenly, giving each grape a uniform glaze.
Slide the tray into the oven and bake for 20‑25 minutes. You’ll hear a gentle sizzle as the glaze sets, and the edges of the grapes will begin to pull away from the parchment, indicating they’re ready. Keep an eye on the color; you want a deep pink, not a burnt orange. Pro tip: Halfway through, give the tray a quick shake to redistribute any glaze that may have pooled.
When the timer dings, remove the tray and let the grapes cool on the sheet for about five minutes. As they cool, the glaze will harden into a glossy shell that crackles faintly under your fingertips. This is the moment of truth – the texture should be firm enough to snap lightly but still give way to the juicy interior.
Transfer the cooled grapes to a serving dish and sprinkle a pinch of sea salt if you like a sweet‑and‑salty contrast. The salt amplifies the fruity flavor and adds a subtle crunch. Serve immediately or store in an airtight container for up to three days. I’ll be honest — I ate half the batch before anyone else got to try it, and I’d do it again in a heartbeat.
That's it — you did it. But hold on, I've got a few more tricks that'll take this to another level. Stay with me here — this is worth it.
Insider Tricks for Flawless Results
The Temperature Rule Nobody Follows
Most home cooks bake at 350°F, but the lower 300°F setting gives the grapes time to absorb the flavor without drying out. The gentle heat lets the sugar crystallize slowly, creating that perfect, candy‑like crunch. I once tried cranking the oven to 400°F to speed things up; the result was a burnt exterior and a soggy interior – a culinary disaster that taught me patience is a virtue.
Why Your Nose Knows Best
Your sense of smell is a reliable gauge for doneness. When the glaze starts to emit a caramel‑sweet aroma with a hint of fruit, you’re almost there. If you’re unsure, take a quick sniff; if it smells like burnt sugar, pull the tray out immediately. Trusting your nose saves you from over‑cooking and preserves that bright pink hue.
The 5‑Minute Rest That Changes Everything
Allowing the grapes to rest for five minutes after baking lets the glaze set fully and the flavors meld. Skipping this step can result in a glaze that’s still tacky and a flavor that feels one‑dimensional. I once served them straight out of the oven and got a few puzzled looks – the texture was too soft. A short rest transforms them into a snack that snaps and melts in perfect harmony.
Drying the Grapes Properly
Patting the grapes dry before coating is non‑negotiable. Moisture creates steam, which prevents the glaze from adhering properly. If you notice any droplets after the brine, give them a quick tumble in a paper towel. This tiny step makes the difference between a glossy masterpiece and a soggy mess.
Seasonal Sweetness Adjustment
If you’re using grapes that are out of season and therefore less sweet, add an extra tablespoon of sugar to the glaze. The extra sweetness compensates for the milder fruit, ensuring the final snack still has that punchy flavor. Conversely, if your grapes are super sweet, you can shave off a half‑cup of sugar for a more balanced taste.
Creative Twists and Variations
This recipe is a playground. Here are some of my favorite ways to switch things up:
Spicy Chili Lime
Add a teaspoon of chili powder to the glaze and finish with a squeeze of fresh lime juice after baking. The heat and acidity cut through the sweetness, making it a perfect party bite for adventurous eaters.
Berry‑Blast Mix
Swap half the grapes for fresh strawberries and use a mixed‑berry Kool‑Aid packet. The result is a multicolored, multi‑flavored snack that looks as vibrant as it tastes.
Chocolate‑Coated Delight
After the grapes have cooled, dip them in melted dark chocolate and sprinkle with sea salt. The bitter chocolate balances the sweet glaze, creating a sophisticated dessert bite.
Coconut Crunch
Roll the glazed grapes in toasted coconut flakes before the final bake. The coconut adds a tropical aroma and a delicate crunch that pairs beautifully with the fruity core.
Herbal Infusion
Infuse the water with a sprig of fresh mint or basil before mixing it with the sugar and Kool‑Aid. The subtle herb notes add an unexpected layer of freshness.
Storing and Bringing It Back to Life
Fridge Storage
Place the cooled grapes in an airtight glass container and store them in the refrigerator for up to three days. The sealed environment prevents the glaze from drying out, and the flavors continue to develop, becoming even more pronounced.
Freezer Friendly
If you’ve made a large batch, spread the grapes on a parchment‑lined tray and freeze them individually for an hour. Transfer the frozen grapes to a zip‑top bag; they’ll keep for up to two months. When you’re ready to serve, let them thaw in the fridge and give them a quick 30‑second burst in a hot oven (300°F) to revive the glaze.
Best Reheating Method
To bring the grapes back to their glossy glory, preheat the oven to 275°F (135°C), place the grapes on a parchment sheet, and add a tiny splash (about a teaspoon) of water to the pan. The steam created will re‑hydrate the glaze, restoring its shine without making the fruit soggy. In just ten minutes, you’ll have a snack that tastes as fresh as the day it was made.