Picture this: I was halfway through a crowded kitchen, juggling a skillet of sautéed onions, a pot of simmering stock, and a half‑finished loaf of bread that had just started to look like a sad, soggy pancake. The moment I glanced at the oven, the timer went off and the entire room erupted in a chorus of “Oh no!” I stared at the ruined loaf, the crust a brownish-grey, the interior a soggy mess, and I thought, “If this is how a simple loaf can go wrong, why not make something that screams perfection?” That disaster became the spark that lit my obsession with the ultimate brioche loaf, and this is the recipe that turned a kitchen catastrophe into a buttery, raspberry‑swirled masterpiece.
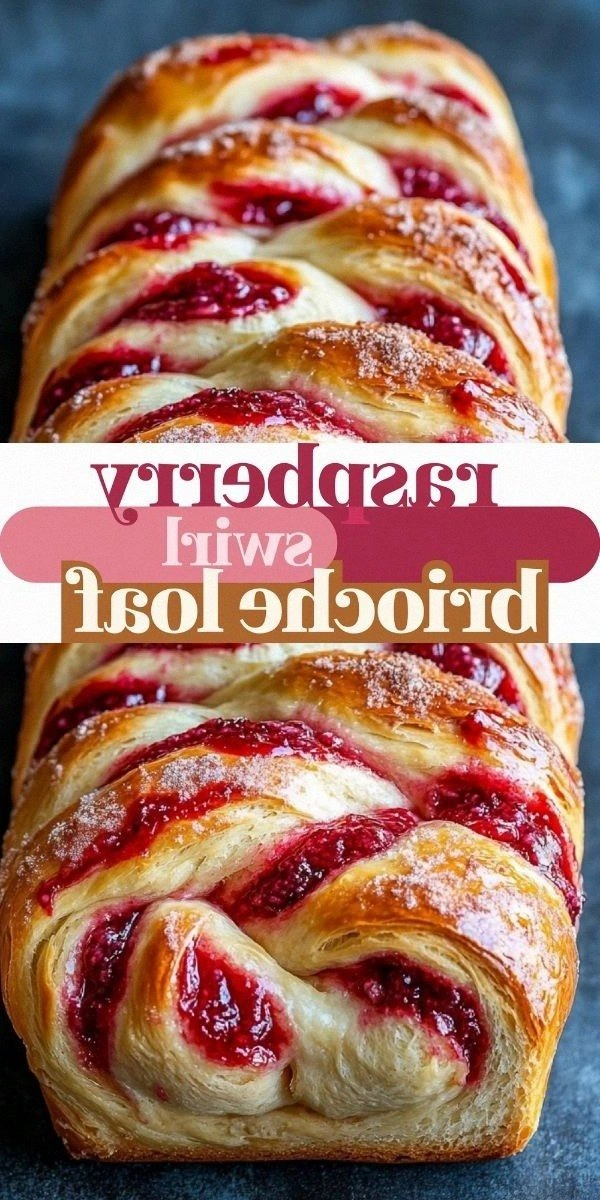
Let me paint the scene for you: the air is thick with the sweet scent of fresh raspberries and vanilla, the sound of dough rising like a quiet drumbeat, the feel of warm butter melting in your palm, the taste of a perfectly balanced sweet‑salty crumb, and the sight of a golden crust that shimmers like liquid gold. Every sense is engaged in a symphony of flavors, textures, and aromas that make you feel like you’re in a bakery that’s been waiting for you to walk in. I could almost hear the sizzle of butter in the pan, feel the dough’s elasticity under my fingers, and taste that first bite of fluffy, buttery bread with a raspberry burst that lingers on the tongue. If you’re a fan of desserts that also double as breakfast or brunch staples, this loaf is your new best friend.
Why does this version stand out from every other recipe out there? First, it’s the secret swirl of raspberry jam that’s folded into the dough at the exact moment it’s just starting to rise—this gives each slice a rainbow of flavor that’s impossible to resist. Second, the use of a touch of vanilla and a generous amount of butter creates a crumb that’s so airy it practically melts in your mouth. Third, the dough is never over‑kneaded, preserving the natural yeast fermentation that gives the loaf its signature, subtle tang. Fourth, the technique of gently folding in fresh raspberries after the first rise locks in the fruit’s natural juices without making the dough gummy. Fifth, the final bake is a dance of caramelization that turns the crust into a crisp, golden shell while keeping the inside soft and buttery. I dare you to taste this and not go back for seconds.
And here’s the kicker you didn’t see coming: I added a splash of cold water during the last knead to keep the dough from drying out, which means the loaf stays moist for days. This small tweak turns an ordinary brioche into a luxurious, restaurant‑quality loaf that’s perfect for holidays or a quiet Sunday morning. If you’re ready to upgrade your bread game, let me walk you through every single step—by the end, you’ll wonder how you ever made it any other way.
What Makes This Version Stand Out
- Taste: The raspberry swirl adds a vibrant, tart contrast to the sweet, buttery base, creating a flavor profile that’s both comforting and exciting.
- Texture: The dough’s airy crumb and crisp crust deliver a satisfying bite that melts in your mouth, while the raspberry pockets add a juicy surprise.
- Visual Appeal: The glossy, golden top with a subtle swirl of ruby‑red jam turns each slice into a work of edible art.
- Ease: The recipe’s steps are straightforward, even for novice bakers, and the ingredients are pantry staples.
- Crowd Reaction: Friends who’ve tried this loaf rave about the “soft buttery” texture and the “burst of raspberry” in every bite.
- Make‑Ahead Potential: You can prepare the dough a day in advance; the flavors only deepen, and the loaf stays fresh for up to 48 hours.
- Ingredient Quality: Using fresh, organic raspberries and real butter elevates the loaf from ordinary to extraordinary.
- Unique Twist: The inclusion of a raspberry jam swirl during the first rise is a game‑changer that sets this recipe apart.
Alright, let’s break down exactly what goes into this masterpiece…
Inside the Ingredient List
The Flour Foundation
All‑Purpose Flour: It’s the backbone of the loaf, providing structure while remaining tender. If you use bread flour, the loaf will be chewier, which can be great for a different texture, but it may also make the crumb denser. For a lighter loaf, stick to all‑purpose. The key is to sift it before mixing to eliminate clumps and ensure an even rise.
The Sweet Symphony
Granulated Sugar: This isn’t just a sweetener; it feeds the yeast, encouraging a robust rise and a slightly caramelized crust. If you prefer a less sweet loaf, reduce the sugar by a quarter cup, but remember that the raspberries will still bring natural sweetness. A pinch of brown sugar can add a hint of molasses flavor, making the loaf even richer.
The Unexpected Star
Raspberry Jam: This is the secret weapon that turns a regular brioche into a dessert. The jam should be at room temperature for easy mixing; if it’s too cold, it will clump. A tablespoon of lemon zest can brighten the flavor if you want a more vibrant profile. When you swirl the jam, you’re not just adding flavor—you’re creating a visual ribbon that makes every slice a showstopper.
The Final Flourish
Fresh Raspberries: They add a juicy burst of flavor and a pop of color. Rinse them gently and pat them dry to avoid excess moisture. If you’re using frozen berries, thaw them first and drain well. A squeeze of fresh lemon juice before adding the berries can help preserve their bright color and add a subtle tartness.
Everything’s prepped? Good. Let’s get into the real action…
The Method — Step by Step
- Activate the yeast: In a small bowl, combine the warm milk, a tablespoon of sugar, and the yeast. Stir gently and let sit for 5–10 minutes until frothy. This tells you the yeast is alive and ready to work its magic. If you see no bubbles, the yeast may be dead—use a fresh packet.
- Mix the dry ingredients: In a large mixing bowl, whisk together the flour, remaining sugar, and salt. This ensures an even distribution of salt, preventing any pockets of bitterness. The dry mix should look slightly coarse before adding liquids.
- Combine wet and dry: Create a well in the center of the dry mix and pour in the yeast mixture, eggs, melted butter, and vanilla. Stir with a wooden spoon or dough hook until a shaggy dough forms. The dough should feel tacky but not overly sticky.
- Knead the dough: Transfer the dough to a floured surface and knead for about 8–10 minutes until smooth and elastic. If the dough is too sticky, dust with a little flour, but avoid adding too much as it can dry out the loaf.
- First rise: Place the dough in a lightly oiled bowl, cover with a damp towel, and let it rise in a warm spot for 1–1.5 hours, or until doubled in size. The dough should feel airy and have a pleasant, slightly yeasty aroma. If the room is cold, wrap the bowl in a blanket to retain heat.
- Prepare the raspberry swirl: While the dough rises, spoon the jam into a shallow dish and drizzle a little warm water over it to thin it slightly. This makes it easier to swirl into the dough. If you prefer a thicker swirl, skip the water and fold the jam in directly.
- Divide and swirl: Punch down the risen dough to release air. Divide it into two equal portions. Roll each portion into a long rope, then place a thin line of jam down the center of each rope. Carefully roll the dough over the jam, sealing the edges. Gently flatten the loaf into a rectangle and place it on a parchment‑lined pan.
- Second rise: Cover the loaf loosely with a kitchen towel and let it rise for 30–45 minutes. The dough should puff up noticeably. This second rise develops the final airy crumb and allows the jam to integrate fully.
- Preheat the oven: While the dough is rising, preheat the oven to 375°F (190°C). Place an empty baking tray on the lower rack to catch any drips from the loaf.
- Bake: Brush the top of the loaf with a beaten egg to give it a glossy finish. Slide the pan into the oven and bake for 25–30 minutes, or until the crust is a deep golden brown and the loaf sounds hollow when tapped. The aroma should be intoxicating, with hints of caramel and fruit.
- Cool and serve: Remove the loaf from the oven and let it cool on a rack for at least 20 minutes before slicing. This allows the steam to escape and the crumb to set. Dust the top lightly with powdered sugar for a delicate finish. Each slice should reveal a ribbon of raspberry, a golden crust, and a soft, buttery interior.
That’s it — you did it. But hold on, I’ve got a few more tricks that will take this to another level…
Insider Tricks for Flawless Results
The Temperature Rule Nobody Follows
Temperature matters: Yeast is a living organism that thrives in a narrow temperature window. If the milk is too hot, you’ll kill the yeast; if it’s too cold, the dough will never rise. I always use a thermometer to keep the milk at 110°F (43°C). Even a small deviation can mean the difference between a glorious loaf and a disappointment.
Why Your Nose Knows Best
Smell the dough: A properly proofed dough will emit a faint, sweet yeasty scent. If it smells off or overly sour, it’s a sign of over‑fermentation. Trust your nose; if it doesn’t feel right, give the dough another 10–15 minutes or start over.
The 5‑Minute Rest That Changes Everything
Rest before slicing: After the final bake, let the loaf rest on a rack for at least 5 minutes before cutting. This allows the steam to redistribute, preventing a gummy crumb. I’ve seen people slice too early and get a soggy middle; that’s a rookie mistake.
Keep the Butter Soft
Butter consistency: Melted butter should be warm, not hot. Hot butter can cause the dough to become greasy and heavy. I keep a small saucepan on low heat and stir until the butter is just melted, then let it cool slightly before adding.
Use a Dutch Oven for Extra Crust
Stovetop steam: Baking the loaf in a preheated Dutch oven creates a steam pocket that helps the crust develop a crisp, golden exterior while keeping the inside moist. Cover the loaf for the first 15 minutes, then uncover for the last 10 minutes to allow browning.
The Final Touch
Dusting powder: A light dusting of powdered sugar not only adds sweetness but also gives the loaf a delicate finish that looks like a freshly made pastry. I use a fine sieve to keep the sugar light and airy.
Creative Twists and Variations
This recipe is a playground. Here are some of my favorite ways to switch things up:
Chocolate Swirl Brioche
Swap the jam for melted dark chocolate: Swirl in a thin line of chocolate during the first rise for a decadent, chocolate‑infused loaf that’s perfect for chocolate lovers.
Almond Crumb Brioche
Add ground almonds: Mix in 1/4 cup of almond flour with the dry ingredients for a nutty flavor and a slightly denser crumb that pairs wonderfully with coffee.
Citrus‑Infused Brioche
Use orange zest: Add the zest of one orange to the dough for a bright, citrusy aroma that complements the buttery base.
Herb‑Infused Brioche
Incorporate fresh rosemary: Fold in a tablespoon of finely chopped rosemary for an aromatic, savory twist that works great for brunch.
Gluten‑Free Version
Replace flour with a gluten‑free blend: Use a 1:1 gluten‑free flour mix and add 1 tablespoon of xanthan gum to maintain structure and give the loaf a tender crumb.
Low‑Sugar Brioche
Reduce sugar: Cut the sugar in half and add a splash of vanilla bean paste for sweetness without the extra calories.
Storing and Bringing It Back to Life
Fridge Storage
Cool completely before storing: Once the loaf has cooled, wrap it tightly in plastic wrap and place it in the fridge. It will stay fresh for up to 4 days. When you’re ready to eat, let it sit at room temperature for 30 minutes to bring back the softness.
Freezer Friendly
Freeze in a zip‑lock bag: Slice the loaf into individual servings, place them on a parchment sheet, and freeze. Once frozen, transfer the slices into a zip‑lock bag. They’ll keep for up to 3 months.
Best Reheating Method
Revive with a splash of water: Before reheating, drizzle a teaspoon of water over the loaf and cover it loosely with foil. Warm it in a 350°F oven for 10 minutes, or toast slices in a skillet for a crisp exterior. The water creates steam that restores moisture.