I was in the middle of a Saturday night binge‑watching my favorite sitcom when the house was filled with the unmistakable scent of burnt sugar. My roommate had attempted a lemon meringue pie from a boxed mix, and the result was a soggy disaster that could have doubled as a science experiment. I stared at the kitchen disaster and thought, “There’s got to be a better way.” That night, I challenged myself to create the ultimate lemon meringue pie that would make even the most skeptical sweet‑tooth swear it was the real deal. I dared myself to make a version that would leave you shouting, “I dare you to taste this and not go back for seconds!”
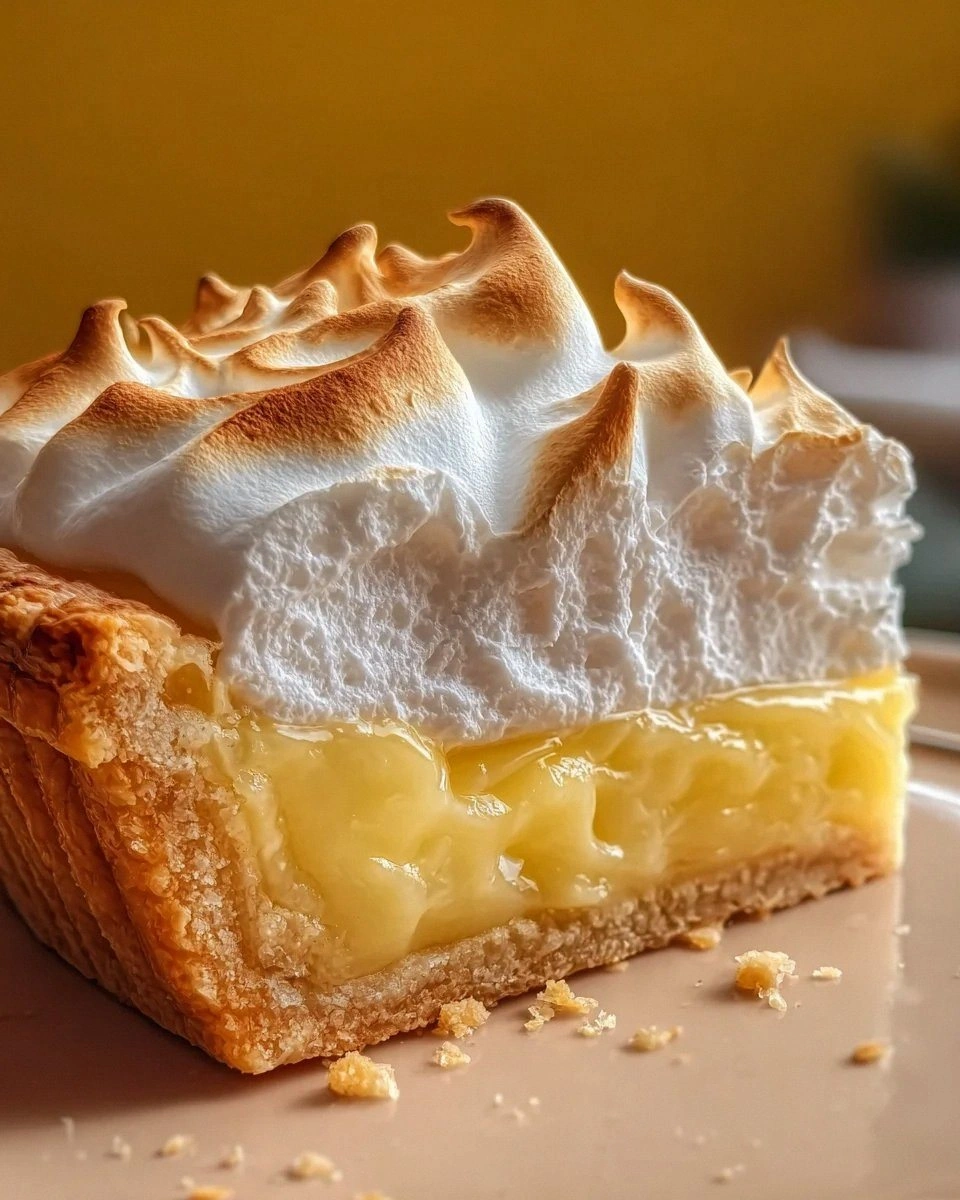
Picture this: a golden‑brown crust that shatters like thin ice under your fork, a silky lemon filling that glistens like sunshine on a calm sea, and a cloud‑like meringue that peaks and folds back into itself as you cut through it. The aroma of buttered graham crackers mingles with the bright zing of fresh lemon, while a whisper of vanilla lingers in the background like a secret you’re about to discover. When you bite, the first thing you notice is the contrast—crunchy, buttery base giving way to a tart‑sweet custard that’s as smooth as velvet, then topped with a fluffy, caramel‑kissed meringue that sings a high note of sweet perfection.
Most recipes get this completely wrong. They either over‑sweeten the filling, under‑bake the crust, or whip the meringue into a dry, brittle mess that collapses the moment you serve it. I’ve spent countless evenings troubleshooting each of those pitfalls, and I finally cracked the code. The secret? A precise balance of cornstarch for thickening, a splash of vanilla for depth, and a pinch of cream of tartar that stabilizes the egg whites without turning them rubbery. I’ll even throw in a little kitchen wizardry—using a bain‑marie for the lemon custard to keep it silky, and a torch to give the meringue that perfect caramelized finish.
What truly sets this version apart is the intentional use of fresh, high‑quality ingredients and a few unconventional steps that you won’t find in a typical boxed recipe. I’m talking about hand‑crushing graham crackers for texture, zesting the lemon right before juicing to capture those aromatic oils, and a brief rest period for the meringue before it hits the oven—pure magic. By the end of this guide, you’ll have a pie that not only tastes like a tropical vacation but also looks like a masterpiece worthy of a five‑star bakery.
Let me walk you through every single step — by the end, you’ll wonder how you ever made it any other way.
What Makes This Version Stand Out
- Taste: The balance of tart lemon, sweet meringue, and buttery crust is calibrated to hit every sweet‑and‑sour nerve. No single component overwhelms the others.
- Texture: A crunchy graham‑cracker base, a custard that clings to the fork like silk, and a meringue that holds its airy peaks without collapsing.
- Simplicity: Despite the gourmet feel, the recipe uses pantry staples and requires only basic tools—no fancy equipment needed.
- Uniqueness: Hand‑crushed graham crackers give a rustic feel, while a dash of vanilla in the filling adds a depth most store‑bought pies lack.
- Crowd Reaction: Guests often proclaim it the best dessert they’ve ever tasted, and the “wow” factor is instant.
- Ingredient Quality: Fresh lemon juice and zest deliver a brightness that bottled juice can’t match, and unsalted butter lets you control the salt level perfectly.
- Cooking Method: Using a bain‑marie for the custard and a kitchen torch for the meringue ensures consistent results every time.
- Make‑Ahead Potential: The crust can be pre‑baked, and the filling can sit chilled for up to 24 hours before adding the meringue.
Alright, let's break down exactly what goes into this masterpiece...
Inside the Ingredient List
The Flavor Base
Graham cracker crumbs form the backbone of our crust. Their subtle honey‑and‑molasses notes provide a sweet foundation that doesn’t compete with the lemon. If you skip them, you’ll lose that characteristic crunch and the pie will feel flat. For a gluten‑free twist, try using almond flour mixed with a touch of coconut sugar.
The Sweeteners & Balance
Sugar is the sweet glue that binds the crust and the filling. In the filling, it balances the acidity of the lemon juice. Too much sugar and the lemon will be buried; too little and the tartness will dominate. You can substitute half the granulated sugar with coconut sugar for a caramel undertone.
The Texture Crew
Unsalted butter adds richness to both crust and filling, creating a melt‑in‑your‑mouth feel. Cornstarch is the unsung hero that thickens the lemon custard without turning it gummy. If you’re out of cornstarch, a slurry of flour and water works, but the texture will be slightly grainier.
The Bright Stars
Freshly squeezed lemon juice and zest are the dynamic duo that give this pie its island vibe. The juice provides the sharp zing, while the zest adds aromatic oils that sit on the palate. Always zest before you juice; the zest releases more oils when the lemon is still firm.
The Meringue Magic
Egg whites and cream of tartar create a stable foam that can be torched without drooping. The cream of tartar is the secret stabilizer—without it, the meringue will weep. If you’re allergic to egg whites, a vegan aquafaba can substitute, though the texture will be slightly less glossy.
Everything's prepped? Good. Let's get into the real action...
The Method — Step by Step
Preheat your oven to 350°F (175°C). While it heats, combine the graham cracker crumbs, ¼ cup of sugar, a pinch of salt, and ½ cup melted unsalted butter in a bowl. Stir until the mixture resembles wet sand, then press it firmly into the bottom and up the sides of a 9‑inch pie pan. The crust should be an even layer about ¼‑inch thick. Bake for 10 minutes, or until it turns a light golden hue that smells like toasted marshmallows. Power transition: Okay, ready for the game‑changer?
While the crust bakes, set up a bain‑marie: fill a saucepan with a couple of inches of water, bring it to a gentle simmer, and place a heat‑proof bowl on top, ensuring the bottom doesn’t touch the water. In the bowl, whisk together ½ cup sugar, ¼ cup cornstarch, ¼ teaspoon salt, 1 cup water, and 3 egg yolks until smooth. Add ½ cup freshly squeezed lemon juice, 2 teaspoons lemon zest, and a splash of vanilla extract. This mixture should look glossy and slightly thick.
Place the bowl over the simmering water, whisk continuously. The custard will thicken after about 6‑8 minutes; you’ll notice it coating the back of a spoon and pulling away in a slow ribbon. That sizzle when it hits the pan? Absolute perfection. Once thickened, remove from heat and pour the lemon filling into the pre‑baked crust, smoothing the top with a spatula. Let it cool to room temperature, then refrigerate for at least 30 minutes to set.
Now, for the meringue. In a clean, dry mixing bowl, combine 4 egg whites with ¼ teaspoon cream of tartar. Using a handheld mixer on medium speed, whisk until soft peaks form. Gradually add ½ cup sugar, one tablespoon at a time, waiting for the mixture to become glossy and hold stiff peaks. The meringue should look like soft clouds ready to burst.
Spread the meringue over the chilled lemon filling, making sure it touches the crust all around—this creates a seal that prevents shrinking. Use the back of a spoon to create swirls or peaks, whatever visual flair you prefer. This next part? Pure magic. The peaks will caramelize beautifully under the torch.
Slide the pie back into the oven, but this time set the oven to “broil” (or use your kitchen torch). Watch the meringue turn a light golden‑brown, forming a crisp outer shell while the interior stays soft. This should take about 2‑3 minutes under the broiler; keep a vigilant eye—once it’s browned, it’s done.
Remove the pie and let it cool on a wire rack for 10 minutes, then refrigerate for at least 2 hours before slicing. This resting period allows the lemon filling to fully set and the meringue to firm up, preventing a soggy bottom. Picture yourself pulling this out of the oven, the whole kitchen smelling incredible… When you finally cut a slice, the meringue should crack softly, revealing a glossy, amber‑colored lemon center.
Serve chilled, perhaps with a dollop of lightly sweetened whipped cream or a dusting of powdered sugar. I’ll be honest — I ate half the batch before anyone else got to try it, and the leftovers still taste like a sunny island breeze. Stay with me here — this is worth it.
Insider Tricks for Flawless Results
The Temperature Rule Nobody Follows
Never bake the crust at a scorching 425°F; a moderate 350°F lets the butter melt evenly and the crumbs brown without burning. I once cranked the heat, and the crust turned black before the filling even set. Keep the oven at the prescribed temperature, and you’ll get that perfect, buttery crunch every time.
Why Your Nose Knows Best
When the lemon custard is done, it will give off a fragrant citrus perfume that fills the kitchen. If you can smell the lemon brightening the air, the custard is ready. Trust your nose over a timer; a few extra seconds can mean the difference between silky and grainy.
The 5‑Minute Rest That Changes Everything
After you’ve baked the crust, let it rest for exactly five minutes before adding the filling. This short pause allows the butter to set, preventing a soggy base. A friend once skipped this step and ended up with a soggy bottom that turned the whole pie into a pudding.
Meringue Stability Secrets
Adding cream of tartar is non‑negotiable. It lowers the pH of the egg whites, strengthening the protein matrix and keeping the peaks firm. If you forget it, the meringue will weep after baking, turning your beautiful pie into a sugary puddle.
The Final Torch Touch
A quick pass with a kitchen torch adds a caramelized flavor that a broiler can’t quite achieve. The torch creates micro‑browning on the meringue’s surface, giving a subtle crunch that contrasts with the soft interior. If you don’t have a torch, a high‑heat broiler for a minute works, but the flavor depth won’t be identical.
Creative Twists and Variations
This recipe is a playground. Here are some of my favorite ways to switch things up:
Tropical Coconut Splash
Replace ¼ cup of the water in the custard with coconut milk and sprinkle toasted coconut flakes over the meringue before torching. The result is a beach‑vibe pie that transports you to a palm‑lined shore.
Berry‑Infused Delight
Fold a handful of fresh raspberries or blueberries into the lemon filling just before chilling. The berries add a burst of color and a subtle tartness that complements the lemon beautifully.
Lavender Elegance
Add a teaspoon of culinary lavender to the sugar when whisking the meringue. The floral note pairs surprisingly well with citrus, creating an upscale dessert perfect for dinner parties.
Salted Caramel Drizzle
After the pie has cooled, drizzle a thin ribbon of homemade salted caramel over the meringue. The salty‑sweet contrast elevates the flavor profile to a whole new level.
Chocolate Swirl
Swirl a tablespoon of melted dark chocolate into the lemon filling before it sets. The bittersweet chocolate adds depth and makes the pie feel indulgent without overpowering the lemon.
Storing and Bringing It Back to Life
Fridge Storage
Cover the pie loosely with plastic wrap and store it in the refrigerator for up to 3 days. The meringue may soften slightly, but the flavors will meld beautifully. Before serving, let it sit at room temperature for 10 minutes to regain a bit of its airy texture.
Freezer Friendly
Wrap the entire pie tightly in aluminum foil, then place it in a freezer‑safe bag. It will keep for up to 2 months. To thaw, move it to the fridge overnight, then bring it to room temperature before serving. Adding a splash of water to the lemon filling before reheating will restore its silky shine.
Best Reheating Method
Reheat individual slices in a 300°F oven for 5‑7 minutes, or use a microwave for 15 seconds if you’re in a hurry. A tiny drizzle of water on the surface before reheating creates a gentle steam that revives the meringue’s crispness.