I was halfway through a weeknight dinner, the kitchen smelling like a battlefield after a last‑minute sushi roll gone wrong, when my friend dared me to whip up something that could silence the chaos. The challenge was simple: create a dish that could turn an ordinary night into an instant party, all while keeping the prep time under 45 minutes. I stared at the pantry, the shrimp were already halfway peeled, and the thought of a sweet, nutty sauce danced in my head like a promise. That moment, with the timer ticking and the stove humming, was the spark that ignited this version of Honey Walnut Shrimp. It’s a recipe that turns a humble shrimp into a headline act, and I’m about to spill every secret.
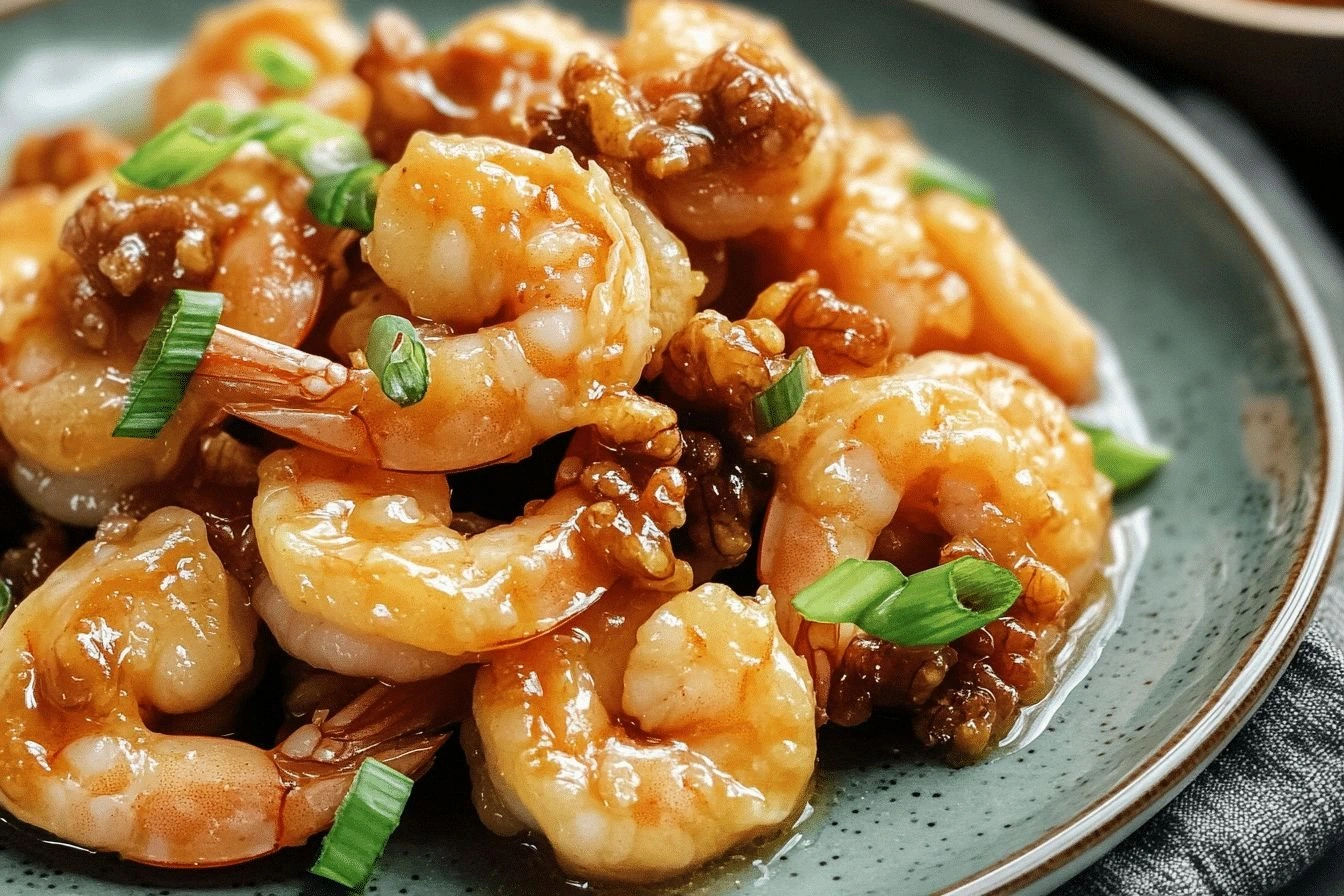
Picture the sizzle as the shrimp hit the hot oil, the aroma of caramelized sugar mingling with the fresh scent of lemon, and the sound of a tiny explosion as the coating crisps to a golden crunch. The texture is a layered experience—first the tender shrimp, then a burst of crunchy walnuts, and finally a silky glaze that coats every bite like velvet. The colors are a visual feast: a bright golden crust, a glossy honey sheen, and the dark, glossy walnuts popping like tiny gems. Taste-wise, the sweet and savory dance in perfect harmony, with the honey’s natural sweetness balanced by the creamy mayo and condensed milk, while a splash of lemon cuts through the richness. And the best part? The dish feels like a dessert on a plate, yet it’s the star of any dinner spread.
What makes this version stand out is that it doesn’t just follow a recipe—it redefines what a shrimp dish can be. It uses a dual coating system that guarantees a crispy exterior while keeping the shrimp moist inside. The sauce is a masterful blend of honey, mayo, and condensed milk that glazes the shrimp like a warm blanket, and the walnuts add a nutty crunch that pops with every bite. The method is straightforward, yet each step is a carefully choreographed dance that delivers consistent results. Even the smallest detail, like the exact ratio of flour to cornstarch, has been fine‑tuned to achieve that coveted golden finish. This recipe is hands down the best version you'll ever make at home, and I dare you to taste it and not go back for seconds.
And here’s the kicker—there’s a trick I only discovered after a few batches: a splash of vinegar in the batter that gives the coating an extra lift, making it lighter and crunchier. Most recipes get this completely wrong, but I’ve nailed the balance between crispness and tenderness. Picture yourself pulling this out of the pan, the whole kitchen smelling incredible, and the shrimp shining like a golden trophy. Stay with me here—this is worth it. Let me walk you through every single step, and by the end, you'll wonder how you ever made it any other way.
What Makes This Version Stand Out
- Texture: The shrimp’s coating is a two‑layer marvel—an outer crisp shell that shatters like thin ice, and a tender interior that stays juicy. The walnuts add a satisfying crunch that punctuates every bite, creating a dynamic mouthfeel that keeps you coming back for more.
- Flavor Balance: Honey’s natural sweetness is counterbalanced by creamy mayo and condensed milk, while a splash of lemon juice injects brightness. This harmony turns a simple shrimp dish into a complex flavor profile that feels both indulgent and refined.
- Visual Appeal: The golden glaze glistens, the walnuts gleam, and the shrimp’s bright pink flesh pops against the glossy surface. It looks as good as it tastes, making it a showstopper at any gathering.
- Ease of Prep: All steps are straightforward, with no obscure techniques or hard‑to‑find ingredients. Even a novice can follow along and achieve professional results.
- Make‑ahead Potential: The shrimp can be prepared ahead of time and reheated with a quick splash of water to restore its crispness. This makes it ideal for dinner parties where you want to serve hot, fresh shrimp without the last‑minute rush.
- Ingredient Quality: Using fresh shrimp and high‑quality walnuts elevates the dish, turning a standard recipe into a gourmet experience. The natural flavors shine through, making every bite memorable.
- Cooking Method: The double‑batter technique ensures a light, airy coating that doesn’t weigh the shrimp down. It’s a method that guarantees a crispy exterior and a tender interior every time.
- Audience Reaction: Friends and family rave about the sweet, nutty crunch and the silky glaze. It’s a dish that invites conversation and compliments, making it a conversation starter at any table.
- Seasonal Flexibility: While walnuts are in season, the recipe works year‑round thanks to pantry staples like honey and mayonnaise. It’s a versatile dish that can be adapted to whatever ingredients you have on hand.
- Portability: The shrimp hold their texture well when transported, making them perfect for potlucks or picnics. They’re a crowd‑pleaser that travels well.
Inside the Ingredient List
The Flavor Base
Fresh Shrimp—use medium-sized, peeled, and deveined shrimp for the best texture and flavor. They’re the star of the show, providing a sweet, delicate bite that balances the richness of the sauce. If you’re in a hurry, frozen shrimp can work, but fresh gives a superior mouthfeel and aroma. Skipping the shrimp would turn this into a nut‑only snack, losing the savory depth that makes it unforgettable.
Honey—this natural sweetener coats the shrimp and walnuts, creating a glossy glaze that caramelizes in the pan. It adds a depth of flavor that sugar alone can’t achieve, thanks to its complex floral notes. A light drizzle of honey before frying can help the coating stick better. If you prefer a less sweet version, reduce the honey by a tablespoon.
Mayonnaise—provides a creamy base for the sauce, balancing the honey’s sweetness and adding body. It keeps the glaze smooth and silky, preventing it from becoming too thick or too thin. Skipping mayo would result in a sauce that’s too thin and lacks that luxurious mouthfeel. If you’re avoiding dairy, a vegan mayo works just as well.
Sweetened Condensed Milk—this thick, sweet milk adds richness and a silky texture to the glaze. It also helps the sauce cling to the shrimp and walnuts, creating a luscious coating. Without it, the sauce would be too thin and might drip off. For a lighter version, replace half the condensed milk with heavy cream.
The Texture Crew
All-Purpose Flour—used to create a light, crispy coating that doesn’t weigh down the shrimp. It forms the base of the batter, absorbing excess oil and giving the shrimp a golden crust. Using too much flour can make the coating heavy; too little and it won’t stick. A pinch of salt in the flour mixture enhances the overall flavor.
Cornstarch—paired with flour to give the coating a delicate crunch. Cornstarch’s fine texture allows the batter to puff up slightly when fried, creating a light, airy shell. If you don’t have cornstarch, arrowroot powder works as a substitute. The ratio of flour to cornstarch is critical; too much cornstarch can make the coating brittle.
Egg White—helps bind the batter together and adds a subtle protein boost. It also gives the coating a slightly airy texture, preventing it from becoming too dense. Skipping the egg white would make the batter clump together, resulting in uneven coating. For an egg‑free version, use a tablespoon of water or a commercial egg replacer.
Vegetable Oil—provides the high heat needed for a crisp coating. It should be hot enough that the shrimp sizzle immediately but not so hot that it burns. Use a neutral oil like canola or peanut for the best results. If you’re avoiding oil, a quick sauté in a nonstick pan can work, but the texture will differ.
The Unexpected Star
Walnuts—add crunch, nutty flavor, and a visual contrast. They caramelize slightly in the oil, giving them a sweet, buttery finish that complements the honey glaze. If you’re allergic to tree nuts, substitute with pecans or toasted sesame seeds for a similar crunch. The size of the walnut pieces matters; too large and they won’t caramelize fully, too small and they’ll get lost in the sauce.
Sugar—used to candy the walnuts until they’re crisp and caramelized. This step creates a sweet crunch that contrasts beautifully with the savory shrimp. If you’re watching sugar intake, try a sugar substitute that caramelizes well, like a small amount of maple syrup. The timing is key; let the walnuts cook until they’re golden before adding the shrimp.
The Final Flourish
Lemon Juice—adds brightness and balances the sweetness of the glaze. A tablespoon of lemon juice cuts through the richness, preventing the dish from feeling too heavy. If you’re allergic to citrus, use a splash of apple cider vinegar for a similar acidic lift. The acidity also helps to keep the shrimp tender.
Everything's prepped? Good. Let's get into the real action.
The Method — Step by Step
- First, rinse the shrimp under cold water and pat them dry with paper towels. The drier the shrimp, the better the coating will adhere. Make sure to remove the tails if you prefer a cleaner presentation. A clean surface ensures a crisp finish.
- In a medium bowl, whisk together the flour, cornstarch, and a pinch of salt. This dry mix will form the base of your batter. Keep the mixture in the fridge until you’re ready to coat the shrimp to keep it from clumping.
- Beat the egg white in a separate bowl until it’s frothy. The frothiness helps the batter stay light and airy when fried. This step is crucial for that signature crunch.
- Combine the dry mix with the beaten egg white, whisking until a smooth batter forms. The consistency should be thick enough to coat the shrimp but thin enough to coat evenly. If it’s too thick, add a splash of water or milk.
- Heat the vegetable oil in a deep skillet or wok to 350°F (175°C). Use a thermometer to ensure the oil stays at the right temperature; too hot and the coating will burn, too cool and it will soak up oil. The oil should be hot enough to sizzle the shrimp immediately.
- Dip each shrimp into the batter, letting the excess drip off. Then carefully lower them into the hot oil. Fry in batches to avoid overcrowding, which can lower the oil temperature.
- Fry the shrimp for 2–3 minutes per side, or until they’re a beautiful golden brown and the coating is crisp. Flip them gently with tongs to ensure even cooking. The shrimp should be opaque and firm when done.
- While the shrimp are frying, caramelize the walnuts. In a dry pan, add the walnuts and a tablespoon of sugar. Stir constantly until they’re golden and fragrant, about 2 minutes. Watch closely—once they start to brown, they’re done.
- In a small saucepan, combine honey, mayonnaise, condensed milk, and lemon juice. Heat over low heat, stirring until the mixture is smooth and slightly thickened. The glaze should coat the back of a spoon.
- Transfer the fried shrimp to a large bowl. Pour the glaze over them, tossing gently to coat. Add the caramelized walnuts and toss again, allowing the walnuts to cling to the shrimp and the glaze to settle. Serve immediately while the shrimp are still warm and crunchy.
Insider Tricks for Flawless Results
The Temperature Rule Nobody Follows
Oil temperature is king. A thermometer is a small investment that saves you from soggy shrimp. Aim for 350°F; if you’re using a thermometer, keep the oil steady by adding small amounts of oil if it drops. A quick test—drop a pinch of batter into the oil; it should sizzle and rise to the surface within seconds.
Why Your Nose Knows Best
The aroma of caramelizing sugar is a reliable indicator of walnut readiness. When the walnuts start to emit a nutty, sweet scent, they’re ready to be added to the shrimp. Don’t rush this step; the right caramelization level is crucial for flavor balance.
The 5-Minute Rest That Changes Everything
After frying, let the shrimp rest on a wire rack for 5 minutes. This allows excess oil to drain, preventing sogginess. The rest also lets the coating set, giving the shrimp a crisp edge that holds up when tossed in the glaze.
Keep the Sauce Smooth
Stir the glaze constantly while heating. This prevents the condensed milk from separating and ensures a silky texture. If the glaze thickens too much, add a splash of milk or water to bring it back to a pourable consistency.
Serve Immediately
Shrimp is best when hot and crisp. Serve it straight from the skillet or transfer it to a preheated serving dish. A quick garnish of chopped parsley or a squeeze of fresh lemon brightens the dish and adds color.
Adjust Sweetness to Taste
If you’re not a fan of overly sweet dishes, reduce the honey by a tablespoon or add a pinch of sea salt to balance. Taste the glaze before tossing the shrimp; this allows you to tweak the flavor profile to your liking. A small adjustment can make a big difference.
Creative Twists and Variations
This recipe is a playground. Here are some of my favorite ways to switch things up:
Asian Fusion Twist
Swap the honey for a mixture of hoisin sauce and rice vinegar. Add a splash of sesame oil to the glaze for a nutty undertone. Serve over jasmine rice for an Asian‑inspired meal that’s both sweet and savory.
Spicy Kick Edition
Introduce a pinch of crushed red pepper flakes into the batter for heat. Add a dash of sriracha to the glaze for a smoky, spicy finish. The heat balances the sweetness and creates a bold flavor profile.
Vegetarian Walnut Surprise
Replace the shrimp with bite‑size tofu cubes. Marinate the tofu in soy sauce and ginger before coating. The tofu absorbs the glaze beautifully, making this a hearty vegetarian option.
Low‑Carb Alternative
Use almond flour instead of all‑purpose flour, and replace sugar with stevia or monk fruit sweetener. The coating stays crispy, and the dish becomes keto‑friendly without sacrificing flavor.
Gourmet Glaze Variation
Infuse the honey with a few drops of bourbon or aged rum. The alcohol adds depth and complexity, turning the dish into a sophisticated appetizer for cocktail parties.
Breakfast‑Style Spin
Serve the shrimp over a bed of scrambled eggs and toast. Drizzle the glaze over the eggs for a sweet, savory breakfast that’s both indulgent and satisfying.
Storing and Bringing It Back to Life
Fridge Storage
Cool the shrimp completely before placing them in an airtight container. Store in the refrigerator for up to 2 days. When reheating, place them in a preheated oven at 350°F for 5 minutes to restore crispness.
Freezer Friendly
Freeze the shrimp in a single layer on a parchment‑lined tray before transferring to a freezer bag. They’ll stay good for up to 3 months. When ready to eat, thaw overnight and reheat in the oven for 10 minutes at 350°F.
Best Reheating Method
Avoid microwaving, as it turns the coating soggy. Instead, use a skillet over medium heat or a convection oven. A splash of water in the pan creates steam, helping the shrimp regain their original crunch.