I was in the middle of a chaotic Sunday brunch, juggling a blender, a pot of coffee, and a stack of croissants. Suddenly the timer buzzed, and the kitchen smelled like burnt sugar. I stared at the charred sugar, thinking, “This is the end of my sweet dreams.” That moment was the spark that led me to reinvent a simple snack that would change the way I think about dried fruit forever.
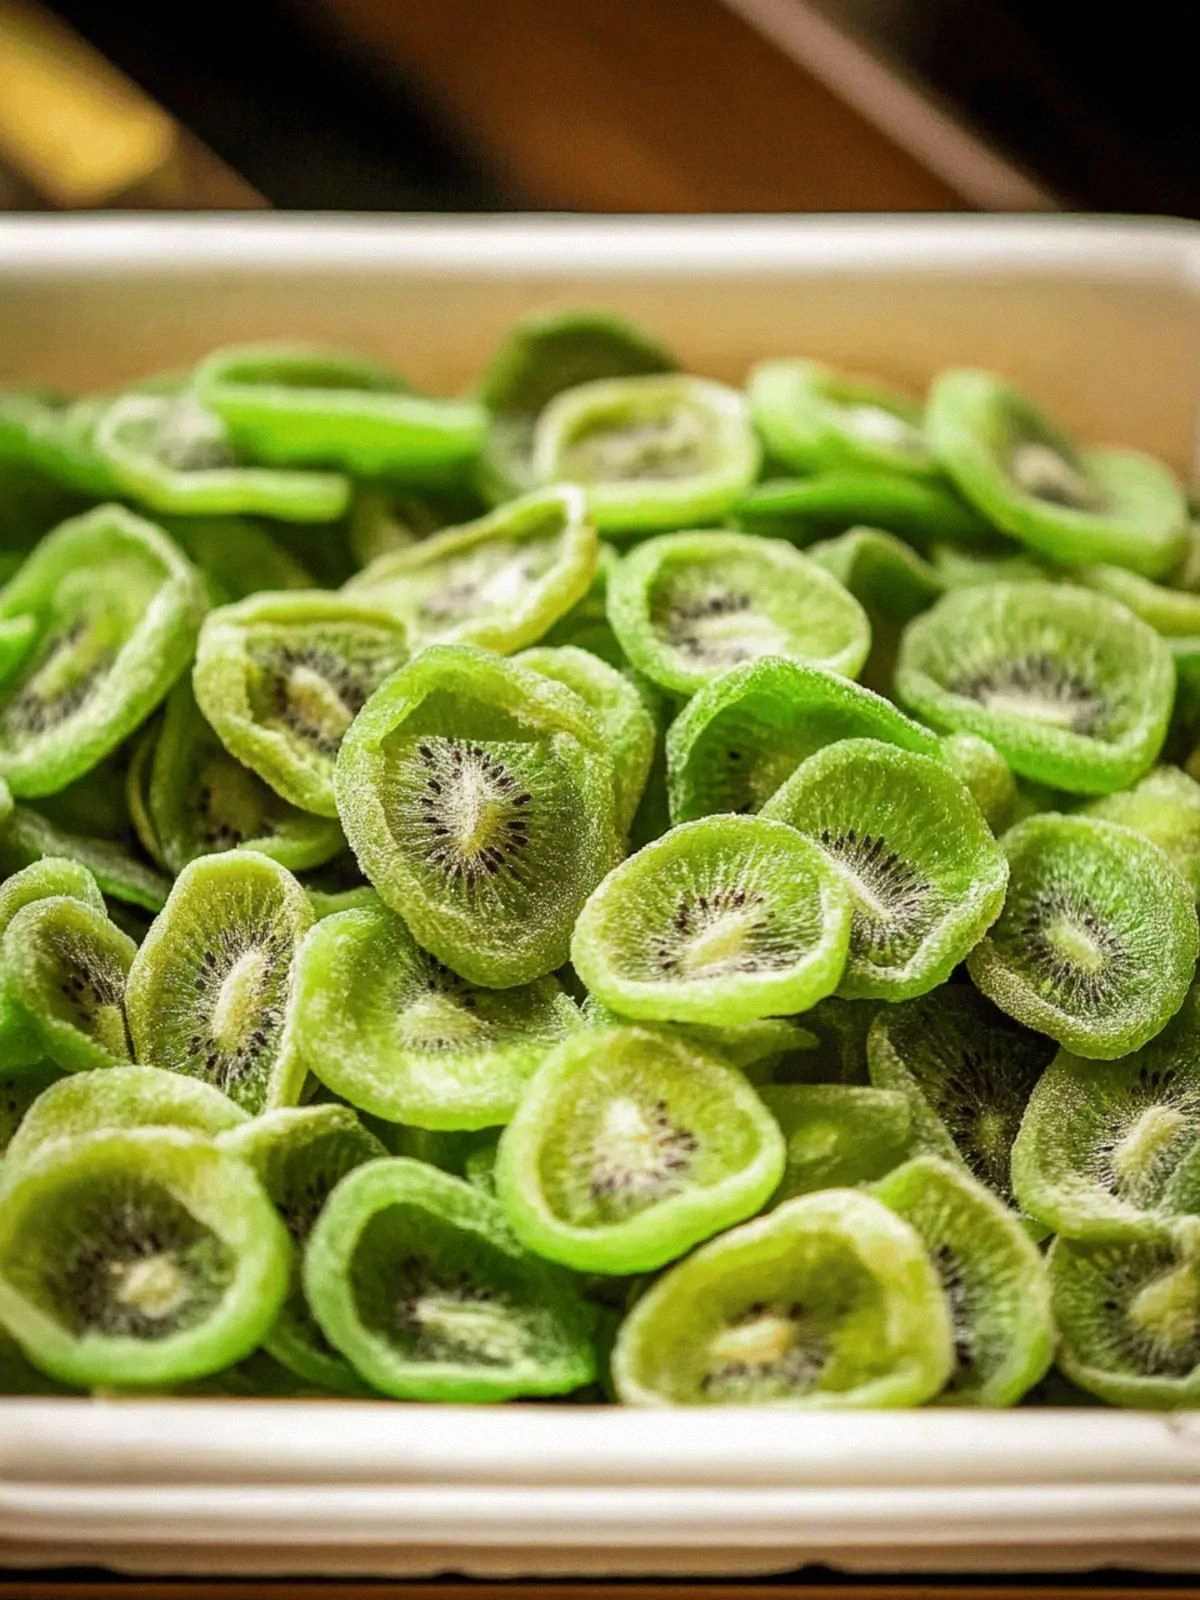
Picture this: the air is thick with the aroma of ripe kiwis, their bright green flesh glistening under the kitchen light. You can hear the faint hiss of the oven as it preheats, the gentle clink of parchment on a baking sheet, and the rhythmic slicing of fruit. The texture of the kiwi feels almost buttery, the juice dripping like liquid gold. When you bite, the sweet flesh gives way to a chewy, caramelized bite that feels like a secret treasure. The whole experience is a sensory symphony that makes your taste buds dance.
What makes this version stand out is that it doesn't rely on sugary syrup or artificial flavorings. Instead, it lets the natural sweetness of the kiwi shine through, with just a splash of lemon to cut the sweetness and a whisper of sea salt to amplify the flavor. The low‑heat baking process turns each slice into a chewy, caramelized delight without drying it to brittle. And because it's homemade, you control every aspect—from the slicing thickness to the exact baking time—so each batch tastes exactly how you want it. This recipe is the ultimate test of patience, but the payoff is a snack that feels luxurious yet effortless.
I dare you to taste this and not go back for seconds, because once you experience the perfect chew, you'll be hooked. This is hands down the best version you'll ever make at home, and it's so simple that even a kitchen novice can master it. Picture yourself pulling these golden slices out of the oven, the whole kitchen smelling incredible, and sharing them with friends who will instantly ask for the recipe. I’ll be honest— I ate half the batch before anyone else got to try it. Stay with me here— this is worth it.
What Makes This Version Stand Out
There are countless ways to dry fruit, but this recipe cuts through the noise with a focus on flavor, texture, and pure enjoyment. The combination of low heat, precise timing, and minimal ingredients creates a snack that feels both indulgent and wholesome. It’s a testament to how a few simple tweaks can elevate a humble fruit into a show‑stopping treat. The result is a chewy, caramelized delight that pairs perfectly with coffee or a glass of chilled white wine. Let’s break down exactly what goes into this masterpiece.
- Flavor: The kiwis retain their natural sweetness, while a splash of lemon juice adds a bright, zesty counterpoint that prevents the slices from becoming cloying.
- Texture: Low‑heat baking yields a chewy interior with a slightly crisp edge—think of it as a cross between a cookie and a fruit leather.
- Simplicity: No sauces, no marinades, just sliced kiwis, a touch of lemon, and a bit of patience.
- Time Efficiency: The entire process takes less than an hour from prep to final product, making it a quick weekend indulgence.
- Ingredient Quality: Using ripe, fragrant kiwis ensures maximum sweetness and a vibrant color that looks as good as it tastes.
- Make‑Ahead Potential: These slices keep well in an airtight container for up to a week, allowing you to stock up for busy days or share as a thoughtful gift.
Alright, let's break down exactly what goes into this masterpiece.
Inside the Ingredient List
Before you even touch a knife, it helps to understand the role each component plays in the final product. The kiwi itself is the star, but the supporting cast—lemon juice, salt, and the baking environment—ensures that the slices transform from juicy to chewy without losing flavor. The balance between sweetness and acidity, moisture and dryness, is delicate, so every ingredient matters. Let’s dive into each group and see why you should never skip any of them.
The Juicy Core
The kiwi is the heart of this recipe. Its natural sugars caramelize beautifully under low heat, creating a caramelized glaze that clings to the flesh. Choosing ripe kiwis with a slight give under gentle pressure ensures maximum juice and flavor. If you skip the kiwis, you lose the unique sweet‑tart profile that makes these slices stand out.
The Tangy Touch
A splash of fresh lemon juice is the secret to cutting through the natural sweetness and preventing the slices from becoming syrupy. Lemon also acts as a natural preservative, helping the slices keep their vibrant color and extending shelf life. If you’re allergic to citrus, a teaspoon of apple cider vinegar can provide a similar acidity, though the flavor will shift slightly.
The Drying Trick
Baking at a low temperature—200 °F (93 °C)—is crucial for transforming the kiwis into chewy slices. High heat would scorch the surface before the interior had a chance to dry, resulting in a bitter bite. Using parchment paper prevents sticking and allows even airflow around each slice. If you’re in a hurry, you can use a food dehydrator, but the oven method yields a more caramelized finish.
The Final Touch
A pinch of sea salt is optional but recommended; it heightens the natural sweetness and balances the citrus tang. The salt also encourages a slightly crisp edge as the slices bake. If you prefer a completely sugar‑free snack, simply omit the salt and let the natural flavors shine. Remember, the key to perfection is patience—do not rush the baking process.
Everything's prepped? Good. Let's get into the real action.
The Method — Step by Step
- Preheat your oven to 200 °F (93 °C) and line a baking sheet with parchment paper. This low‑heat setting is essential for slow caramelization without burning. The oven should be fully preheated before you start, so the slices begin drying immediately. I dare you to skip this step and see how the texture changes.
- Wash the kiwis under cold water, pat them dry, and slice them into 1/8‑inch thick rounds. Aim for uniform thickness to ensure even drying. A serrated knife makes clean cuts and preserves the fruit’s structure. The slices should be bright green, not brown, indicating peak ripeness.
- Arrange the slices on the parchment in a single layer, making sure they don’t overlap. This allows air to circulate around each piece, preventing steam pockets that can keep them from drying properly. Lightly drizzle each slice with a splash of fresh lemon juice, then sprinkle a pinch of sea salt if you’re using it. The lemon will add brightness and help the sugar caramelize.
- Slide the sheet into the oven and bake for 2 hours, checking every 30 minutes. The slices should develop a golden hue and the edges should start pulling away from the parchment. If you notice any browning too quickly, reduce the temperature by 25 °F. The goal is a chewy, caramelized interior with a slightly crisp edge.
- When the slices feel firm yet still slightly pliable, remove the sheet from the oven and let the slices cool on the parchment for 15 minutes. During this time, the interior will firm up as the moisture evaporates. The cooling process is crucial for achieving that perfect chewy bite.
- Store the dried kiwi slices in a sealed container at room temperature for up to a week, or refrigerate for longer freshness. If you notice any softening, reheat them in a low‑heat oven for 5 minutes to restore chewiness. Enjoy them as a snack, sprinkle on yogurt, or toss into a fruit salad for an unexpected twist.
- That’s it — you did it. But hold on, I've got a few more tricks that will elevate these slices from great to unforgettable. Keep reading for insider tips and creative variations.
Insider Tricks for Flawless Results
The Temperature Rule Nobody Follows
Many bakers default to 250 °F, but that temperature is too high for delicate kiwis. The sweet sugars burn before the fruit dries, leading to a bitter aftertaste. By keeping the oven at 200 °F, you give the sugars time to caramelize slowly, resulting in a richer flavor. I once baked at 250 °F and ended up with slices that tasted like burnt plastic—lesson learned.
Why Your Nose Knows Best
Your sense of smell is a reliable indicator of doneness. When the slices emit a sweet, caramelized aroma, you’re close to the perfect chew. If the smell is faint, give them a few more minutes. Trusting your nose saves you from overbaking and preserves the fruit’s natural sweetness.
The 5‑Minute Rest That Changes Everything
After baking, let the slices rest on the parchment for 15 minutes before transferring them to a container. This short pause allows the surface to set, preventing the slices from becoming tacky. Skipping this step can lead to a sticky, less enjoyable texture. I swear by the rest; it’s the difference between good and great.
Use a Food Dehydrator for a Different Texture
If you own a dehydrator, set it to 135 °F and bake for 6–8 hours. The dehydrator’s constant airflow creates a drier, chewier result that’s almost like a fruit leather. The trade‑off is a longer time commitment, but the texture is worth it for those who love a denser bite.
Experiment with Flavored Lemon Juices
Replace fresh lemon juice with a splash of lime or even orange juice for a citrus twist. Each citrus adds a unique flavor profile—lime for a tart edge, orange for a sweeter note. Be cautious with orange; it can make the slices slightly softer due to its higher water content.
Creative Twists and Variations
This recipe is a playground. Here are some of my favorite ways to switch things up:
Spicy Twist
Add a pinch of cayenne pepper to the lemon drizzle before baking. The heat pairs beautifully with the natural sweetness, creating a balanced snack that’s perfect for party platters. Serve with a cooling yogurt dip to offset the spice.
Herb‑Infused
Stir a tablespoon of finely chopped fresh mint into the lemon mixture. The mint’s cool, aromatic notes provide a refreshing counterpoint to the caramelized kiwi. This version works well as a light dessert or a palate cleanser.
Nutty Crunch
After baking, toss the slices with a handful of toasted almond slivers. The crunch adds a new dimension of texture and a nutty flavor that complements the fruit’s natural sweetness. Keep the almonds in a separate container to avoid moisture absorption.
Chocolate Drizzle
Melt dark chocolate and drizzle it over the cooled slices. The bittersweet chocolate coats each piece, creating a decadent treat that feels indulgent yet remains healthy. Let the chocolate set before serving.
Glazed with Honey
Brush a light coat of honey over the slices before baking. The honey caramelizes, giving the slices a glossy finish and a subtle floral sweetness. This variation is especially delightful when paired with a cup of chai tea.
Storing and Bringing It Back to Life
Fridge Storage
Keep the dried kiwi slices in an airtight container at room temperature for up to a week. If you need longer freshness, refrigerate them in a sealed bag; they’ll stay crisp for up to 3 weeks. Avoid storing near strong odors, as the fruit can absorb them.
Freezer Friendly
Place the slices in a freezer‑safe bag and remove as much air as possible. They can be frozen for up to 3 months without losing texture. When ready to eat, let them thaw at room temperature for 15 minutes before serving.
Best Reheating Method
To restore chewiness, reheat the slices in a low‑heat oven at 200 °F for 5 minutes. If you’re in a hurry, microwave them on low for 10–15 seconds, but be careful not to overcook. A tiny splash of water before reheating creates steam that helps revive the slices’ moisture.