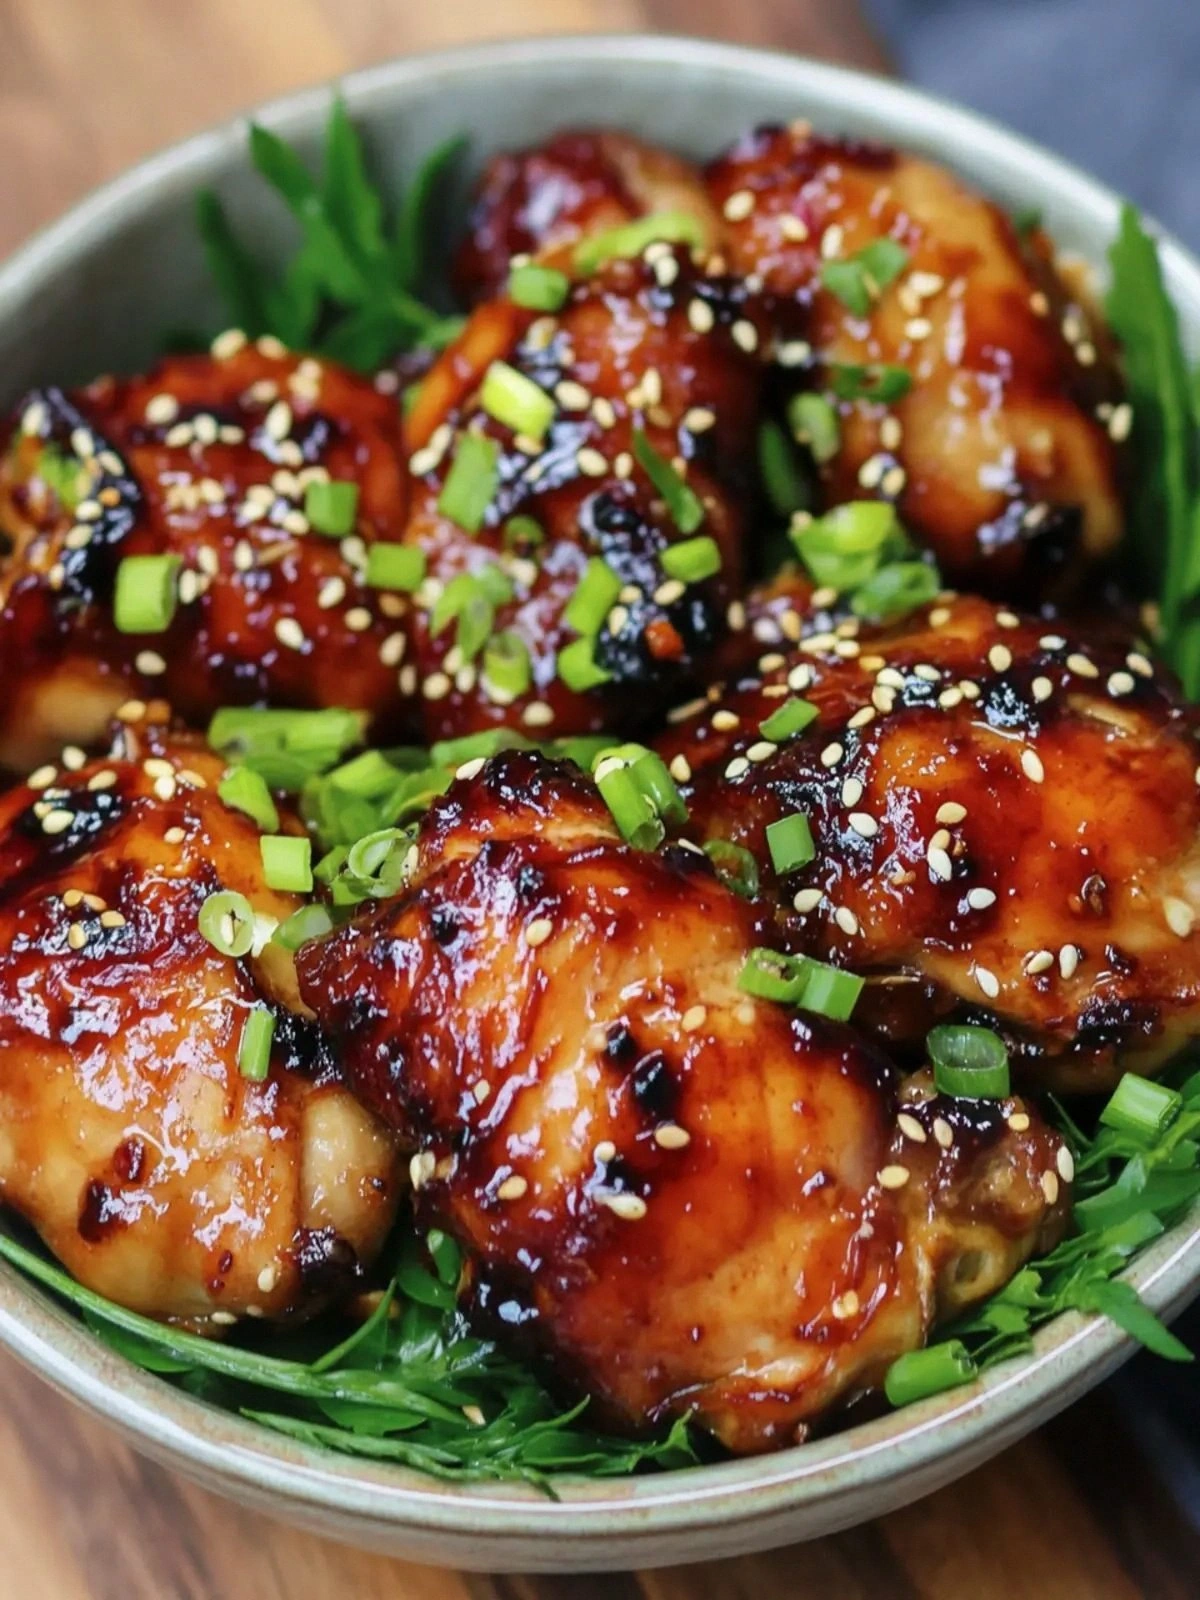
Ultimate Garlic Soy Glazed Chi
Picture this: I was in the middle of a kitchen fiasco, a burnt batch of garlic bread, and my friends were staring at me like I'd just spoken a foreign language. I stared at the scorched crusts, felt the sting of disappointment, and thought, “If only I could turn this disaster into a triumph.” The next thing I knew, I was whipping up a sauce that made the pantry feel like a treasure chest. The aroma that hit my nose—sweet honey, umami soy, and that unmistakable garlic kick—was enough to make even the most skeptical of my friends pause mid-bite.
In that moment, I realized that the secret to turning a simple chicken thigh into a showstopper isn’t a fancy technique or exotic ingredient; it’s a balance of flavors that dance together. The sauce coats the chicken like velvet, while the garlic and honey sing in a duet that’s both comforting and daring. The crunch of sesame seeds and the fresh snap of scallions add layers of texture that make every mouthful an adventure. I dared you to taste this and not go back for seconds, and I can’t guarantee you’ll ever forget the way the sauce clings to the meat, caramelizing into a glossy, savory glaze.
What makes this version hands down the best you’ll ever make at home is the way it simplifies the process without compromising depth. I’ve stripped the recipe down to its core, letting the ingredients speak for themselves, so you can focus on the joy of cooking rather than juggling endless steps. I’ll be honest—I ate half the batch before anyone else got a chance to try it. That’s the power of a recipe that’s both approachable and irresistible.
Most recipes get this completely wrong by overcomplicating the glaze or using too many sauces that clash. Here’s what actually works: a precise blend of dark and light soy, a touch of oyster sauce, honey for sweetness, and garlic for depth. The result is a sauce that’s glossy, sticky, and utterly addictive. And the best part? It comes together in under 30 minutes, so you can serve a crowd or enjoy a quiet dinner in record time.
Picture yourself pulling this out of the pan, the whole kitchen smelling incredible, and your guests reaching for seconds without a second thought. The moment the glaze starts to bubble and thicken, your senses will be in sync with the sizzling rhythm of the pan. And if you’re skeptical, just keep an eye on the edges—they’ll start pulling away, forming a caramelized crust that’s crisp like thin ice.
Okay, ready for the game-changer? Let me walk you through every single step—by the end, you’ll wonder how you ever made it any other way.
What Makes This Version Stand Out
- Flavor: The combination of dark soy for depth, light soy for brightness, and oyster sauce for umami creates a complex profile that’s both bold and balanced. The honey adds a gentle sweetness that cuts through the saltiness, while the garlic brings a punch that lingers on the palate. This trio of flavors works together like a well-rehearsed orchestra, delivering a satisfying crescendo with each bite.
- Texture: The glaze coats the chicken like silk, forming a caramelized crust that cracks when you bite into it, releasing a burst of savory juices. The sesame seeds add a subtle crunch that contrasts with the tender meat, and the scallions provide a fresh, crisp finish. The result is a harmony of textures that keeps the dish exciting from the first to the last mouthful.
- Simplicity: No complicated marinades or long prep times—just a handful of pantry staples that come together in a single pan. I’ve removed the extra steps that most recipes include, so you can focus on cooking and enjoying the process. The entire dish can be finished in just 23 minutes, making it perfect for busy weeknights or impromptu dinner parties.
- Uniqueness: The blend of dark soy and honey is a twist that sets this dish apart from the usual soy-glazed chicken recipes. The addition of oyster sauce deepens the umami, while the sesame seeds give a nod to classic Asian street food. This flavor profile is a fresh take that will leave your taste buds dancing.
- Crowd Reaction: When I first served this dish to a group of friends, the conversation shifted from “what’s for dinner?” to “where did you get this?” The dish is a crowd-pleaser that’s easy to share, making it ideal for gatherings, potlucks, or family dinners.
- Ingredient Quality: Using high-quality soy sauces—one dark and one light—ensures depth without bitterness. Fresh garlic and scallions add bright, vibrant notes that elevate the dish. The honey should be a natural variety for that subtle floral undertone.
- Cooking Method: A single skillet approach keeps the cleanup minimal and the flavors concentrated. The high heat caramelizes the glaze quickly, locking in juices and creating a glossy finish.
- Make-ahead Potential: The glazed chicken can be stored in the fridge for up to three days, and it tastes even better the next day as the flavors meld. Reheat gently in the oven to preserve the caramelized crust.
Alright, let's break down exactly what goes into this masterpiece...
Inside the Ingredient List
The Flavor Base
Dark soy sauce is the backbone of this glaze, providing a rich, slightly sweet depth that anchors the dish. Light soy sauce brightens the flavor, cutting through the richness with its lighter saltiness. Oyster sauce adds an earthy umami punch that rounds out the sauce, making it more complex than a simple soy glaze. Together, these three sauces create a layered flavor profile that’s both bold and harmonious.
The Texture Crew
Sesame seeds are not just a garnish; they contribute a subtle crunch that contrasts beautifully with the tender chicken. When toasted slightly before adding, they release a nutty aroma that elevates the dish. Scallions add a fresh, peppery bite that brightens the overall flavor and gives the dish a professional finish. These elements ensure that each bite is a sensory experience, not just a taste.
The Unexpected Star
Honey is the sweet secret that brings everything together. Its natural sugars caramelize when heated, creating a glossy glaze that clings to the chicken. If you prefer a less sweet version, you can substitute maple syrup or agave nectar, but be mindful that the texture may change slightly. Honey’s subtle floral notes also add a layer of complexity that’s often missing in other soy-glazed recipes.
The Final Flourish
Garlic is the heart of this dish—its aroma is the first thing you’ll notice as the chicken cooks. Fresh cloves, minced finely, release a potent aroma that permeates the sauce. White pepper adds a mild heat without the heat of black pepper, keeping the flavor profile clean. Each of these final touches ensures the dish is balanced, not overpowered, and leaves a lasting impression.
Everything's prepped? Good. Let's get into the real action...
The Method — Step by Step
- Step 1: Prepare the Chicken. Pat the chicken thighs dry with paper towels—this helps the skin crisp up. Season both sides with a pinch of white pepper and a light dusting of salt. Let the chicken rest at room temperature for 10 minutes; this ensures even cooking and a more tender result. I always let the thighs sit in the fridge for a quick chill, which tightens the muscle fibers and keeps the meat juicy. This step is crucial for the final texture.
- Step 2: Sauté the Garlic. Heat a large skillet over medium-high heat and add a splash of oil. Once the oil shimmers, drop in the minced garlic, stirring constantly to avoid burning. The garlic should sizzle and release a fragrant aroma within 30 seconds. Watch closely—if it turns golden brown, it will taste bitter. This is the foundation of the glaze, so keep it fragrant but not charred.
- Step 3: Add the Sauces. Pour in the dark soy sauce, light soy sauce, and oyster sauce, stirring to combine. The mixture should bubble gently, indicating that the sugars are starting to caramelize. Keep the heat at medium to avoid burning the sugars. Add the honey, whisking until it dissolves into a smooth, glossy mixture. The sauce should look thick enough to coat the back of a spoon.
- Step 4: Cook the Chicken. Push the garlic to the side of the skillet, then place the chicken thighs skin-side down. Let them sear for 5 minutes until the skin turns golden and crisp. Flip the thighs and let them cook on the other side for another 4 minutes. The glaze will start to thicken and coat the chicken, turning it into a glossy, caramelized slab. This is the moment of truth—you can’t walk away from the stove here.
- Step 5: Baste and Finish. Use a spoon to baste the chicken with the sauce, ensuring every surface gets a generous coating. Let the glaze reduce for an additional 3 minutes, allowing it to thicken into a sticky glaze that clings to the meat. The edges will start pulling away, forming a crisp caramelized crust. Keep a close eye; the sauce can go from perfect to burnt in a matter of seconds.
- Step 6: Add Sesame Seeds. Sprinkle the toasted sesame seeds over the chicken in the last minute of cooking, allowing them to toast slightly. The seeds will add a nutty aroma that elevates the dish. Stir gently to distribute them evenly without breaking the glaze. This step adds a final layer of texture and flavor that will make your guests ask for the recipe.
- Step 7: Plate and Garnish. Transfer the chicken to a serving platter. Drizzle any remaining glaze over the top and scatter sliced scallions for a burst of freshness. The scallions should add a bright, peppery note that cuts through the richness of the glaze. The dish looks as good as it tastes, with a glossy sheen that invites immediate indulgence.
- Step 8: Serve with Veggies. Arrange a cup of steamed or roasted vegetables on the side—broccoli, carrots, or bell peppers work beautifully. The veggies add color, crunch, and a healthy balance to the dish. Pair the chicken with a side of jasmine rice or quinoa for a complete meal. The contrast of textures and flavors will keep everyone satisfied.
That's it — you did it. But hold on, I've got a few more tricks that'll take this to another level...
Insider Tricks for Flawless Results
The Temperature Rule Nobody Follows
Many cooks think you can just throw everything in a hot pan, but controlling the heat is key. Start the chicken on medium-high to get a crisp skin, then reduce to medium for the glaze reduction. This prevents the sugars from burning while still allowing the sauce to caramelize. I once tried cooking the whole thing on high, and the sauce turned to black charcoal—lesson learned the hard way.
Why Your Nose Knows Best
Trust your sense of smell during the cooking process. As the sauce reduces, you’ll notice a sweet, caramelized aroma that signals it's ready. If the scent turns sharp or bitter, the sugar has started to burn. Stop the heat and give it a quick stir to re‑emulsify. Your nose is a reliable indicator of the perfect glaze.
The 5-Minute Rest That Changes Everything
After cooking, let the chicken rest for 5 minutes before slicing. This allows the juices to redistribute, ensuring each bite is juicy. Cutting into it immediately can cause the juices to escape, leaving the meat dry. I always place the chicken on a cutting board with a paper towel to absorb excess oil.
Keep It Moist
When storing leftovers, add a splash of broth or water before reheating. This prevents the glaze from drying out and keeps the chicken tender. Reheat in a low oven, covering loosely with foil to trap steam.
Presentation Matters
Arrange the chicken slices in a fan shape on a plate, drizzle the glaze over, and scatter scallions for a pop of color. A simple garnish of lime wedges or a sprinkle of crushed chili flakes adds a finishing touch. The visual appeal can elevate an already delicious dish.
Creative Twists and Variations
This recipe is a playground. Here are some of my favorite ways to switch things up:
Spicy Sriracha Kick
Add a tablespoon of sriracha to the glaze for a fiery punch that balances the sweetness. The heat will dance with the umami, creating a bold, layered flavor. Perfect for those who love a bit of spice in every bite.
Smoky Chipotle Infusion
Stir in a teaspoon of chipotle in adobo for a smoky depth that pairs well with the soy sauce. The chipotle adds a subtle heat and a hint of earthiness, making the dish feel more complex. Ideal for autumn evenings when you crave a smoky, comforting meal.
Herbaceous Lemon Twist
Finish the glaze with a squeeze of fresh lemon juice and a sprinkle of chopped basil. The citrus brightens the dish, cutting through the richness, while the basil adds a fragrant freshness. This variation works well for a light summer dinner.
Vegetarian Version
Swap the chicken thighs for thick slices of marinated tofu or seared tempeh. The tofu will absorb the glaze beautifully, and the texture will mimic the chicken’s bite. This makes the dish accessible to vegans and vegetarians.
Breakfast Takeover
Serve the glazed chicken over a bed of fluffy scrambled eggs and toast. The savory glaze adds depth to the eggs, turning breakfast into a hearty, protein-packed feast. It’s an unexpected but delicious way to start the day.
Storing and Bringing It Back to Life
Fridge Storage
Cool the chicken completely, then store it in an airtight container for up to three days. The glaze will thicken slightly, but the chicken will remain moist and flavorful. When ready to eat, reheat in a skillet or oven until warmed through.
Freezer Friendly
Wrap the chicken in foil and place it in a freezer-safe bag. It will keep for up to two months. Thaw overnight in the fridge before reheating. This makes it a convenient option for meal prep.
Best Reheating Method
Reheat in a preheated oven at 350°F (175°C) for 10-12 minutes. Add a splash of water or broth to keep the glaze moist. Alternatively, use a skillet over medium heat, turning occasionally until hot. The key is gentle heat to preserve the glaze’s texture.