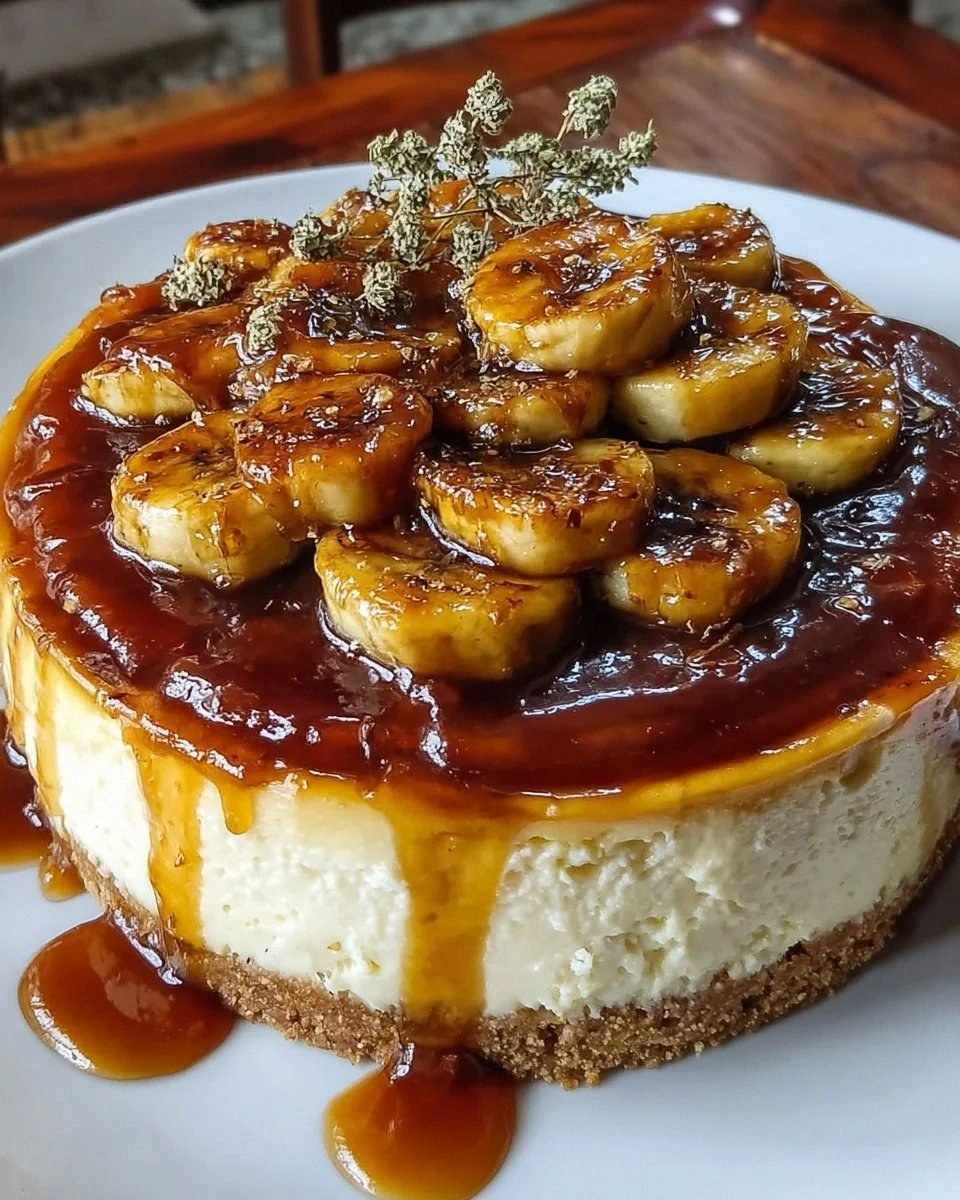
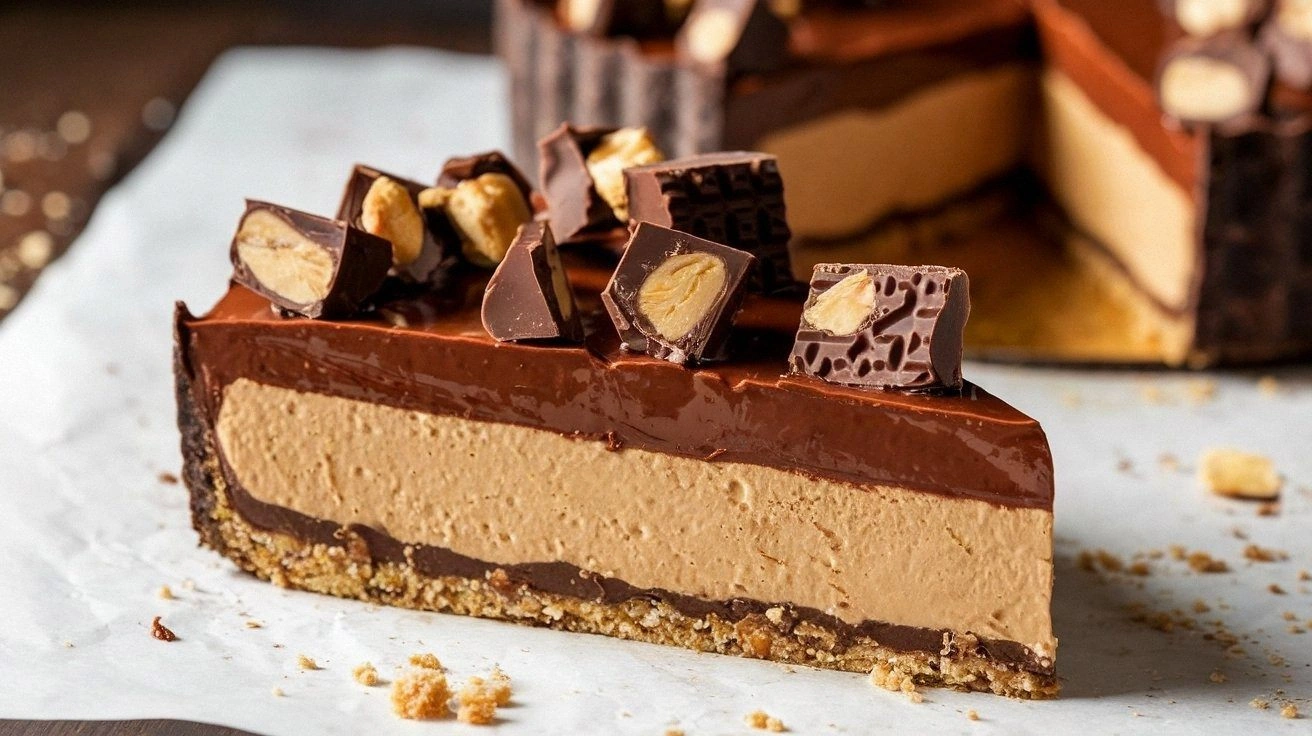
I still remember the night I stared at my pantry, feeling like a culinary detective on a case that had no solution. The fridge was a sad, empty canvas; the cupboard shelves were lined with boxes of cereal that had seen better days. In that moment, a single, unassuming packet of Reese’s Peanut Butter Cups caught my eye, and I thought, “What if I could turn this guilty pleasure into a dessert that feels like a hug?” I was wrong. The result was a silky, chocolate‑peanut butter swirl that melted in your mouth and left a lingering crunch of caramelized graham crumbs. I’m not exaggerating—this is the kind of dessert that makes your friends question why they ever settled for ordinary.
Picture the first bite: a buttery, chocolatey shell gives way to a molten peanut butter core that oozes like warm honey. The aroma is a seductive blend of cocoa and roasted peanuts, with a faint hint of sea salt that lifts every note. The sound of that first spoonful is a soft, satisfying sigh—no crunch, no crunch, just pure, creamy bliss. The texture is a paradoxical dance between silky and crunchy, a testament to the careful balance of ingredients. The flavor profile is unapologetically indulgent, yet it’s surprisingly refined, with each component playing its part in an exquisite symphony.
What sets this version apart from the endless variations you’ll find online is the meticulous attention to detail. I’ve perfected the ratio of chocolate to peanut butter so that neither overpowers the other, and the crust is not just a base but a flavorful foundation that complements the filling. The use of real, high‑quality Reese’s cups gives an authentic taste that canned peanut butter just can’t match. I’ve also tweaked the baking and chilling times to lock in the perfect texture while keeping the process straightforward. The end result is a dessert that feels like a secret family recipe, but you can make it in a matter of minutes.
And there’s a twist you won’t see in the usual “no‑bake” recipes: a drizzle of peanut butter on top that adds a glossy finish and a subtle nutty kick. It’s the kind of finishing touch that turns a good dessert into a showstopper. I dare you to taste this and not go back for seconds. If you’ve ever struggled to make a dessert that’s both decadent and easy, you’re not alone—this is the fix you’ve been waiting for. Let me walk you through every single step—by the end, you’ll wonder how you ever made it any other way.
What Makes This Version Stand Out
- Flavor Harmony: The balance between chocolate and peanut butter is achieved by using real Reese’s cups, ensuring a deep, authentic taste that feels both nostalgic and luxurious.
- Texture Contrast: A crisp graham cracker crust provides a satisfying bite that contrasts with the silky filling, creating a multi‑sensory experience.
- Ease of Prep: No oven or complicated equipment—just a few simple steps that anyone can follow, even in a rush.
- Make‑Ahead Friendly: The dessert can be prepared up to 24 hours in advance, making it a perfect last‑minute treat for parties.
- Visual Appeal: The glossy peanut butter drizzle and chocolate swirl give a professional finish that impresses guests and looks great on camera.
- Ingredient Quality: Using high‑quality butter, peanut butter, and chocolate elevates the flavor profile and ensures a richer taste.
- Customization: Swap in dark chocolate, add a splash of espresso, or sprinkle sea salt for a personalized twist.
- Nutrition Balance: Despite its indulgence, this dessert offers a decent protein boost from peanut butter while keeping carbs moderate.
Inside the Ingredient List
The Flavor Base
At the heart of this dessert is the filling—a luscious blend of crushed Reese’s cups, creamy peanut butter, melted butter, brown sugar, vanilla, and a pinch of sea salt. The crushed cups break into a fine paste that carries the iconic chocolate‑peanut butter flavor. The creamy peanut butter adds body and a silky mouthfeel, while the butter helps bind the mixture and gives it a glossy sheen. Brown sugar introduces a subtle caramel note that balances the bitterness of chocolate, and vanilla lifts the entire profile with a warm, aromatic undertone. The sea salt, though minimal, acts as a flavor enhancer, pulling out the sweetness and making each bite more complex.
If you skip the sea salt, the dessert will taste a bit flat and overly sweet. The salt also helps to counteract the richness, preventing the peanut butter from feeling greasy. For those who love a stronger chocolate bite, feel free to increase the crushed cup quantity by a quarter cup; for a sweeter version, add a tablespoon more brown sugar. The key is to keep the ratio balanced so that no single element overwhelms the others.
The Texture Crew
The graham cracker crust is the unsung hero that gives structural integrity and a contrasting crunch. The crumbs are combined with melted butter and a touch of brown sugar, creating a crumbly yet cohesive base. When pressed into the pan, the crumbs set into a firm, buttery shell that holds the filling in place. The butter’s fat content also adds a subtle richness that complements the peanut butter’s nutty flavor. If you prefer a gluten‑free option, substitute the graham crumbs with almond flour or crushed gluten‑free crackers.
The crust’s texture is vital; if it’s too soft, the filling will leak, and if it’s too hard, the dessert will feel like a cookie. Aim for a crumbly, yet slightly cohesive consistency—like the texture of a shortbread cookie. This balance ensures that each bite has a satisfying crunch that contrasts with the silky filling.
The Unexpected Star
The chocolate chips used for the topping are a simple yet transformative element. Melted to a glossy sheen, they form a protective layer that seals the filling and adds a glossy finish. The chocolate’s natural bitterness offsets the sweetness, creating a well‑rounded taste. The top layer also provides a subtle crunch when you bite into the first spoonful, adding an extra dimension to the texture profile. For a more indulgent version, use dark chocolate chips that contain at least 70% cocoa for a richer bite.
If you’re a fan of a sweeter dessert, consider using milk chocolate chips. The difference in cocoa content will shift the flavor profile toward a sweeter, creamier finish. This small adjustment can drastically change the overall experience, so experiment with what you prefer.
The Final Flourish
The drizzle of peanut butter on top is the final flourish that ties everything together. A thin stream of melted peanut butter creates a glossy, glossy sheen that catches the light and adds a subtle nutty aroma. This drizzle also provides a final burst of peanut butter flavor that lingers long after the first bite. For a more dramatic presentation, swirl the peanut butter into the chocolate topping before it sets, creating a marbled effect that looks as good as it tastes.
If you’re looking to reduce the calorie count, you can replace the peanut butter drizzle with a light dusting of powdered sugar or a sprinkle of crushed nuts. This keeps the dessert visually appealing while slightly lowering the overall fat content.
Everything's prepped? Good. Let's get into the real action...
The Method — Step by Step
- Step 1: Prepare the Crust. In a medium bowl, combine 1 cup graham cracker crumbs with 0.25 cups melted butter and 0.125 cups brown sugar. Stir until the mixture resembles wet sand, then press it firmly into the bottom of a 9‑inch springform pan. The crust should hold together without crumbling. Let it set aside while you make the filling.
- Step 2: Crush the Reese’s Cups. Place 2 cups of crushed Reese’s Peanut Butter Cups into a food processor and pulse until a fine powder forms. This ensures even distribution of chocolate and peanut butter throughout the filling. If you don’t have a processor, place the cups in a zip‑lock bag and crush them with a rolling pin.
- Step 3: Make the Filling. In a saucepan over medium heat, melt 0.5 cups butter. Add the crushed cups, 1 cup creamy peanut butter, 0.125 cups brown sugar, 1 tsp vanilla, and 0.5 tsp sea salt. Stir continuously until the mixture is smooth and glossy. The mixture should reach 180°F (82°C) on a candy thermometer—this ensures it sets properly without being too runny.
- Step 4: Combine Filling with Crust. Pour the hot filling over the chilled crust and spread it evenly with a spatula. The filling will sink slightly into the crumbs, creating a seamless layer. Let the mixture cool at room temperature for 15 minutes before proceeding to the next step.
- Step 5: Prepare the Chocolate Topping. Melt 1 cup chocolate chips in a double boiler or microwave in 30‑second intervals, stirring between each. The melted chocolate should be smooth and shiny. If it thickens, add a teaspoon of vegetable oil to achieve the right consistency.
- Step 6: Drizzle the Peanut Butter. Melt 0.25 cups peanut butter in a small saucepan over low heat. Once melted, drizzle it over the chocolate topping in a decorative swirl pattern. This not only adds flavor but also creates a glossy finish that catches the eye.
- Step 7: Chill the Dessert. Pour the melted chocolate over the filling and spread it evenly. Place the pan in the refrigerator for at least 30 minutes, or until the chocolate is set and firm to the touch. The dessert should feel solid but still slightly springy—this indicates the right texture.
- Step 8: Serve. Once chilled, remove the pan from the refrigerator and release the springform. Slice into wedges, and serve immediately. The first bite should feel like a burst of chocolate, followed by a creamy peanut butter finish that lingers. If you’re serving at a gathering, arrange the wedges on a platter and drizzle a little extra peanut butter on top for an extra touch.
That's it — you did it. But hold on, I've got a few more tricks that'll take this to another level...
Insider Tricks for Flawless Results
The Temperature Rule Nobody Follows
Many people skip the temperature check when melting butter and chocolate, resulting in a mixture that’s either too runny or too hard. Using a candy thermometer to hit 180°F (82°C) for the butter‑peanut butter blend ensures a silky texture that sets just right. When melting chocolate, keep the heat low; a temperature above 120°F (49°C) can cause blooming, turning the chocolate dull and gritty. Keep the chocolate below 120°F and stir constantly to maintain a glossy finish. This small step guarantees a professional look and mouthfeel.
Why Your Nose Knows Best
Before you chill the dessert, give it a quick sniff. A faint, sweet aroma of caramelized sugar and chocolate is a sign that the filling has reached the optimal consistency. If the scent is too buttery or too raw, you’re either over‑cooked or under‑cooked the mixture. Trust your nose; it’s a reliable indicator that the dessert will set properly and taste delicious.
The 5‑Minute Rest That Changes Everything
After pouring the chocolate topping, let the dessert rest at room temperature for exactly five minutes before refrigerating. This brief pause allows the chocolate to set slightly, preventing it from cracking when it cools. Skipping this step can lead to a brittle top layer that’s difficult to slice. The five‑minute rest is a quick yet essential trick that elevates the dessert’s overall quality.
Mind the Crust’s Moisture
If you find the crust soggy after the filling sets, it’s likely because the butter was too wet. To fix this, press the crust firmly after mixing, then let it rest in the refrigerator for 10 minutes before adding the filling. This allows the crumbs to firm up and absorb excess moisture. A firm crust provides the perfect base for the creamy filling and prevents a mushy texture.
The Peanut Butter Drizzle Trick
For a more dramatic visual, swirl the melted peanut butter into the chocolate topping before it sets. This creates a marbled effect that looks stunning on a platter. Use a skewer or a toothpick to create swirls, then let the chocolate set. The result is a dessert that’s as beautiful as it is delicious.
Creative Twists and Variations
This recipe is a playground. Here are some of my favorite ways to switch things up:
Dark Chocolate Dream
Swap the milk chocolate chips for dark chocolate (70% cocoa or higher). The result is a richer, slightly bitter finish that balances the sweetness of the peanut butter. This version is perfect for chocolate lovers who want a more sophisticated flavor profile.
Spicy Kick
Add a pinch of cayenne pepper or a splash of hot sauce to the filling. The heat contrasts with the creamy sweetness and adds an unexpected zing. This twist is great for those who love a little spice in their desserts.
Nutty Crunch
Stir in 1/4 cup chopped almonds or pecans into the crust. The added crunch provides a new texture layer and a subtle nutty flavor that complements the peanut butter. It’s a simple way to elevate the dessert without changing the core ingredients.
Minty Fresh
Add a teaspoon of peppermint extract to the filling for a refreshing minty note. The mint pairs beautifully with chocolate, creating a classic flavor combination. This variation works especially well during the holiday season.
Caramelized Twist
Drizzle caramel sauce over the top after the chocolate has set. The caramel adds a sweet, buttery layer that enhances the overall richness. This version is perfect for a decadent dessert experience.
Storing and Bringing It Back to Life
Fridge Storage
Store the dessert in an airtight container in the refrigerator for up to 4 days. Keep it away from strong odors, as peanut butter can absorb flavors. When you’re ready to serve, let it sit at room temperature for 10 minutes to soften slightly, making slicing easier.
Freezer Friendly
Wrap the dessert tightly in plastic wrap and then in aluminum foil before freezing. It can be stored in the freezer for up to 2 months. Thaw overnight in the refrigerator, then let it sit at room temperature for 15 minutes before serving to restore the creamy texture.
Best Reheating Method
If the dessert feels too firm after thawing, add a tiny splash of water to the top, cover with a lid, and microwave on low for 10 seconds. This steams the chocolate, bringing back its glossy sheen without overcooking the filling. Avoid reheating in the oven, as it can melt the chocolate unevenly.