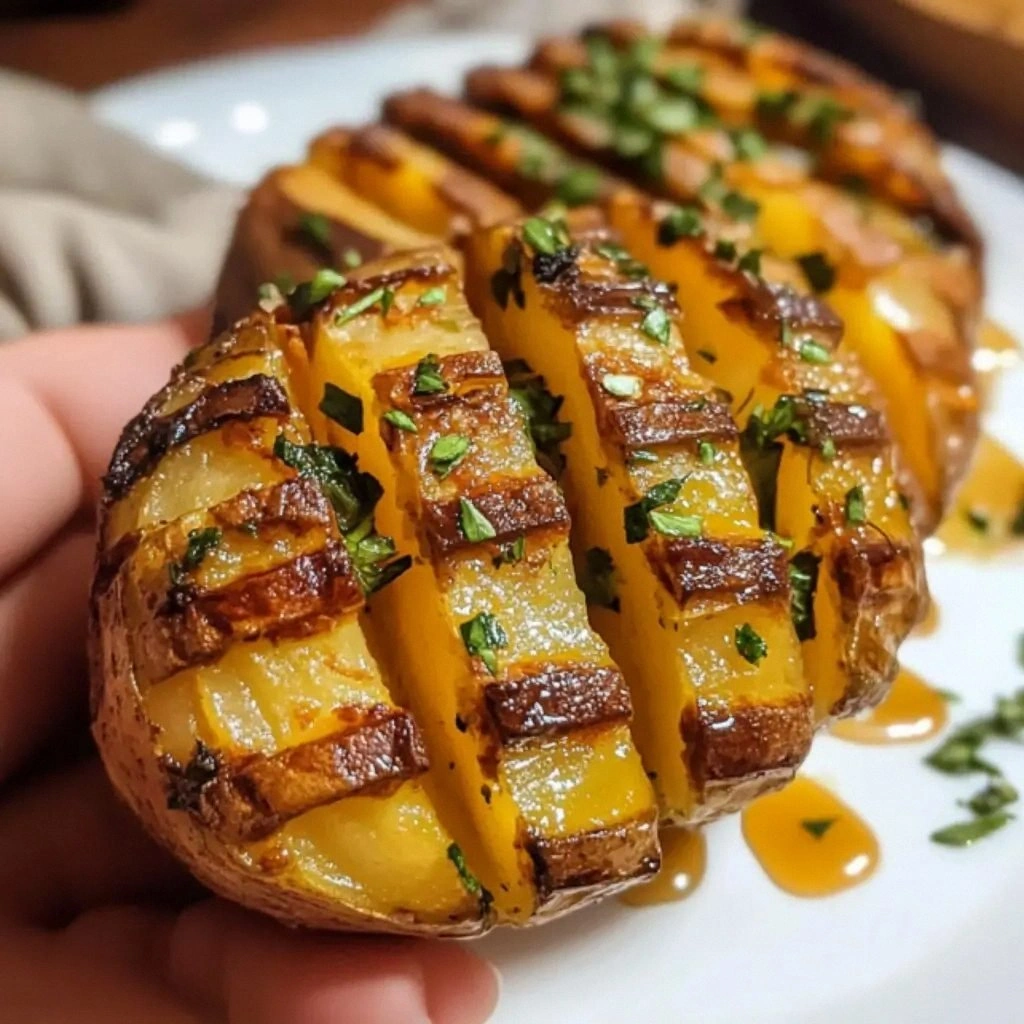
Picture this: it’s a rainy Tuesday, the kitchen lights flicker, and your fridge is a silent, lonely desert. You reach for the one thing that can turn that gloom into a culinary celebration—potatoes. But not just any potatoes. I was staring at a pile of russet tubers, feeling the urge to create something that would make your taste buds dance and your friends whisper, “What’s the secret?” That’s when I discovered the Hasselback Waffle Potato, a dish that transforms a humble root into a showstopper.
The first bite is a symphony of textures: the outer skin crackles like freshly fallen snow, the inner flesh melts in your mouth like buttered toast, and the savory steam rises, perfuming the air with garlic, rosemary, and a whisper of sea salt. The aroma alone is enough to convince you that you’ve entered a culinary wonderland. The sound of the first crisp bite is a satisfying snap that echoes through the kitchen, and the heat from the oven warms the room in a comforting, buttery glow.
What makes this version stand out is that it’s not just about crispiness. It’s about the way the waffle-cut layers allow the flavors to seep in, creating pockets of buttery, herb-infused goodness. It’s the way the cheese melts into a golden crust, the way the garlic’s sweetness is amplified by the caramelization of the potato edges. This isn’t a recipe; it’s a culinary ritual that turns a simple side into a centerpiece.
I’ll be honest—after tasting the first batch, I ate half before anyone else even had a chance to try it. I dare you to taste this and not go back for seconds. By the end of this guide, you’ll wonder how you ever made potatoes any other way.
What Makes This Version Stand Out
- Texture: The waffle cut creates a labyrinth of surfaces that trap heat and flavor, producing an outer crispness that shatters like thin ice while the interior remains tender and fluffy.
- Flavor: A blend of garlic, rosemary, and sea salt permeates every slice, while a generous layer of Parmesan and cheddar crowns the top, forming a melty, golden crust.
- Visual Appeal: The alternating light and dark bands of the cut potatoes look like a miniature forest, making the dish as delightful to the eye as it is to the palate.
- Ease of Prep: Despite the intricate cut, the process is straightforward—no special tools required, just a sharp knife and a little patience.
- Make‑Ahead Friendly: You can assemble the potatoes a few hours before baking; the flavors only deepen, and the dish holds up well when reheated.
- Versatility: Serve it as a decadent side, a crowd‑pleasing appetizer, or even as a hearty main when topped with grilled chicken or sautéed mushrooms.
Inside the Ingredient List
The Flavor Base
The foundation of this dish is the potatoes themselves. Russet potatoes are the gold standard because their high starch content creates a fluffy interior when baked. If you can’t find russets, Yukon Golds will work, but they’ll give you a slightly buttery, denser texture. A pinch of sea salt on each slice ensures the flavor penetrates every groove.
Garlic is the unsung hero of this recipe. Minced cloves are scattered between the cuts, releasing their aroma as the potatoes cook. If you’re not a garlic fan, replace it with finely chopped shallots for a milder, sweeter note.
The Texture Crew
Olive oil is the lubricant that keeps the potato skins from sticking together while they crisp up. A generous drizzle also carries the herbs and spices deep into the cuts. For a richer flavor, switch to a high‑smoke‑point oil like grapeseed or avocado, especially if you plan to add extra butter on top.
Butter is the secret to that golden crust. When melted and brushed over the potatoes, it creates a glossy, caramelized finish that’s impossible to resist. If you’re avoiding dairy, try a dairy‑free butter alternative, but be aware the flavor profile will shift slightly.
The Unexpected Star
Parmesan cheese adds a nutty, umami punch that balances the earthiness of the potatoes. Grated just before baking, it melts into a golden crust that’s both crunchy and gooey. If you prefer a sharper cheese, try Pecorino Romano or a sharp cheddar for a different flavor profile.
A dash of cayenne pepper or smoked paprika can give the dish a subtle kick, turning it from comforting to adventurous. If you’re not a fan of heat, a sprinkle of dried thyme or oregano can add a herbal depth without overpowering the potatoes.
The Final Flourish
Fresh parsley or chives tossed on top after baking adds a pop of color and a fresh, bright contrast to the rich, buttery flavors. A squeeze of lemon juice right before serving can lift the dish, cutting through the richness and adding a zesty note.
Everything’s prepped? Good. Let’s get into the real action.
The Method — Step by Step
- Preheat your oven to 425°F (220°C). Line a baking sheet with parchment paper or a silicone mat to prevent sticking. This high temperature is crucial for crisping the outer layers while keeping the inside tender.
- Wash the potatoes thoroughly, scrubbing off any dirt. Pat them dry with a clean towel; moisture on the skin will hinder crispiness. A clean surface ensures the oil and seasonings adhere properly.
- Using a sharp knife, slice the potatoes into 1/4-inch thick wafers, stopping just short of the bottom to keep them attached. The cuts should be evenly spaced to create a uniform waffle pattern that maximizes surface area.
- Brush each potato with olive oil, ensuring every slice is coated. Sprinkle sea salt and freshly ground black pepper between the cuts to season each layer. The oil not only prevents sticking but also carries the herbs deep into the cuts.
- Place the seasoned potatoes on the prepared baking sheet. Arrange them in a single layer, leaving a few inches of space between each to allow heat circulation. This spacing is essential for even cooking.
- Bake for 25 minutes, turning the potatoes halfway through. The edges should start to turn golden brown, and the interior should be soft when pierced with a fork. This is the first stage of caramelization.
- Remove the potatoes from the oven and brush them with melted butter. This step creates a shiny, caramelized crust that locks in moisture and flavor. The butter also adds a luxurious richness to the dish.
- Sprinkle grated Parmesan and cheddar over the potatoes. Return them to the oven for an additional 5-7 minutes until the cheese is melted, bubbly, and slightly browned. The cheese forms a golden, crunchy top that’s the highlight of the dish.
- While the cheese melts, mince the garlic and finely chop the rosemary. Scatter the garlic and rosemary between the cuts of the potatoes. These aromatics infuse the potato layers with a fragrant, herbal depth.
- If you’re using cayenne or smoked paprika, sprinkle it over the potatoes now. This will give the dish a subtle heat or smoky undertone that balances the buttery richness.
- Return the potatoes to the oven for a final 3-4 minutes until the cheese is fully melted and the edges are crisp. Keep a close eye on them; overcooking will turn the cheese into a hard crust.
- Remove the potatoes from the oven and let them rest for 2 minutes. This brief rest allows the juices to redistribute, preventing the potatoes from drying out.
- Toss the potatoes gently with fresh parsley or chives for a burst of color and freshness. The herbs add a bright contrast to the rich, buttery flavors.
- Squeeze a small amount of lemon juice over the potatoes just before serving. The acidity cuts through the richness, balancing the overall flavor profile.
- Plate the potatoes on a warmed dish to keep them hot. Garnish with an extra sprinkle of Parmesan or a few rosemary sprigs for an elegant finish. The visual appeal is as important as the taste.
- Serve immediately while the edges are still crisp and the cheese is molten. This dish is best enjoyed hot, but you can reheat it in a 350°F oven for 5 minutes if needed.
Insider Tricks for Flawless Results
The Temperature Rule Nobody Follows
Many bakers bake at 375°F, but the high heat of 425°F is essential for achieving that coveted crisp exterior. The rapid rise in temperature creates a Maillard reaction that caramelizes the sugars in the potato skin, giving it a deep, savory flavor. If your oven runs hot, you can lower the temperature by 25°F and extend the baking time by 5 minutes.
Why Your Nose Knows Best
The aroma of garlic and rosemary is a natural indicator of when the potatoes are ready. As the scent intensifies, you can tell the interior is tender and the exterior is crisp. Trust your nose; it’s a reliable guide to perfect doneness.
The 5‑Minute Rest That Changes Everything
Letting the potatoes rest for a few minutes after baking allows the steam to redistribute, preventing the outer crust from becoming soggy. The rest also lets the cheese set slightly, making the slices easier to handle. Skipping this step can result in a greasy, uneven bite.
Use Fresh Herbs Over Dried
Fresh rosemary and parsley bring a bright, aromatic punch that dried herbs can’t match. The oils in fresh herbs release more flavor during baking, giving each bite a vibrant, herbaceous note. If you’re short on time, dried herbs work, but the flavor will be muted.
Cheese Choices Matter
A blend of Parmesan and cheddar balances sharpness and meltiness. Parmesan adds nutty depth, while cheddar brings a creamy, gooey texture. Using only one type can shift the flavor profile, so keep the combo for the best results.
Brushing Butter at the Right Time
Brushing melted butter after the first bake but before the cheese melt locks in moisture and creates a glossy finish. If you wait too long, the butter will separate, and the potatoes will become greasy. Timing is key to a buttery, non‑greasy outcome.
Creative Twists and Variations
Vegan Version
Swap the butter for a plant‑based butter or coconut oil, and use nutritional yeast instead of Parmesan. The result is a creamy, cheesy flavor without dairy. This version is perfect for plant‑based diners who still crave comfort food.
Spicy Cajun Kick
Add a tablespoon of Cajun seasoning to the olive oil before brushing the potatoes. The spicy, smoky flavor pairs beautifully with the buttery base, creating a bold, Southern twist. Serve with a side of cool ranch dip to balance the heat.
Herb‑Infused Olive Oil Drizzle
Before baking, drizzle the potatoes with olive oil infused with thyme, oregano, and a hint of lemon zest. This aromatic oil permeates each slice, elevating the dish to gourmet status. The citrus note cuts through the richness for a bright finish.
Cheesy Gouda Layer
Replace the cheddar with smoked Gouda for a smoky, sweet flavor. Gouda melts smoothly and adds a caramelized depth that complements the potato’s earthiness. This variation is ideal for cheese lovers looking for something different.
Sweet Potato Variation
Use sweet potatoes instead of russets for a naturally sweet, orange‑colored dish. Pair with maple syrup drizzled over the top for a sweet‑savory balance. The sweet potato’s natural sugars caramelize beautifully under the high heat.
Breakfast Boost
Top the finished potatoes with a fried or poached egg, a sprinkle of chives, and a dash of hot sauce. This transforms the dish into a hearty breakfast that satisfies both sweet and savory cravings. The runny yolk adds a luxurious, velvety texture.
Gluten‑Free Twist
Serve the potatoes alongside a quinoa or rice pilaf instead of bread. This keeps the dish gluten‑free while still providing a filling, wholesome side. The grains absorb the savory juices, creating a comforting, balanced meal.
Storing and Bringing It Back to Life
Fridge Storage
Store leftovers in an airtight container in the refrigerator for up to 3 days. Reheat in a 350°F oven for 10 minutes, or until the edges crisp again. The flavor remains robust, and the potatoes retain their golden crunch.
Freezer Friendly
To freeze, let the potatoes cool completely, then place them in a freezer‑safe bag. Freeze for up to 2 months. Thaw overnight in the refrigerator, then reheat in a 350°F oven for 15 minutes. The texture stays close to the freshly baked version.
Best Reheating Method
Add a splash of water or broth before reheating to create steam, which helps restore moisture. Cover the dish loosely with foil to trap steam and prevent the cheese from drying out. This method ensures each bite is as juicy and flavorful as the first.