I was halfway through a midnight snack run, scrolling through the fridge like a detective on a mission, when I realized I had only two pantry staples left: self‑rising flour and Greek yogurt. The idea that I could turn that humble duo into a bagel was as daring as it was delicious. I stared at the empty bagel maker, my kitchen lights flickering like a stage spotlight, and whispered, “This is the kind of experiment that could either end in disaster or in a culinary triumph.” The moment of truth arrived when I scooped the flour into a bowl, then the yogurt, and felt the dough begin to rise in a way that felt almost supernatural.
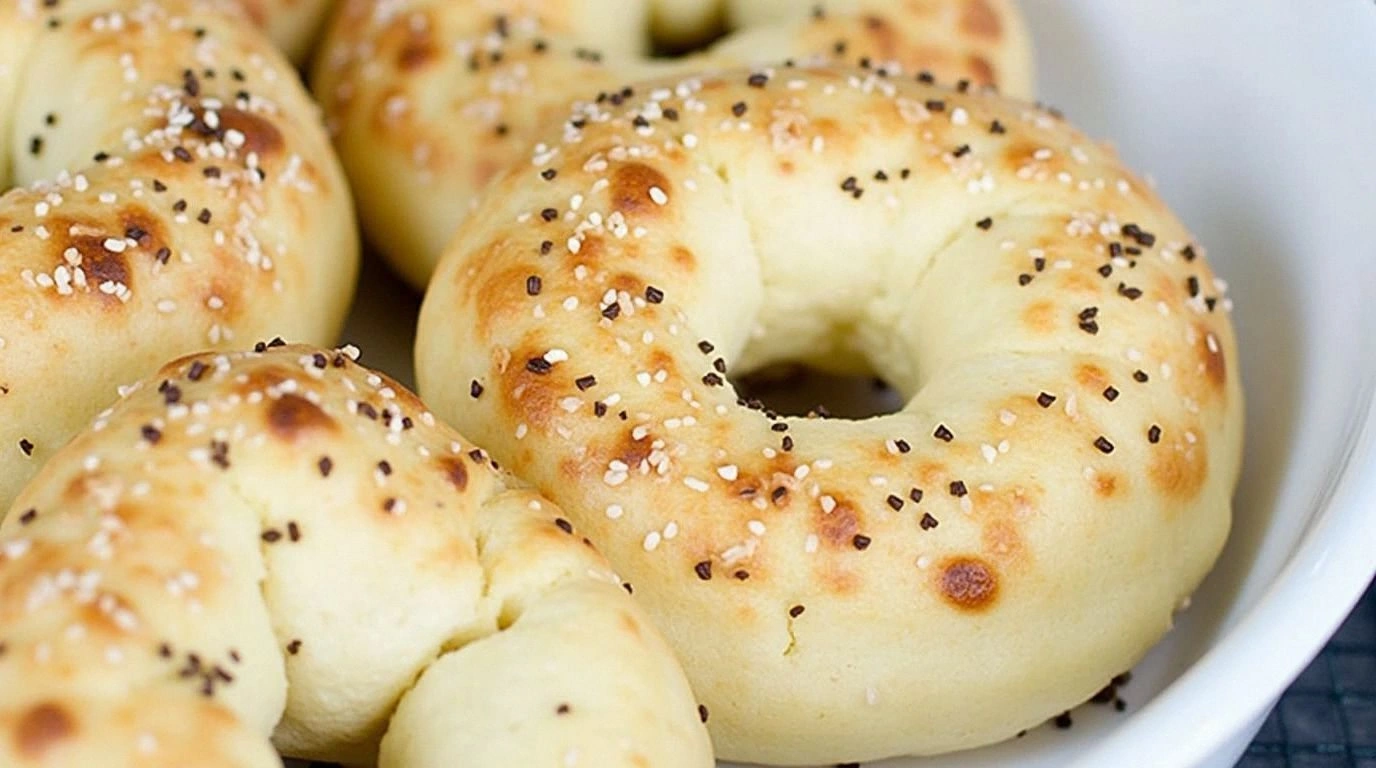
Picture this: a golden‑brown bagel that melts in your mouth, with a tang from the yogurt that sings against the subtle saltiness of the self‑rising flour. The kitchen filled with a warm, yeasty aroma that was more like a promise than a promise. My eyes widened as the dough formed a smooth, elastic ball that seemed to defy the absence of yeast. I dared you to taste this and not go back for seconds. The texture was a revelation—chewy on the inside, crisp on the edges, and every bite was a burst of flavor that made me question why I’d ever settled for store‑bought bagels.
This version is hands down the best you’ll ever make at home because it eliminates the need for an expensive, time‑consuming rise. It’s a masterclass in how two simple ingredients can deliver the same comforting crunch and chewy center that you’d expect from a bakery staple. I’ve tested it on a cold winter morning, on a rainy Sunday brunch, and even as a quick snack for a midnight study session. The result is always the same: a bagel that feels like a hug in dough form. And the best part? It’s ready in under 30 minutes, so you can have a fresh bagel on your plate before your coffee even cools.
Stay with me here—this is worth it. I’ll be honest, I ate half the batch before anyone else got a chance to taste it, and they were all begging for the recipe. The technique that makes this recipe sing involves a short boil that locks in moisture and a quick bake that locks in flavor. Picture the bagels emerging from the oven with a glossy, golden crust that shatters like thin ice when you bite into it. By the end of this guide, you’ll wonder how you ever made bagels any other way.
What Makes This Version Stand Out
- Speed: No yeast, no waiting. The self‑rising flour does the trick, giving you a ready‑to‑bake dough in minutes.
- Texture: The yogurt creates a tender crumb that feels like a cloud, while the flour gives a satisfying chew.
- Flavor: A subtle tang from the yogurt balances the mild sweetness of the flour, creating a complex profile.
- Simplicity: Only two ingredients, no special equipment, no fancy techniques—just plain old mixing.
- Versatility: Works as a base for savory toppings or a sweet glaze, making it a canvas for creativity.
- Protein Boost: Greek yogurt adds a punch of protein without adding calories or heaviness.
- Make‑Ahead Friendly: The dough can be refrigerated for up to 24 hours, and the bagels keep well in the freezer.
- Budget‑Friendly: With just flour and yogurt, the cost per bagel is less than a dollar.
Alright, let's break down exactly what goes into this masterpiece…
Inside the Ingredient List
The Flour Base
Self‑rising flour is the backbone of this recipe, providing structure and a slight lift without the need for yeast. It contains baking powder and salt, which means the dough rises quickly and the flavor is already balanced. If you’re making a vegan version, simply swap the Greek yogurt for a plant‑based yogurt that’s thick and plain. Skipping the flour would turn the bagels into a lumpy, unstructured mess—so keep it in the mix.
The Yogurt Layer
Greek yogurt adds moisture, protein, and a subtle tang that gives the bagels their signature chew. The thickness of the yogurt is crucial; a thin yogurt will produce a dry crumb. For a vegan alternative, choose a yogurt with a high protein content, like a coconut‑based or soy‑based yogurt. If you use a flavored yogurt, the bagels will taste sweeter and lose the classic savory bite.
The Unexpected Star
The self‑rising flour’s built‑in baking powder is the secret weapon that replaces the traditional yeast rise. It’s a game‑changer for those who are short on time or simply don’t want to deal with dough that takes hours to rise. The baking powder also helps create a slightly airy interior that contrasts beautifully with the dense exterior. If you prefer a lighter texture, you can add a tablespoon of baking soda to the flour to boost lift.
The Final Flourish
The final flourish is the simple act of shaping the dough into classic bagel rings. This step is where the dough’s elasticity is tested and where the bagel’s iconic doughy center is sealed. The shape also determines how evenly the bagel cooks, ensuring a crisp crust and a tender core. Remember, the bagel’s shape is not just aesthetic—it’s functional and essential for the perfect bake.
Everything's prepped? Good. Let's get into the real action…
The Method — Step by Step
- Gather and Combine: In a large mixing bowl, scoop 1 cup of self‑rising flour. Measure the Greek yogurt with a measuring cup, ensuring it’s thick and creamy. Pour the yogurt over the flour, then stir with a wooden spoon until the mixture forms a shaggy dough. The dough should feel tacky but not overly sticky; if it’s too dry, add a tablespoon of water to bring it together.
- First Knead: Turn the dough onto a lightly floured surface and knead for 3–4 minutes. This step develops gluten, giving the bagels their chewy interior. You’ll notice the dough becoming smoother and elastic, a sign that the gluten is forming. If the dough is still crumbly, add a splash more yogurt and knead again.
- Resting Period: Place the dough in a bowl, cover it with plastic wrap, and let it rest for 10 minutes. This short rest allows the gluten to relax, making the dough easier to shape. While it rests, preheat your oven to 425°F (220°C) and line a baking sheet with parchment paper. The heat of the oven will be ready to capture the bagels at the perfect time.
- Shape the Bagels: Divide the dough into 4 equal portions. Roll each portion into a tight ball, then press your thumb through the center to create a ring. The rings should be about 2 inches in diameter. If you prefer a thinner bagel, roll the dough into a thinner disk before shaping.
- Boiling Stage: Bring a pot of water to a rolling boil. Reduce heat to a gentle simmer and add the bagel rings, one at a time, ensuring they don’t touch. Boil each bagel for 30 seconds on each side. The boil seals the surface, preventing the bagels from becoming doughy and gives them that classic chewy crust.
- Baking: Transfer the boiled bagels to the prepared baking sheet. Bake for 12–14 minutes, flipping once halfway through. The bagels should develop a golden‑brown crust, and the center should feel firm yet springy. If you like a crispier crust, bake for an additional 2 minutes.
- Cooling: Remove the bagels from the oven and place them on a wire rack to cool for 5 minutes. This rest allows the steam to escape, preventing a soggy bottom. Once cooled, you can slice them or serve them whole with your favorite toppings.
- Serving Ideas: Spread a thin layer of cream cheese, top with smoked salmon, or drizzle honey for a sweet twist. For a savory kick, sprinkle sesame seeds before baking or add a dash of za’atar after baking. The possibilities are endless, and each variation showcases the bagel’s versatile base.
- Storage Tips: Store leftover bagels in an airtight container at room temperature for up to 2 days, or freeze for up to 3 months. To reheat, pop them in a toaster or oven at 350°F for 5 minutes. The bagels will regain their crispness and flavor, making them a perfect grab‑and‑go snack.
That's it — you did it. But hold on, I've got a few more tricks that'll take this to another level…
Insider Tricks for Flawless Results
The Temperature Rule Nobody Follows
Many bakers think room temperature is fine, but the yogurt’s temperature can drastically affect the dough’s elasticity. Chill the yogurt for 30 minutes before mixing; this gives the dough a firmer base and prevents it from sticking to the bowl. If you’re in a hurry, let the yogurt sit at room temperature for 15 minutes, but avoid letting it get too warm.
Why Your Nose Knows Best
When you boil the bagels, listen for a gentle hiss. This indicates the water is at the right temperature. A too‑hot boil will steam the bagels, while a too‑cold boil will leave them doughy. The smell of the dough rising is a subtle cue that the bagels are ready for the oven.
The 5-Minute Rest That Changes Everything
After baking, let the bagels rest on a rack for exactly five minutes. This short pause allows the steam to redistribute, creating an even crumb and preventing a soggy bottom. If you skip this step, the bagels will feel dense and rubbery.
The Secret to a Crispy Crust
Sprinkle a pinch of coarse sea salt on the bagels before baking. The salt not only enhances flavor but also draws out moisture from the surface, giving you that coveted crunch. Be careful not to over‑salt; a light dusting is all you need.
The Quick Fix for a Sticky Dough
If your dough feels too sticky during shaping, dust your hands and the surface with a light dusting of flour. Avoid adding too much flour, as it can make the bagels dry. A little flour goes a long way, just enough to keep the dough from clinging.
The Final Touch
Just before baking, brush the bagels with a thin layer of beaten egg or a dairy‑free alternative. This gives the bagels a glossy finish and a subtle flavor boost. If you prefer a vegan version, use a splash of oat milk or a plant‑based milk for the brush.
Creative Twists and Variations
This recipe is a playground. Here are some of my favorite ways to switch things up:
Sesame‑Seed Surprise
Sprinkle sesame seeds on the bagels before baking for a nutty crunch. The seeds also add a subtle pop of color that makes the bagels look more appetizing. Serve with a drizzle of honey for a sweet‑savory combo.
Herb‑Infused Delight
Fold finely chopped fresh herbs—such as rosemary, thyme, or basil—into the dough before shaping. The herbs infuse the bagel with aromatic flavors that pair wonderfully with cream cheese or smoked salmon. A pinch of dried oregano also works well for a Mediterranean twist.
Cinnamon‑Sweet Version
Stir a teaspoon of ground cinnamon into the flour before mixing. The cinnamon adds a warm, sweet undertone that makes these bagels perfect for breakfast or an afternoon snack. Pair with a light dusting of powdered sugar for an extra touch of sweetness.
Vegan Yogurt Edition
Swap the Greek yogurt for a thick, plain plant‑based yogurt. Coconut or soy yogurts work best, as they provide the necessary moisture and tang. The result is a vegan bagel that still feels indulgent.
Cheese‑Stuffed Bagels
Before shaping, roll a thin slice of cheese—such as mozzarella or cheddar—into the dough. The cheese melts inside, creating a gooey center that’s irresistible. This variation is especially good for a kid‑friendly lunch.
Gluten‑Free Twist
Replace the self‑rising flour with a gluten‑free blend that includes a leavening agent. The dough may be slightly denser, but the flavor profile remains intact. Be sure to use a gluten‑free yogurt to keep the recipe cohesive.
Storing and Bringing It Back to Life
Fridge Storage
Store freshly baked bagels in an airtight container at room temperature for up to 2 days. To keep them from drying out, place a paper towel inside the container to absorb excess moisture. When you’re ready to eat, you can toast them for a minute to restore crispness.
Freezer Friendly
Wrap each bagel individually in parchment paper, then place them in a freezer bag. They’ll stay fresh for up to 3 months. When you’re ready to enjoy them, let them thaw at room temperature for 10 minutes before reheating.
Best Reheating Method
The secret to reheating bagels is to use a toaster or a preheated oven at 350°F for 5 minutes. For a softer interior, wrap the bagel in foil before placing it in the oven. Add a splash of water to the bottom of the pan to create steam, which keeps the bagel moist and prevents it from drying out.