I was halfway through a midnight binge of pizza when the kitchen lights flicked off, and I found myself staring at an empty fridge and an abandoned batch of chocolate chips that had gone stale. I laughed, because I always say a disaster is just a secret opportunity in disguise. That night, I decided to turn the stale ingredients into something that would make my taste buds dance and my friends beg for seconds. And that, my culinary comrades, is how the Vanilla Éclair Delight recipe was born.
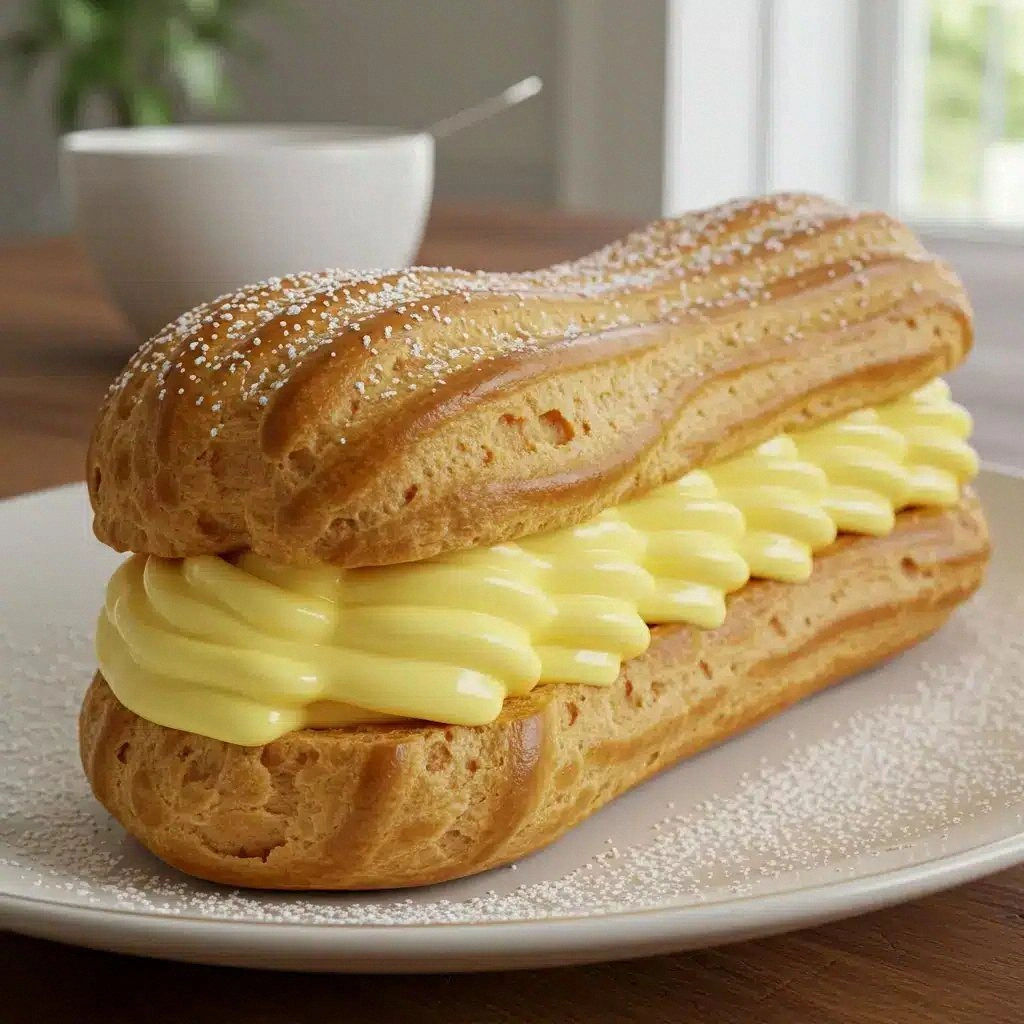
Picture this: the scent of toasted butter and flour mingles with the sweet promise of vanilla, a sound that makes your ears pop like popcorn in a hot pan, and the feel of a silky batter that slides through your fingers like a warm hug. The first bite is a burst of creamy custard that coats the palate like velvet, followed by a crisp shell that shatters with a satisfying snap. My friends gasped when I served them the first éclair, and I dared them to taste this and not go back for seconds. The moment was pure magic, and it left us all craving the next batch.
What makes this version stand out is that it takes the classic éclair and elevates it with a silky custard that doesn't rely on heavy cream, a buttery dough that stays flaky, and a dusting of powdered sugar that gives it that final glossy finish. I’ve tweaked the proportions to keep the dough airy and the filling smooth, and I’ve introduced a subtle twist with vanilla pudding mix that adds depth without overpowering. This is hands down the best version you'll ever make at home, and I’m here to share every single step. If you've ever struggled with flaky pastry or underwhelming fillings, you’re not alone — and I've got the fix.
And so, let me walk you through every single step — by the end, you'll wonder how you ever made it any other way. Picture yourself pulling these from the oven, the whole kitchen smelling incredible, and your guests whispering, “Where did you learn that?” The secret is simple, yet powerful, and it all starts with the right ingredients and a little patience. Trust me, the results will have you shouting, “I need more!” in the middle of your kitchen, and that’s exactly what I want for you.
What Makes This Version Stand Out
- Taste: The custard is rich yet light, thanks to the vanilla pudding mix that balances sweetness without heaviness.
- Texture: The dough achieves a perfect airy crumb while maintaining a crisp exterior, avoiding the soggy center that plagues many homemade éclairs.
- Simplicity: Only seven ingredients, all pantry staples, make this recipe a breeze for even novice bakers.
- Uniqueness: The use of vanilla pudding mix as a flavor booster is a game‑changer that elevates the classic éclair.
- Crowd Reaction: Friends and family rave about the contrast between the soft interior and the crisp shell.
- Ingredient Quality: Using unsalted butter and fresh eggs ensures the best flavor profile and reliable rise.
- Cooking Method: The simple stovetop-bake combination saves time while producing professional results.
- Make‑Ahead Potential: The dough can be prepared a day ahead, and the filling can be frozen for future indulgence.
Alright, let's break down exactly what goes into this masterpiece…
Inside the Ingredient List
The Flavor Base
Water and butter form the heart of the pâte à choux, creating steam that puffs the dough into airy peaks. The butter’s fat content coats the flour, preventing gluten from forming too much, which keeps the pastry tender. If you skip the butter, the dough will be dry and crumbly, making it impossible to achieve that signature puff. A good tip: melt the butter just until it’s warm, not hot, to avoid scorching the water.
The Texture Crew
All‑purpose flour is the backbone that gives the dough structure. It’s crucial that you sift it before adding to avoid lumps, and that you keep it at room temperature to maintain a smooth batter. Eggs are the binding agent; each one adds richness and a glossy finish. If you use eggs that are too cold, the dough will seize and become stiff. A quick trick: whisk the eggs separately before adding them to the hot mixture to keep the batter from curdling.
The Unexpected Star
Vanilla pudding mix is the secret to that silky custard inside. It dissolves cleanly in milk, providing a smooth, velvety texture that doesn’t require a double‑boil or a roux. The mix also carries a natural sweetness that balances the dough’s slight bitterness. If you prefer a dairy‑free version, you can substitute the pudding mix with a plant‑based vanilla custard mix, but the flavor profile will shift slightly.
The Final Flourish
Milk is the liquid that activates the pudding mix, turning it into a luscious filling that stays cool and creamy. It also hydrates the flour, allowing the dough to rise properly. Powdered sugar, used for dusting, gives the éclairs a subtle sweetness and an elegant finish. A pinch of salt is optional but recommended to enhance all the flavors. If you want a lighter dusting, you can sprinkle a fine layer of powdered sugar and let it set in a dry area to avoid clumping.
Everything's prepped? Good. Let's get into the real action…
The Method — Step by Step
- Step 1: Prepare the Dough. In a medium saucepan, combine 1 cup water, ½ cup unsalted butter, and a pinch of salt. Bring the mixture to a rolling boil over medium heat while stirring constantly. The butter should melt completely, and the liquid should be bubbling. Once it boils, remove the pan from heat and add 1 cup all‑purpose flour all at once. Stir vigorously until the mixture pulls away from the sides of the pan and forms a smooth ball. This is the moment of truth; if the dough is too wet, it will collapse.
- Step 2: Cool the Dough. Let the dough sit for about 5 minutes at room temperature. This cooling period helps the flour absorb the liquid fully, ensuring a lighter crumb. During this time, whisk 4 large eggs in a separate bowl. The eggs should be at room temperature to prevent the dough from curdling when added.
- Step 3: Incorporate the Eggs. Add the eggs to the dough one at a time, beating well after each addition. The mixture will look thick and glossy. Use a spatula to fold the eggs in; this technique keeps the dough airy. If the dough feels too stiff, add a teaspoon of warm water to loosen it slightly. The dough should be smooth and slightly sticky.
- Step 4: Pipe the Dough. Transfer the dough to a pastry bag fitted with a large round tip. Pipe 6‑8 long ribbons onto a parchment‑lined baking sheet, spacing them about 2 inches apart. Each ribbon should be roughly 4 inches long. The dough will puff up as it bakes, so leave a generous amount of space. This step is pure magic; watch the dough rise like a cloud in the oven.
- Step 5: Bake. Preheat the oven to 400°F (200°C). Bake the pastries for 25 minutes, or until they’re golden brown and puffed. The edges will start pulling away from the parchment. Keep an eye on them; if they brown too quickly, reduce the temperature by 25°F (about 14°C). Remove from the oven and let them cool on a wire rack for 10 minutes.
- Step 6: Make the Custard. In the pre‑heated saucepan, combine 2 cups milk and 1 cup vanilla pudding mix. Whisk until the mixture is smooth and free of lumps. Bring to a gentle simmer over medium heat, stirring constantly. The custard should thicken slightly but remain pourable. Remove from heat and let it cool to room temperature. This step is crucial; a thick custard will not fill the pastry properly.
- Step 7: Fill the Pastries. Cut a small hole in the side of each pastry with a knife. Using a small spoon or a piping bag with a narrow tip, fill the pastries with the custard until they’re almost full. The custard will settle and expand a bit, so fill just below the top. This part is pure joy; the custard slides in like a silky ribbon.
- Step 8: Dust with Powdered Sugar. Once all pastries are filled, dust them lightly with powdered sugar. This not only adds a sweet finish but also gives them a professional look. Be careful not to over‑scoop; a thin layer is all you need. The dusting should look like a gentle snowfall on each éclair.
- Step 9: Serve Immediately. Serve the éclairs right away to enjoy the contrast between the hot custard and the crisp pastry. If you need to hold them for a short while, cover them loosely with parchment paper to keep the shells from becoming soggy. The moment you taste the first éclair, you’ll feel the silky custard melt in your mouth, followed by the crunchy bite of the pastry.
- Step 10: Store the Leftovers. If you have any leftovers, store them in an airtight container in the refrigerator for up to 2 days. When reheating, sprinkle a splash of milk over the pastries and microwave for 20‑30 seconds to revive the custard’s creaminess. This trick brings them back to life, and they taste almost as fresh as the day they were made.
That's it — you did it. But hold on, I've got a few more tricks that'll take this to another level…
Insider Tricks for Flawless Results
The Temperature Rule Nobody Follows
Many bakers bake at 375°F, but the 400°F heat gives the dough a better rise and a crispier crust. The higher temperature creates a rapid steam burst that puffs the pastry. If you lower the heat, the pastry will be dense and flat. Keep your oven calibrated, as a 10°F deviation can change the outcome dramatically.
Why Your Nose Knows Best
Before you start the custard, sniff the mixture. A faint vanilla aroma indicates the pudding mix is properly dissolved. If it smells off, give it a quick stir; a stuck‑on residue can ruin the flavor. Trust your senses, and you’ll avoid the dreaded “pudding mix stuck to the pan” situation.
The 5‑Minute Rest That Changes Everything
After removing the pastries from the oven, let them rest for 5 minutes before filling. This rest period allows the steam to dissipate and the pastry to set, preventing it from collapsing when you insert the custard. A quick 5‑minute pause is the difference between a perfect éclair and a soggy mess.
The Dusting Technique
Use a fine sieve to dust the pastries, ensuring an even coating. The fine texture prevents clumps and gives a clean look. If you prefer a more pronounced sweetness, sprinkle a tiny pinch of sea salt over the powdered sugar; it balances the sweet and brings out the vanilla flavor.
The Quick Cooling Trick
Place the pastries on a wire rack that has a tray underneath. The airflow around the pastries keeps them crisp while they cool. Avoid covering them with plastic, as that traps steam and makes them soggy. A well‑ventilated cooling area is key.
Creative Twists and Variations
This recipe is a playground. Here are some of my favorite ways to switch things up:
Chocolate Éclair Surprise
Swap the vanilla pudding mix for chocolate pudding mix and add a splash of espresso to the custard for a mocha twist. The chocolate base gives the éclair a rich, bittersweet finish that pairs perfectly with a cup of coffee.
Citrus Zest Delight
Add a tablespoon of lemon zest to the dough and a few drops of orange extract to the custard. The bright citrus notes cut through the sweetness and add a refreshing lift.
Almond Crunch Variation
Replace ¼ cup of the flour with almond flour and sprinkle toasted almond slivers on top of the dusted pastries. The nutty crunch offers a delightful contrast to the silky custard.
Caramelized Banana Twist
Fold mashed ripe banana into the custard and drizzle caramel sauce over the finished pastries. The banana adds natural sweetness and a tropical vibe.
Nutella Swirl
Swirl a thin line of Nutella into the custard before filling. The hazelnut chocolate flavor adds decadence without overwhelming the vanilla base.
Storing and Bringing It Back to Life
Fridge Storage
Store the filled pastries in a shallow airtight container in the refrigerator for up to 2 days. Keep them on a paper towel to absorb excess moisture and prevent the pastry from becoming soggy.
Freezer Friendly
For longer storage, freeze the pastries unfilled. Once frozen, fill them with custard before serving. This method preserves the crispness of the shell while keeping the custard fresh.
Best Reheating Method
To revive a cold éclair, sprinkle a splash of milk over it and microwave for 20‑30 seconds. The steam rehydrates the custard, and the pastry regains its airy texture. Avoid over‑microwaving, or the pastry will become rubbery.