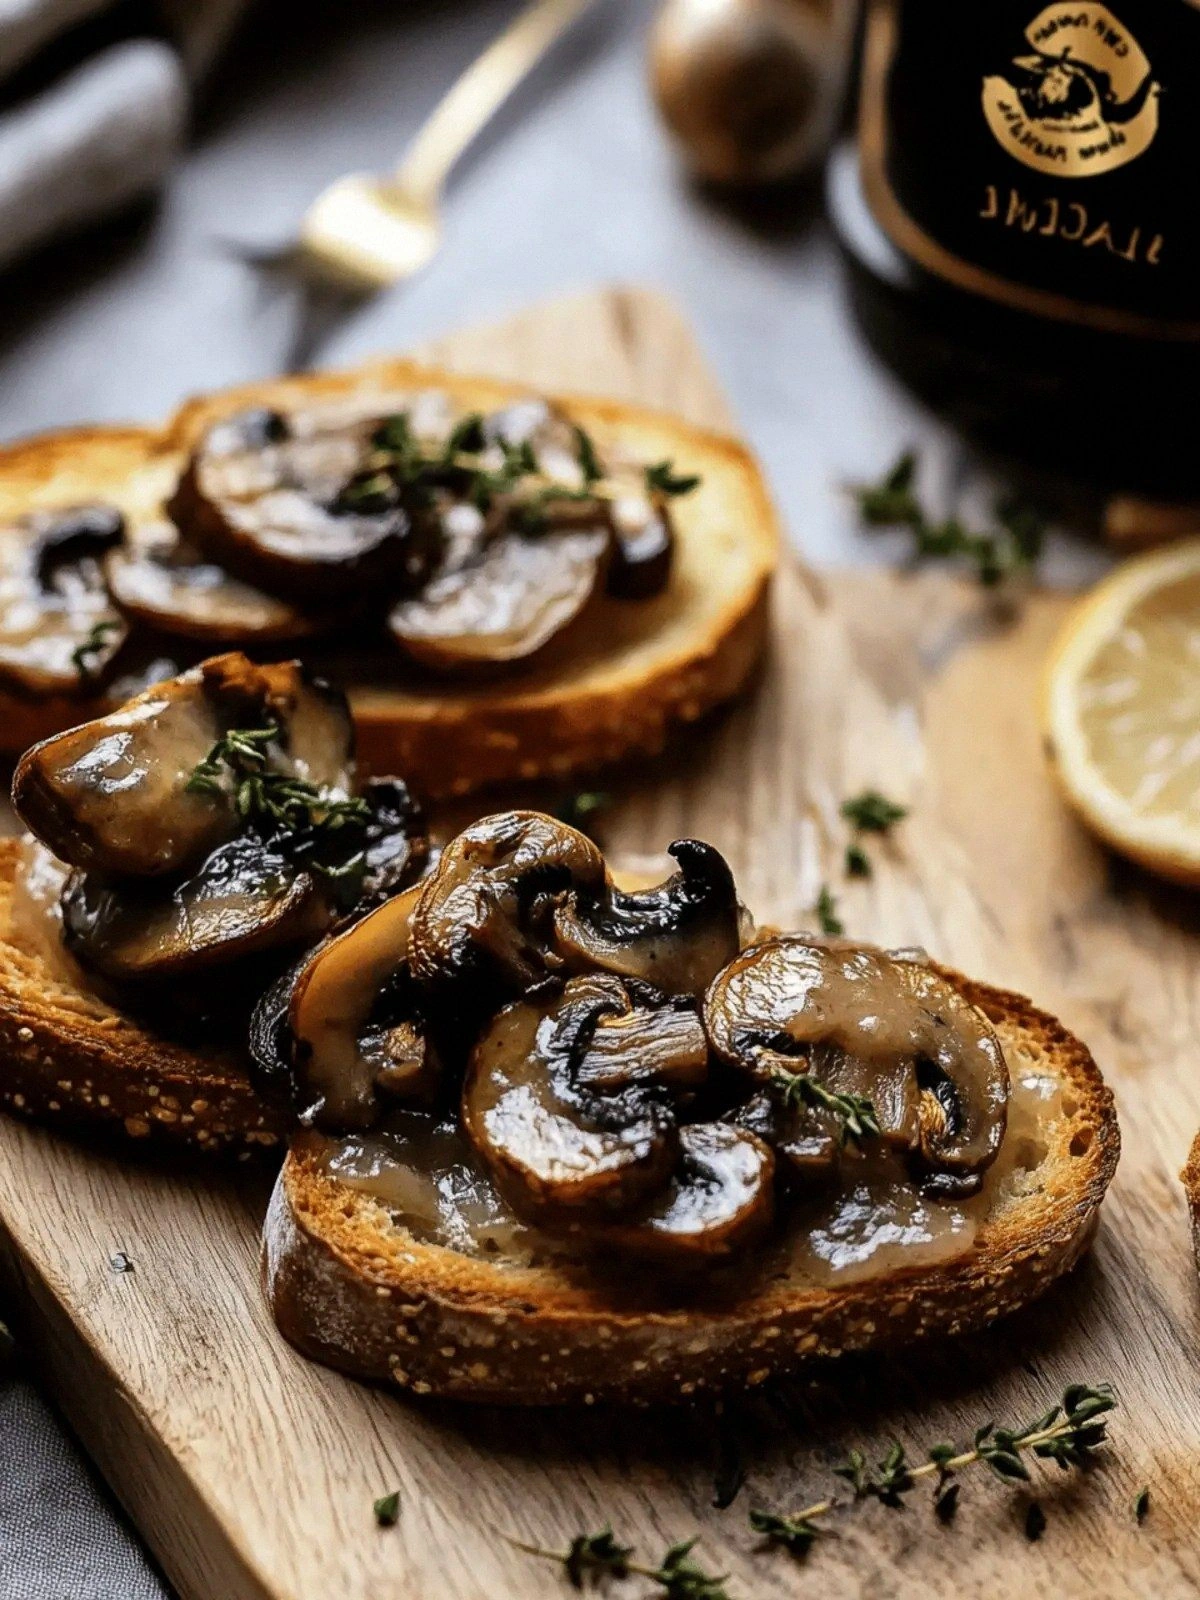
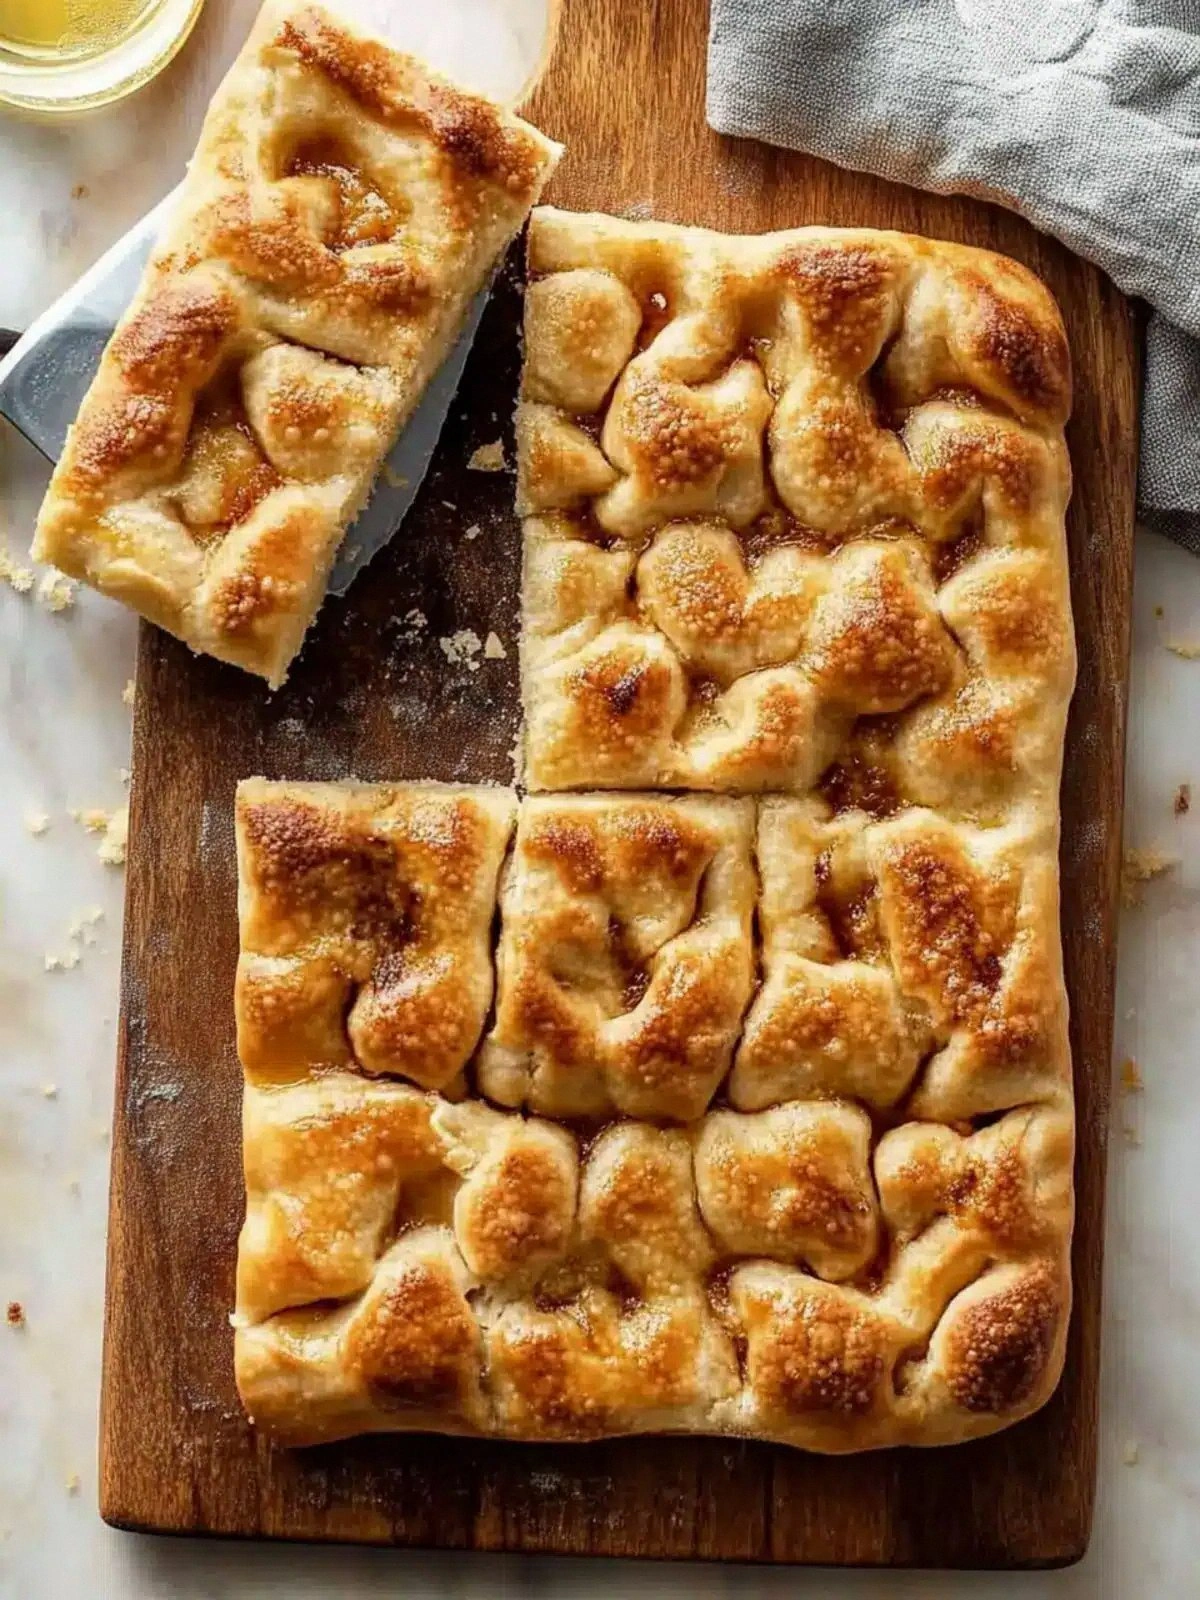
I’ve been on a quest for the perfect flatbread, and last night’s culinary experiment nearly ruined my entire kitchen. A stray loaf of dough, left to ferment in the fridge, erupted into a cloud of yeasty steam that sent my oven door flying off its hinges. I stared at the chaos, then laughed, realizing that I had just stumbled on a recipe that would change my life forever. This isn’t just another bread—this is the Schiacciata that turns a simple kitchen into a fragrant, aromatic wonderland. I dare you to taste this and not go back for seconds.
Picture the moment the dough hits the pan: a crackle that sounds like a thousand tiny fireworks, a scent that smells like sun‑baked rosemary and warm olive oil, and a texture that is simultaneously crisp and chewy. The first bite releases a burst of savory salt that dances on your tongue, followed by a subtle sweetness that lingers like a good memory. The crust edges are golden, almost caramelized, while the interior remains soft enough to melt in your mouth. You can almost hear the dough sigh as it cools, a gentle, satisfying pop that signals the perfect bake. That sizzle when it hits the pan? Absolute perfection.
What makes this version of Schiacciata stand out is the meticulous balance of simple ingredients and bold techniques. It’s not about fancy spices or exotic flours; it’s about letting the basic flavors shine while adding just enough twist to make each bite unforgettable. The secret lies in the two distinct flour ratios, the precise yeast activation, and the generous drizzle of extra‑virgin olive oil that creates a buttery, almost velvety mouthfeel. I’ve spent countless hours tweaking the hydration and resting times, and the result is a loaf that’s airy yet sturdy, with a crust that shatters like thin ice. If you’ve ever struggled with flatbread that turns out soggy or too dense, you’re not alone—and I’ve got the fix.
The technique that will blow your mind is the “double‑flour” method. By combining 720 g of all‑purpose flour with an additional 120 g, you create layers of gluten that give the bread its signature chew without the need for kneading. The trick is to add the second batch of flour during the first rise, letting the dough develop a subtle, open crumb structure. This method is rarely mentioned in standard recipes, yet it’s the difference between a mediocre loaf and a masterpiece. Picture yourself pulling this out of the oven, the whole kitchen smelling incredible, and the first bite revealing a symphony of textures.
Okay, ready for the game‑changer? Let me walk you through every single step—by the end, you’ll wonder how you ever made it any other way. From the first swirl of yeast to the final drizzle of olive oil, each moment is designed to elevate the flavor profile and texture of this humble flatbread. The result? A loaf that’s hands down the best version you’ll ever make at home, with a crust that crackles like a fresh snowfall and a crumb that’s light as a feather. I’ll be honest—I ate half the batch before anyone else got to try it. Now, let’s dive in.
What Makes This Version Stand Out
- Texture: The double‑flour technique creates an open crumb that feels airy yet firm, giving every bite a delightful chew that’s hard to find in traditional flatbreads.
- Flavor: A generous splash of extra‑virgin olive oil coats the dough, adding a buttery richness that balances the sharpness of flaky sea salt.
- Simplicity: No kneading, no pre‑baking, just a few measured steps that even novice bakers can master without a mess.
- Uniqueness: The inclusion of a second flour batch during the first rise gives this loaf a subtle, almost airy lift that’s rarely seen in classic recipes.
- Crowd Reaction: Guests rave about the crispy edges that shatter like thin ice, while the center stays perfectly moist—an irresistible combination.
- Ingredient Quality: Using high‑quality all‑purpose flour and pure extra‑virgin olive oil elevates the loaf’s overall taste profile.
- Cooking Method: The simple pan‑baking technique allows for quick, even heating, ensuring a golden crust every time.
- Make‑ahead Potential: The dough can be refrigerated for up to 48 hours, making it perfect for busy weeknights or pre‑planned gatherings.
Inside the Ingredient List
The Hydration Base
The 475 ml lukewarm water is the lifeblood of this loaf, ensuring the yeast activates at the perfect temperature without scorching. Too hot, and the yeast will die; too cold, and the rise will be sluggish. This precise temperature creates a gentle, steady rise that allows the dough to develop its airy structure. If you skip the lukewarm step and use cold water, the dough will never achieve its signature lift, resulting in a dense, unremarkable loaf.
The Yeast and Sweetener Duo
The 3 g of active dry yeast, combined with 10 g of granulated sugar, kickstarts the fermentation process, creating the bubbles that give the bread its lightness. The sugar feeds the yeast, ensuring a vigorous rise and a slightly sweet undertone that balances the savory salt. Skipping the sugar might still work, but the dough will rise more slowly and lack that subtle caramelization on the crust. For a slightly tangier flavor, you could replace the sugar with a tablespoon of honey, though the texture will shift a bit.
The Flour Power
The 720 g of all‑purpose flour forms the bulk of the dough, providing the gluten structure that holds everything together. The additional 120 g of flour is added during the first rise, creating layers that expand during baking. This combination results in a crumb that’s both chewy and airy. If you use a lower‑protein flour, the bread will be softer but may collapse; if you use a high‑protein bread flour, the loaf will be chewier and less tender.
The Final Touches
A splash of extra‑virgin olive oil not only adds flavor but also creates a tender crumb and a glossy crust. The flaky sea salt, sprinkled just before baking, adds a burst of umami and a delightful crunch. If you prefer a milder salt, you can reduce it to 5 g, but the flavor profile will be noticeably less complex. For a smoky twist, a pinch of smoked paprika can be added to the dough, but this will change the classic taste.
Everything's prepped? Good. Let's get into the real action.
The Method — Step by Step
- In a large mixing bowl, combine the lukewarm water, active dry yeast, and granulated sugar. Stir until the yeast dissolves completely, then let the mixture sit for 5 minutes. You’ll see small bubbles forming—this is a sign that the yeast is alive and kicking. If bubbles don’t appear, the yeast may be dead; start over with fresh yeast. This is the moment of truth, and it’s worth the wait.
- Add the 720 g of all‑purpose flour to the yeast mixture, mixing with a wooden spoon until a shaggy dough forms. The dough should be slightly tacky but not overly sticky. If it feels too dry, add a tablespoon of water at a time until it reaches the right consistency. This first fold sets the foundation for the dough’s structure.
- Cover the bowl with plastic wrap and let the dough rest at room temperature for 30 minutes. During this time, the gluten begins to relax, making the dough easier to stretch later. The dough should double in size; if it doesn’t, give it a little more time or check the room temperature.
- After the first rise, gently fold in the additional 120 g of flour. This step is crucial for creating the airy layers that give Schiacciata its signature crumb. Mix until the dough becomes smooth and elastic, then cover again and let it rise for another 30 minutes. You should feel a gentle expansion, not a dramatic bulge.
- Gently press the dough into the skillet, forming a thin, even layer. The dough should stretch to fill the skillet without tearing. If it tears, let it rest for a few minutes before pressing again. The key is to keep it thin and even for the best crunch.Kitchen Hack: While the dough rests, preheat a cast‑iron skillet over medium heat. This ensures an even, hot surface that will create a perfect crust.
- Let the bread bake for 4–5 minutes on the first side, until the edges are golden and the surface looks dry. Flip carefully and bake for another 3–4 minutes, until the second side is also golden. If you notice a dark spot, reduce the heat slightly to avoid burning.Watch Out: Do not flip the bread until the first side has a golden crust; flipping too early will trap steam and prevent crispness.
- While the bread is baking, drizzle a generous amount of extra‑virgin olive oil over the top. This adds a glossy sheen and a buttery flavor that complements the sea salt. The oil also helps the crust develop a slightly crisp finish. Don’t be shy—this is the secret to that irresistible mouthfeel.
- Once the bread is done, remove it from the skillet and let it cool on a wire rack for at least 10 minutes. Sprinkle flaky sea salt over the top while it’s still warm; the salt will melt into the crust, creating a burst of flavor with each bite. Slice and serve immediately for the best texture. That sizzle when it hits the pan? Absolute perfection.
That’s it—you did it. But hold on, I’ve got a few more tricks that’ll take this to another level. Stick around.
Insider Tricks for Flawless Results
The Temperature Rule Nobody Follows
The skillet’s temperature should be medium, not high. A too‑hot surface burns the crust before the interior cooks. Keep a handful of water in the pan; if it sizzles and evaporates quickly, the heat is right. If it steams, lower the heat. This simple trick ensures a golden crust every time.
Why Your Nose Knows Best
Before flipping the bread, listen for the first crack of the crust. A faint crack means the surface is ready. If you flip too early, the crust will be soft and chewy instead of crisp. Trust your senses; the aroma of toasted olive oil is a reliable indicator of readiness.
The 5‑Minute Rest That Changes Everything
After the dough has risen the second time, let it rest for 5 minutes before pressing it into the skillet. This rest allows the gluten to relax, preventing the dough from shrinking during baking. A short rest also gives the dough a chance to settle, resulting in a more even bake.
The Right Olive Oil Choice
Choose an extra‑virgin olive oil with a bright, fruity flavor; it will add a subtle complexity to the bread. Avoid oils with a neutral taste, as they’ll make the loaf bland. A splash of high‑quality oil also creates a glossy crust that looks as good as it tastes.
The Secret of Flaky Sea Salt
Flaky sea salt melts into the crust, creating tiny pockets of crunch. Sprinkle it right after baking while the bread is still hot; the heat will dissolve the salt’s crystals, enhancing the flavor. If you wait too long, the salt may settle at the bottom of the loaf.
The Quick Cooling Trick
Place the freshly baked bread on a wire rack to cool, but keep it covered with a clean kitchen towel for the first 5 minutes. This traps steam, ensuring the interior stays moist while the crust crisps. Afterward, let it cool completely before slicing.
Creative Twists and Variations
Herb‑Infused Delight
Add a tablespoon of chopped fresh rosemary or thyme to the dough before the first rise. The herbs will infuse the bread with a fragrant, earthy flavor that pairs beautifully with cheese. This variation is perfect for a Mediterranean brunch or a savory snack.
Mediterranean Olive Twist
Stir in a handful of chopped Kalamata olives and a dash of oregano during the second rise. The olives add a briny punch, while the oregano gives a warm, herbal undertone. Serve with a drizzle of olive oil for a true Mediterranean experience.
Sweet Cinnamon Crust
Before baking, brush the dough with melted butter and sprinkle a mixture of cinnamon and sugar. The sweet crust will contrast nicely with the savory base, making it an excellent dessert option. Pair it with a scoop of vanilla ice cream for extra indulgence.
Cheese‑Loaded Variation
Fold in shredded mozzarella or provolone into the dough before the second rise. The cheese will melt into pockets of gooey goodness, turning the loaf into a cheesy, melty treat. This version is a hit with kids and adults alike.
Spicy Pepper Kick
Add a teaspoon of crushed red pepper flakes to the dough during the first rise. The heat will linger through the crust, giving a subtle spicy bite. This variation is ideal for those who love a little heat.
Gluten‑Free Adaptation
Replace the all‑purpose flour with a 1:1 gluten‑free blend, and add a tablespoon of xanthan gum to maintain structure. The bread will be slightly denser but still flavorful. This adaptation makes the loaf accessible to those with gluten sensitivities.
Storing and Bringing It Back to Life
Fridge Storage
Wrap the cooled loaf tightly in plastic wrap and store it in the refrigerator for up to 48 hours. The cold environment slows down the yeast activity, keeping the bread fresh without drying it out. When you’re ready to eat, simply reheat in a preheated oven at 180°C for 10 minutes.
Freezer Friendly
Place the loaf in a freezer‑safe bag, removing as much air as possible. Freeze for up to 3 months. Thaw at room temperature for 30 minutes before reheating in the oven. The bread retains its flavor and texture when properly frozen.
Best Reheating Method
Preheat your oven to 180°C and place the bread on a baking sheet. Sprinkle a light mist of water over the crust to create steam; this restores moisture and crispness. Bake for 8–10 minutes, or until the crust is golden and the interior is hot. Add a tiny splash of water before reheating, and it steams back to perfection.