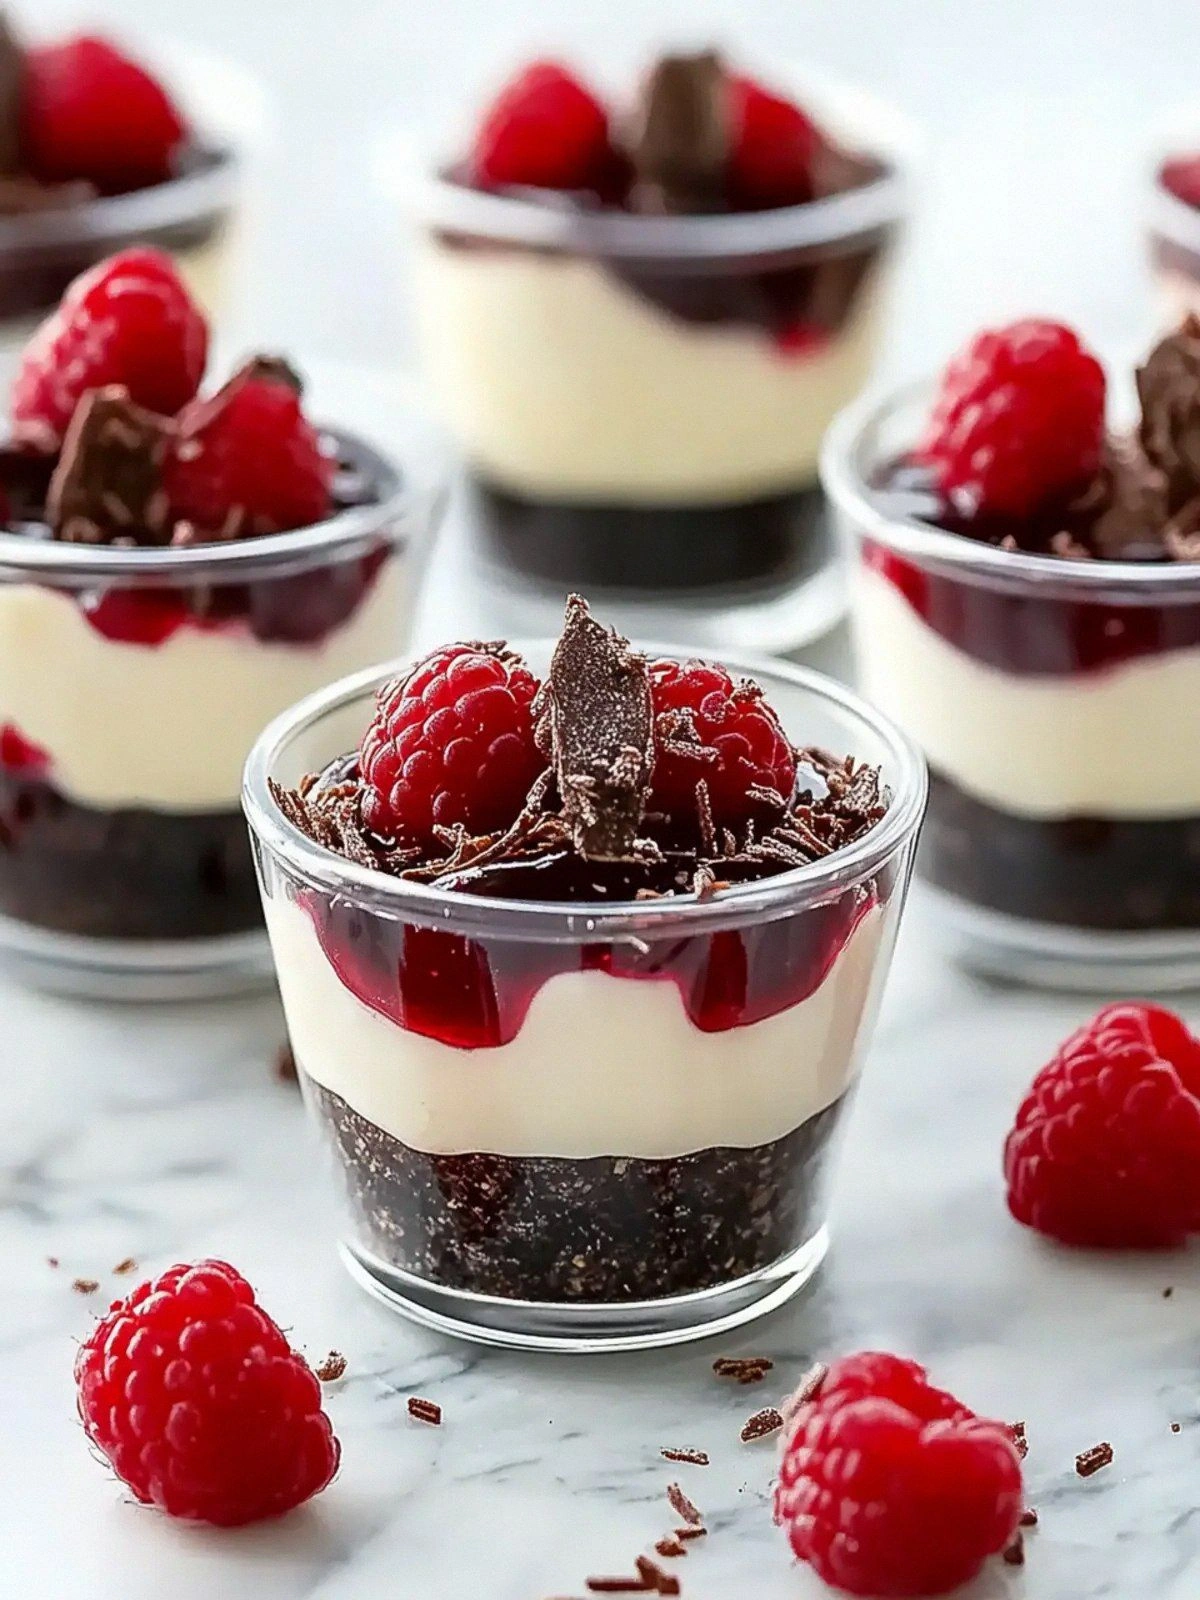
I was standing in my kitchen, staring at a half‑baked chocolate cake that had just slipped out of the oven like a rogue cloud of smoke. The batter had turned into a sticky, chocolatey mess that clung to the pan, and I thought, “This is a disaster.” But then a thought struck me: what if I could salvage that ruined cake and turn it into something that feels like a decadent, bite‑size dessert? I grabbed my favorite mini silicone molds, a jar of cherry pie filling, and a handful of semisweet chocolate shavings, and I set out to create the ultimate mini dessert cup.
Picture the aroma that fills your kitchen as the chocolate cake melts into a velvety ganache, the sweet tang of cherry filling swirled into the mix, and the chocolate shavings crackle with each spoonful. I can almost hear the gentle hiss of the cream whipping into a silky cloud, the faint pop of cherries as they break apart, and the soft clink of a spoon against a glass. The colors are a luscious dark brown, bright red, and a glittering speck of chocolate, all dancing together in a single, tiny cup. I dare you to taste this and not go back for seconds, because the first bite feels like a miniature explosion of flavors that lingers on your tongue.
What makes this version stand out is that it’s not just a dessert; it’s a performance. I’ve taken a simple chocolate cake and turned it into a multi‑layered masterpiece that feels like a sweet cocktail served in a cup. The cherry filling doesn’t just add fruitiness; it provides a subtle acidity that cuts through the richness, creating a perfect balance that most recipes get wrong. The chocolate shavings add a textural contrast, a crackly, bittersweet finish that lingers long after the last spoonful. And the best part? It’s all assembled in a matter of minutes, so you can impress your guests without a full kitchen overhaul.
If you’ve ever struggled with making mini desserts that look fancy and taste amazing, you’re not alone. I’ve been there, juggling a full dinner and trying to whip up something sweet on the fly. That’s why I’ve poured every ounce of my culinary obsession into this recipe, and I’m confident that it’s hands down the best version you’ll ever make at home. Picture yourself pulling these cups out of the oven, the whole kitchen smelling incredible, and your guests’ eyes lighting up in anticipation. Stay with me here—this is worth it, because the next few steps will turn your kitchen into a chocolate‑cherry wonderland.
What Makes This Version Stand Out
- Taste: The combination of rich chocolate and tart cherry creates a flavor profile that feels like a sophisticated dessert cocktail. The sweetness is balanced by a subtle acidity, preventing it from becoming cloying.
- Texture: A silky ganache base with a crunchy chocolate shaving topping delivers a satisfying contrast in every bite.
- Visual Appeal: The dark chocolate base, bright red cherry filling, and speckled shavings create an eye‑catching presentation that looks like a piece of fine art.
- Simplicity: You only need six ingredients, no elaborate sauces or flambé tricks. The method is straightforward, making it perfect for beginners.
- Make‑ahead Potential: Assemble the cups a few hours ahead, chill, and they’ll keep fresh for up to 48 hours—great for parties.
- Ingredient Quality: Using high‑quality chocolate cake and fresh cherries elevates the final product, turning a simple dessert into an indulgent experience.
Alright, let’s break down exactly what goes into this masterpiece. Each component is chosen for its ability to elevate the overall experience, from the first sip of the ganache to the last crunchy bite of chocolate shavings. The next section will dive into the ingredient list, explaining why each item matters and what happens if you skip it.
Inside the Ingredient List
The Flavor Base
Chocolate Cake: The foundation of this dessert, the cake provides the deep, bittersweet backbone that anchors the sweet and tart elements. A full 3 cups of cake ensures a robust chocolate flavor that doesn’t get lost in the mix. Skipping it would turn the cups into a light, almost airy treat that lacks the luxurious mouthfeel you’re after. For an extra touch, opt for a cake with a hint of espresso or sea salt to deepen the flavor profile.
The Creamy Layer
Heavy Cream: This ingredient is the secret to a silky ganache that coats the tongue like velvet. The 2 cups of cream allow the chocolate to melt into a luscious, pourable consistency that’s easy to layer. If you replace it with milk, the ganache will be thinner and lose its rich mouthfeel. For a dairy‑free version, try coconut cream, but be aware it will add a coconut undertone.
The Sweet Touch
Powdered Sugar: The 1 cup of powdered sugar balances the bitterness of the chocolate and the acidity of the cherries. It also gives the ganache a silky texture, preventing it from being clumpy. Skipping the sugar will result in a more bitter ganache that may not pair well with the tart cherries. If you prefer a lower‑sugar option, try using a sugar substitute, but adjust the amount to taste.
The Unexpected Star
Cherry Pie Filling: The 1 cup of cherry filling is the star that brings brightness and a burst of fruitiness. It cuts through the richness, adding a subtle acidity that keeps the dessert from feeling heavy. If you replace it with fresh cherries, you’ll get a fresher, slightly tangier flavor, but the texture will differ. Keep in mind that the filling’s natural sugars will also sweeten the ganache, so you might want to reduce the powdered sugar slightly.
Everything’s prepped? Good. Let’s get into the real action.
The Method — Step by Step
- First, break the chocolate cake into small pieces and place them in a heat‑proof bowl. Melt them gently over a pot of simmering water (double boiler) until they’re completely liquefied. The texture should be smooth and glossy, like melted chocolate poured into a glass. This step is crucial; if the cake isn’t fully melted, the ganache will have lumps that ruin the mouthfeel.
- Next, whisk the heavy cream in a separate bowl until it just starts to thicken. It should form soft peaks but not be fully whipped. This creamy base will blend seamlessly with the melted cake, creating a silky ganache. The key is to keep the cream cold so it doesn’t curdle when mixed.
- Pour the melted cake over the cream and stir gently with a spatula. The mixture should form a smooth, homogeneous ganache. If it looks too thick, add a splash of milk to thin it out. This is the moment of truth—watch the ganache coat the spoon like a velvet curtain.
- Fold in the powdered sugar until it’s fully dissolved. The ganache should feel silky, not gritty. Taste it; it should be sweet enough to complement the cherry, but not overpowering. If it’s too sweet, add a pinch of sea salt to balance the flavors.
- Add the cherry pie filling to the ganache and stir until the mixture is a uniform, bright red swirl. The cherries should not break into pieces; they need to stay whole for that delightful pop in each bite. If the filling is too thick, let it sit for a few minutes to soften.
- Pour the ganache into the silicone molds, filling each cup about ¾ full. The ganache should settle into the mold, creating a glossy, chocolatey base with a visible swirl of cherry. Let it sit for a minute to allow the flavors to meld.
- Top each cup with a generous dusting of semisweet chocolate shavings. The shavings add a subtle bitterness and a delightful crunch that contrasts with the creamy ganache. They also create a beautiful visual contrast against the dark chocolate base.
- Refrigerate the cups for at least 30 minutes, or until the ganache has set. The chill will firm up the texture and make the cups easier to serve. When you’re ready to serve, remove them from the molds and place them on a platter.
- Just before serving, garnish each cup with a whole cherry on top. The stem adds a touch of elegance and makes each cup feel like a personal invitation to indulge. Serve immediately and watch the smiles appear.
That’s it—you did it. But hold on, I’ve got a few more tricks that will take this to another level, turning a simple dessert into a showstopper.
Insider Tricks for Flawless Results
The Temperature Rule Nobody Follows
The key to a perfect ganache is the temperature of the cream. If it’s too warm, the chocolate will seize; if it’s too cold, the mixture will be lumpy. Keep the cream at room temperature, but not warm. A good test is to touch the cream; it should feel like a cool shower but not cold.
Why Your Nose Knows Best
When the ganache is ready, give it a quick sniff. A faint chocolate aroma means it’s on track; if it smells like burnt sugar, you’ve over‑cooked it. Your nose is a reliable guide to the right flavor profile.
The 5‑Minute Rest That Changes Everything
After pouring the ganache into the molds, let it rest for exactly five minutes before adding the chocolate shavings. This short pause allows the mixture to thicken slightly, preventing the shavings from sinking into the ganache and keeping the swirl visible.
The Perfect Cherry Placement
When adding the cherry filling, gently press the cherries into the ganache so they sit flat. This ensures that each bite has a consistent burst of fruitiness and that the cherries don’t float to the surface, which can be unappetizing.
The Secret to a Silky Finish
After chilling, give each cup a quick brush of melted chocolate before serving. This adds a glossy sheen and a hint of extra chocolate flavor. It also makes the cups look like a professional dessert from a high‑end bakery.
Creative Twists and Variations
This recipe is a playground. Here are some of my favorite ways to switch things up:
Minty Chocolate Surprise
Add a splash of peppermint extract to the ganache for a refreshing twist. The mint will pair beautifully with the chocolate, creating a cool, indulgent flavor that’s perfect for summer.
Almond Crunch Edition
Replace the semisweet chocolate shavings with toasted almond slivers. The nutty crunch will add a new dimension to the texture, and the almonds complement the cherry’s sweetness.
Espresso Infusion
Stir in a teaspoon of instant espresso powder into the ganache. The coffee undertone enhances the chocolate flavor and adds a subtle bitterness that balances the cherry’s tartness.
Coconut Cream Variation
Use coconut cream instead of heavy cream for a tropical twist. The coconut adds a subtle sweetness and a creamy texture that pairs well with the cherries.
Berry Burst
Swap the cherry pie filling for a mix of fresh berries like strawberries and blueberries. The bright, fruity flavors will give the cups a vibrant, summery feel.
Dark Chocolate & Raspberry
Use a dark chocolate cake and add a raspberry jam layer. The deep chocolate and tart raspberry create a sophisticated flavor profile that’s perfect for a dinner party.
Storing and Bringing It Back to Life
Fridge Storage
Store the cups in an airtight container in the refrigerator for up to 48 hours. Keep them covered with plastic wrap to prevent them from absorbing any fridge odors. Before serving, let them sit at room temperature for 10 minutes to soften slightly.
Freezer Friendly
The cups can be frozen for up to one month. Wrap each cup individually in parchment paper and then place them in a freezer bag. To thaw, let them sit in the fridge overnight and then bring them to room temperature for 15 minutes.
Best Reheating Method
If your cups have hardened in the fridge, gently reheat them in a microwave on low power for 10‑15 seconds. Add a tiny splash of water before reheating to create steam, which will bring the ganache back to its silky, creamy state.