Picture this: I’m standing in a dim kitchen, a single candle flickering, and a box of Devil’s Food Cake Mix on the counter. I’ve been chasing the perfect Halloween treat for months, but every batch either turns out too dry or too sweet, leaving my guests unimpressed. Then one night, a dare from my best friend—“Make the most terrifying, delicious cookie you can”—ignited a culinary rebellion. I grabbed the mix, eggs, and a bottle of black food coloring, and decided to turn my kitchen into a cauldron of flavor. The moment the dough hit the bowl, the air filled with a deep, chocolatey aroma that felt like midnight in a forest. That instant, I knew I was on the verge of something extraordinary.
With the batter swirling, I added a splash of canola oil to keep the cookies moist, then folded in a generous handful of powdered sugar for that signature sweet‑bitter balance. A single teaspoon of black food coloring turned the mixture into a dark, almost mystical shade that would set the mood for Halloween. I poured the dough onto a baking sheet, forming small, round disks that would later become the perfect base for spooky decorations. The kitchen smelled like a spellbook, but the real magic was in the texture—soft centers with slightly crisp edges that crackled when you bite into them. I dared you to taste this and not go back for seconds, because once you experience that rich chocolate bite, you’ll never settle for ordinary. I’ll be honest—by the time I finished the last cookie, I had already eaten half the batch before anyone else got to try it.
Most recipes get this completely wrong by overbaking or undermixing, resulting in cookies that are either rubbery or crumbly. What sets this version apart is the balance of ingredients: the Devil’s Food mix gives depth, the butter adds silkiness, and the powdered sugar creates a subtle crunch when it caramelizes. The addition of a few drops of green food coloring gives an eerie glow that’s impossible to achieve with standard chocolate cookies. When the cookies come out of the oven, they’re still warm, and the aroma is so inviting that even the most skeptical guests will line up for a bite. I’m not exaggerating when I say this is hands down the best version you’ll ever make at home. Picture yourself pulling this out of the oven, the whole kitchen smelling incredible, and guests gasping as they see the black‑green swirl on each cookie.
Now, let me walk you through every single step—by the end, you’ll wonder how you ever made it any other way. I’ll share the exact measurements, timing, and the little tricks that make these cookies stand out. From the way the dough is mixed to the final decoration with candy eyeballs and pretzel sticks, every detail is essential. I’ll also give you a few shortcuts that will save you time without sacrificing flavor. Ready for the game‑changer? I promise you’ll feel like a wizard in your own kitchen. And trust me, the results will make your Halloween bash unforgettable.
What Makes This Version Stand Out
- Flavor: The Devil’s Food mix provides a deep, bittersweet chocolate base that is far richer than standard chocolate cookie dough. When combined with a splash of black food coloring, the flavor becomes almost mystical, delivering a punch that lingers on the palate. This isn’t just a cookie; it’s an edible potion that satisfies both sweet and savory cravings.
- Texture: The buttery dough melts in your mouth while the edges crisp into a satisfying crunch. The powdered sugar coating caramelizes just enough to give a subtle caramel note, while the green swirl adds a playful visual contrast. The result is a cookie that feels luxurious yet approachable.
- Simplification: With only one boxed mix and a handful of pantry staples, you can produce a show‑stopping treat in under an hour. The recipe eliminates the need for multiple batters or elaborate glazes, making it perfect for last‑minute Halloween parties. No fancy equipment, just a mixing bowl and a sprinkle of courage.
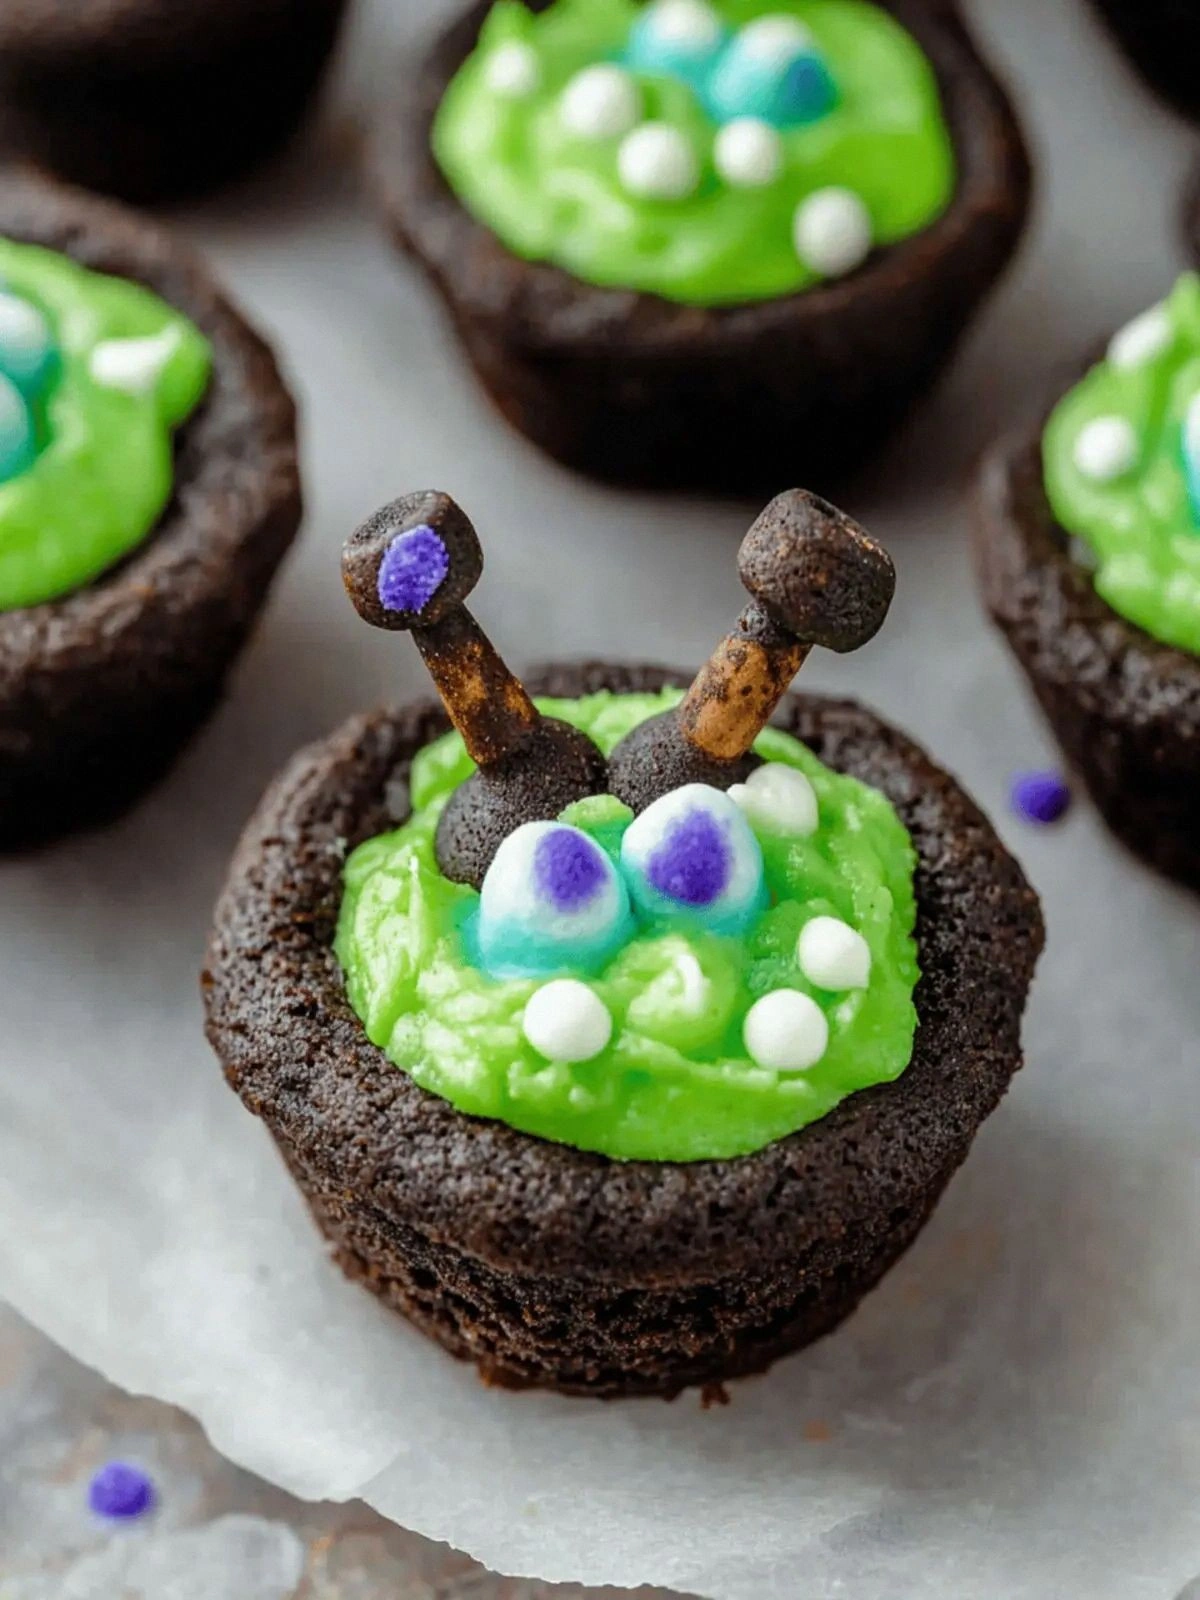
- Unicity: The eerie black‑green hue and candy eyeballs give each cookie a distinct Halloween vibe that other chocolate cookies can’t match. The pretzel sticks act as stems, creating a 3‑D effect that looks like a living creature rising from the cauldron. It’s a visual and gustatory experience that will leave guests spellbound.
- Audience Reaction: Guests line up for a bite, and many come back for seconds. The cookies are a conversation starter, and the spooky decorations make them perfect for photo ops. The recipe’s simplicity also means you can produce dozens without breaking the bank.
- Ingredient Quality: Using a high‑quality cake mix ensures consistent flavor, while the butter and oil keep the dough tender. The powdered sugar is finely ground, preventing graininess, and the food coloring is food‑grade, ensuring no off‑taste. Each component is chosen to elevate the final product.
- Make‑Ahead Friendly: The cookies can be baked in advance and stored in an airtight container for up to a week. They also freeze well, allowing you to have fresh, spooky treats ready for a last‑minute gathering. The recipe’s versatility makes it a staple for any baker’s pantry.
Inside the Ingredient List
The Flavor Base
The Devil’s Food Cake Mix is the heart of this recipe, delivering a deep, bittersweet chocolate flavor that stands up to the intense black food coloring. The single teaspoon of black food coloring not only darkens the dough but also amplifies the chocolate aroma, creating a mysterious, almost gothic look. Vanilla extract rounds off the flavor profile, adding a subtle warmth that balances the bitterness. If you skip the vanilla, the cookies will taste flat and lack depth, so keep it in.
The Texture Crew
Unsalted butter melts into the dough, giving it a silky mouthfeel that contrasts with the crunchy edges. Canola or vegetable oil keeps the cookies moist and prevents them from drying out during baking. Powdered sugar coats the surface, creating a fine glaze that caramelizes slightly as the cookies bake. Eggs bind everything together, ensuring the cookies hold their shape and develop a pleasant chew. Without the eggs, the dough would crumble and the cookies would be flaky.
The Unexpected Star
Green food coloring adds an eerie glow that makes the cookies look like they’re alive. The candy eyeballs provide a fun, spooky twist, while the sprinkles add a playful crunch and a burst of color. Pretzel sticks act as stems, giving each cookie a three‑dimensional appearance that screams Halloween. These elements transform a simple chocolate cookie into a theatrical centerpiece. If you omit the green dye, the cookies will look ordinary; if you leave out the pretzel sticks, they’ll lose their dramatic flair.
The Final Flourish
Milk is added in small amounts to adjust the dough’s consistency, making it easier to scoop and shape. A pinch of salt enhances all the flavors, cutting the sweetness just enough to let the chocolate shine. The final mixture is then scooped onto parchment paper, allowing the cookies to bake evenly. The careful balance of liquids and solids ensures each cookie is moist inside while crisp on the edges. Skipping the milk will make the dough too dry, resulting in brittle cookies.
Everything’s prepped? Good. Let’s get into the real action...
The Method — Step by Step
- Preheat your oven to 350°F (175°C). Line a baking sheet with parchment paper to prevent sticking. The sheet should be large enough to accommodate all the dough balls with space between them. This step ensures even baking and a crisp edge. Remember, a clean sheet means a clean bake.
- In a large bowl, whisk together the Devil’s Food mix, black food coloring, vanilla extract, and salt until the mixture is smooth and free of lumps. The dark color should be uniform; any streaks will show on the finished cookies. This is the foundation of the flavor and appearance. If you see clumps, whisk again.
- Add the melted butter and canola oil to the dry mixture, then fold in the eggs one at a time, beating well after each addition. This technique keeps the dough from becoming too stiff. Kitchen Hack: Use a stand mixer on low speed to avoid overmixing; this keeps the cookies tender.
- Gradually fold in the powdered sugar until the dough is thick but pliable. If the dough feels too dry, add a tablespoon of milk. The dough should be easy to scoop but not too sticky. Overmixing here will result in dense cookies. If it’s too wet, the cookies will spread too much.
- Scoop tablespoon‑sized balls onto the prepared sheet, spacing them 2 inches apart to allow for expansion. Use a cookie scoop or a tablespoon to maintain uniform size. The uniformity ensures even baking and a consistent bite. Let the dough rest for a minute to settle.
- Bake for 12–15 minutes until the edges are set but the centers remain soft. Watch Out: Do not overbake, or the cookies will become brittle and lose their chewy center. The cookies should still have a slight wobble in the middle when you lift them. This is the moment of truth.
- While still hot, drizzle green food coloring over the tops to create a spooky swirl. Kitchen Hack: Use a small paintbrush to apply the drops precisely for a professional look. The green will spread slightly, giving a dramatic effect. Allow it to set for a few seconds before moving them.
- Let the cookies cool on the sheet for 5 minutes before transferring to a wire rack. The brief cooling period lets the edges set fully while the centers firm up. This step prevents the cookies from breaking when moved.
- Once cooled, decorate each cookie with a candy eyeball, sprinkles, and a pretzel stick for the stem. The pretzel stick adds crunch and a fun 3‑D effect. Arrange the decorations carefully to avoid smudging the green glaze. This final touch turns each cookie into a mini creature.
- Serve immediately or store in an airtight container; the cookies stay fresh for up to a week. If you need to keep them longer, freeze them on a parchment sheet and then transfer to a freezer bag. Thaw at room temperature before serving. This method preserves the texture and flavor.
That's it — you did it. But hold on, I've got a few more tricks that'll take this to another level...
Insider Tricks for Flawless Results
The Temperature Rule Nobody Follows
Many bakers bake at a high temperature and then lower it, but this recipe thrives at a steady 350°F. Maintaining a consistent temperature ensures even baking and prevents the edges from overcooking while the center stays soft. If you notice the cookies browning too quickly, reduce the oven rack to the middle level. This subtle adjustment can make the difference between a perfect cookie and a burnt one.
Why Your Nose Knows Best
As the cookies bake, the aroma changes from sweet to caramelized chocolate. Trust your nose; when you smell a slight toasty hint, it means the cookies are ready to come out. This sensory checkpoint is more reliable than a timer because it accounts for variations in oven performance. If you’re unsure, give them an extra minute and check the edges.
The 5-Minute Rest That Changes Everything
After removing the cookies from the oven, let them rest on the sheet for five minutes before transferring to a rack. This brief pause allows the heat to distribute evenly, preventing the cookies from breaking apart. It also lets the green glaze set slightly, making it easier to add decorations without smudging.
The Secret to a Perfect Swirl
When applying the green food coloring, use a small paintbrush and a steady hand. The color will spread as it dries, so apply a thin line first and then let it spread naturally. If you want a more dramatic swirl, apply a second coat after the first one has set. This technique gives a professional, spooky look.
The Quick Frosting Fix
Some friends love a drizzle of chocolate ganache over the cookies for extra richness. To make it quick, melt chocolate chips with a splash of milk and pour over the cooled cookies. The ganache will set quickly, adding a glossy finish that looks like a witch’s potion.
Creative Twists and Variations
Dark Chocolate Ganache Dip
Dip the cooled cookies in a rich dark chocolate ganache for an extra layer of decadence. The ganache adds a glossy sheen and a deeper chocolate flavor that complements the black coloring. This variation is perfect for guests who love a more indulgent treat.
Nutty Crunch Variation
Fold chopped walnuts or pecans into the dough before baking. The nuts add a delightful crunch and a nutty undertone that balances the sweetness. This version is great for those who enjoy a textural contrast.
Vegan Version
Replace the butter with a plant‑based butter or coconut oil, and use a vegan egg substitute like flaxseed eggs. Swap the powdered sugar for a vegan brand to keep it dairy‑free. This makes the cookies suitable for plant‑based diets while maintaining the spooky look.
Sweet & Salty Pretzel Twist
Instead of pretzel sticks, use salted pretzel crumbs or crushed pretzels as a topping. The salty crunch pairs wonderfully with the sweet dough, creating a flavor profile that’s both surprising and satisfying. This twist works well for a party where guests crave a mix of sweet and savory.
Seasonal Spice Variation
Stir in a teaspoon of cinnamon or nutmeg into the dry mix for a warm, autumnal note. The spices add depth and make the cookies feel even more seasonal. This variation is ideal for a cozy Halloween gathering.
Storing and Bringing It Back to Life
Fridge Storage
Place the cookies in a single layer in an airtight container. Store them in the refrigerator for up to 5 days. The cold environment preserves the texture and prevents the glaze from melting. When ready to serve, let them sit at room temperature for 10 minutes.
Freezer Friendly
Freeze the cookies on a parchment sheet for a few hours until solid, then transfer to a freezer bag. They can be stored for up to 3 months. Thaw at room temperature for 20 minutes before serving. This method keeps the cookies crisp and fresh.
Best Reheating Method
Reheat the cookies in a preheated oven at 300°F (150°C) for 5 minutes. Add a splash of water to the container before reheating to create steam, which helps restore moisture. Let them cool on a rack to maintain crisp edges.